Install BobCAD-CAM v23 on Windows 10 and Windows 11
This post solves the various installation problems installing BobCAD v23 on Windows 10 and Windows 11…
How to install BobCAD v23
NOTE: To ensure success, follow the instructions precisely as documented including using the same folder names and paths.
Obtain your purchased copy of the Longbow Reviver App here (you will need V4.29 or newer)
Copy the contents of your BobCAD CD to your hard drive, to a folder named c:\InstallDisks\bobcadv23
Start the Reviver App
Using the “Old Installer Reviver” tab, pick the ‘…’ button to select the c:\InstallDisks\bobcadv23 folder
Now click the ‘Fix and Run Old Installer‘ button.
The Reviver App may prompt that it cannot find setup.exe, simply select executable that launches the installation setup
Once you indicate the setup executable, the Reviver App will fix the setup media and then launch setup. Be patient as the process can take up to 45 minutes to launch the setup sequence.
Once the setup appears, stop and read the next step…
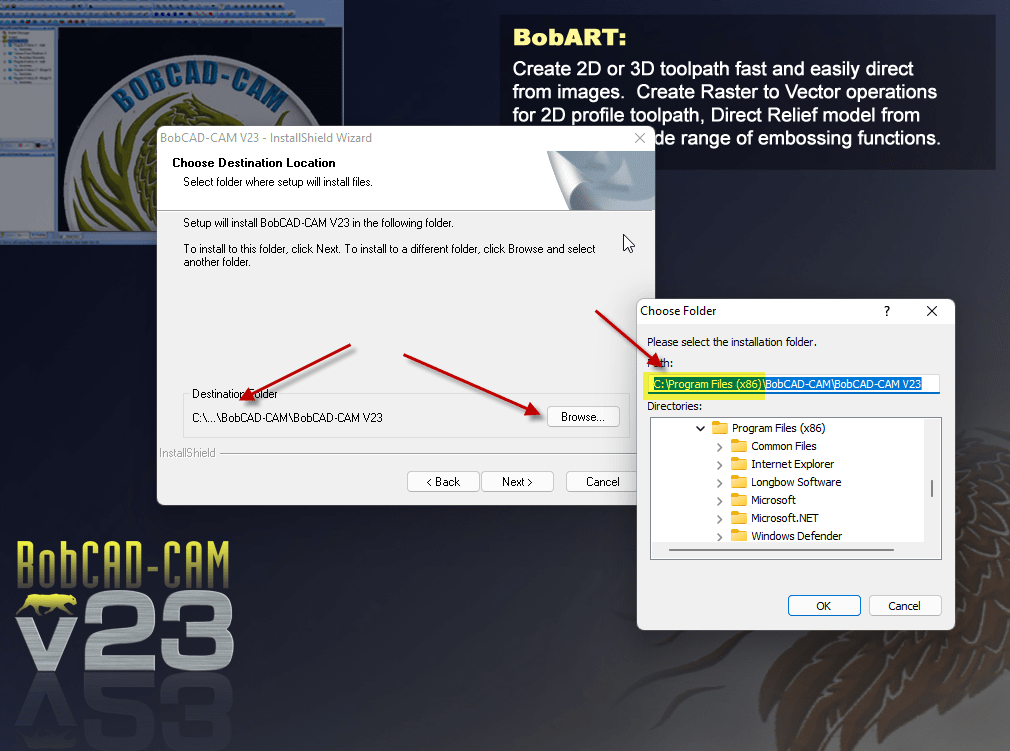
You may install as normal, but when you are asked to select the “Setup Type”, pick “Custom“, this is so you can specify a custom installation folder path…
For every installation location that refers to c:\Program Files or c:\Program Files(x86), remove that folder from the full path, you **must** change the default path to not include c:\Program Files or c:\Program Files(x86) (see image below) – the path should be changed to C:\BobCAD-CAM\BobCAD-CAM V23
Remove “Program FIles (x86)” so that BobCAD is installed to C:\BobCAD-CAM\BobCAD-CAM V23
Now complete the setup process
Repeat the process of removing “Program FIles (x86)” from each of the child setups
do not reboot if prompted to do so
When asked to install Microsoft .NET Framework 1.1, say Yes
Make sure you fully close setup once complete
Now back in the Reviver App…
pick the “Old Program Reviver” tab
Using the ‘…’ button pick the C:\BobCAD-CAM\BobCAD-CAM V23 path
Set the “Run As” to “None”
Now click ‘Fix Old Program‘
When it asks if you want to re-register, say Yes
Once the Reviver App displays “Success!” you will now be able to run your program simply double click the “BobCAD-CAM V23” shortcut
I just joined the Longbow Software team as a Software Engineer, and I have gladly offered to post some informative blogs for you all to read. Check on the left there, for all my blog entries...
Follow these instructions to solve issues around installing/running your legacy AutoCAD R13 on Windows 11 Ransomware Protection Windows 11 and AutoCAD…