Getting your legacy AutoCAD running on new versions of Windows is a 3 step process…
- Step 1 – First you convert the AutoCAD setup files using the Converter App
- Step 2 – Next you install AutoCAD as normal, using the Converter App to launch
- Step 3 – Once AutoCAD is installed, you need to convert the installed program files using the Converter App
Once all of the steps above are completed, you can run AutoCAD as normal. You may uninstall the Converter App if you want (it’s not needed to run AutoCAD at this point) but we recommend you keep it installed incase any problems creep in after a Windows Update.
Installing the Longbow Converter App
If you don’t yet have a copy of the Longbow Converter App you can purchase it here or click on the download link we sent you via email, this will download the Converter App to your PC.
Before installing the Converter App, make sure the files downloaded from our site are not blocked by Windows SmartScreen… Windows 11 is finicky; click the TLC zip first to make sure it’s fully selected then Right+click the file and select Properties. Be sure to check the Unblock checkbox as shown below and click OK… (Note: if the unblock checkbox is not there you are good to skip this step)

Now, double-click the zip file to open it and install the TLC application as normal. By the way, TLC stands for The Longbow Converter.
Once installed, you will see a shortcut to the Longbow Converter tool appear on your desktop, double click to run. If not, press the CTRL + ESC to bring up the Windows App menu then type “Converter” to get access to the shortcut and run the program.
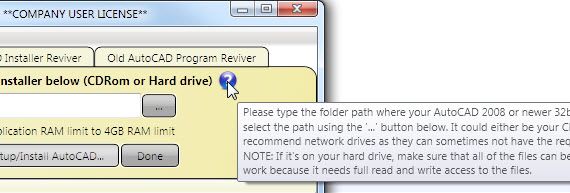
The Converter is split into three separate tools, it’s important that you understand what each tool does before starting. NOTE: Hovering your mouse over any of the user input controls will display a tool tip giving additional contextual help.
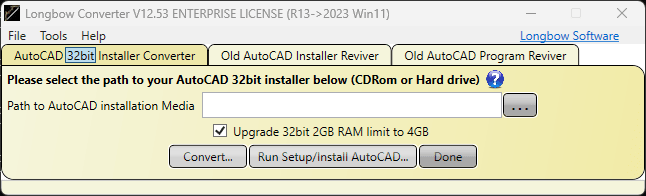
AutoCAD 32bit Installer Converter Tool
This tool is for use with AutoCAD versions 2008 and up and is part of Step 1 as described above. It converts AutoCAD 32bit setup media so that it can be installed on 64bit Windows.
In addition, by clicking on the “32bit” button the tool can also be used to convert 64bit AutoCAD setup media…

VBA users – you can install your Autodesk 32bit VBA modules using this tool, see “How to install 32bit VBA on your 64bit Windows” below.
TIP: Clicking on the help icon gives tips on what the Converter App is expecting next…
Old AutoCAD Installer Reviver Tool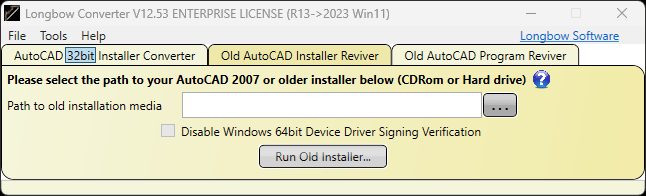
This tool is for use with AutoCAD versions 2007 and below and is part of Step 1 as described above. It converts older AutoCAD setup media (including 16bit) so that it can be installed on 64bit Windows.
Old AutoCAD Program Reviver Tool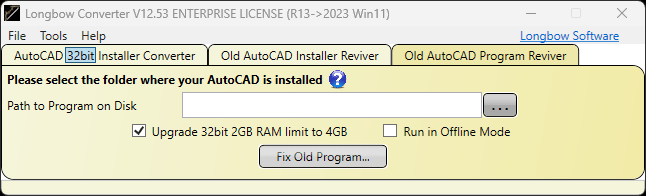
This tool is used once AutoCAD has been installed by either of the above installer tools and is part of Step 3 as described above. It includes additional options
Upgrade 32bit 2GB RAM limit to 4GB
This option is only available on when converting 32bit AutoCAD to run on 64bit Windows. This option can be used to double the available memory available to AutoCAD thus drastically improving performance with large data sets.
NOTE: Some older versions of AutoCAD may crash on startup when using this feature, in this case simply disable the setting.
Run in Offline Mode
This option disables all internet access to and from AutoCAD, more details on usage can be found here.
Get going…
We recommend you refer to our Longbow Software Blog for specific instructions for your AutoCAD version, use the search box to find specific instructions for your version of AutoCAD…

Creating a 32bit Network Deployment for 64bit Windows
NOTE: You will need the the Enterprise version of the Converter to create network deployments
The Create Deployment feature allows you to create a pre-configured installation so that you can deploy the pre-configured install to multiple machines without the need for user interaction – it basically saves a lot of time if you have many machines to install to. It’s available to AutoCAD versions 2008 or newer.
Before you can create deployment using your 32bit installer on 64bit Windows, you need to…
- first convert the raw installation media using the AutoCAD 32bit Installer Converter Tool
- next run setup and create the deployment in the normal way
- finally, convert the newly created deployment again using the AutoCAD 32bit Installer Converter Tool; simply enter the path to your Deployment inside of the Converter and click “Convert“. You can now run the Deployment.
NOTE: You cannot convert a previously created deployment (one that was not created using the Converter App) you must create a brand new deployment using the below instructions.
NOTE: We advise that if you are creating your custom network deployment on a different machine to the one your are running the Converter, that you also install the Converter on that different to run the final step (3). This is because the Converter relies on administrative permissions for the machine that it is running on and if the files reside on a different machine, the permissions are almost always not Administrative and thus the Converter will fail the conversion process with ‘file permission’ errors.
Troubleshooting
Please contact our Support department.
How to install 32bit VBA on your 64bit Windows
If you require VBA support for your 32bit AutoCAD then follow these steps to get VBA installed…
AutoCAD VBA enabler modules available for download…
AutoCAD 2010 VBA 32bit 64bit | AutoCAD 2011 VBA 32bit 64bit | AutoCAD 2012 VBA 32bit 64bit | AutoCAD 2013 VBA 32bit 64bit | AutoCAD 2014 VBA 32bit 64bit | AutoCAD 2015 VBA 32bit 64bit | AutoCAD 2016 VBA 32bit 64bit | AutoCAD 2017 VBA 32bit 64bit | and newer
- Download your required 32bit VBA enabler from one of the required versions above ^
- Run the downloaded exe, this will unzip the VBA installer to your C:\Autodesk\AutoCAD_2011_VBA_Enabler_Install_Image folder.
- Start the Longbow Converter and set the ‘Path to AutoCAD Installation Media’ (detailed as 4 above) to the C:\Autodesk\AutoCAD_2011_VBA_Enabler_Install_Image folder
- Click ‘Convert’
- Quit the Converter and navigate to the C:\Autodesk\AutoCAD_2011_VBA_Enabler_Install_Image folder by hand using Windows Explorer.
- Run the setup.exe, your VBA will now install.
Copyright 2023 (c) Longbow Software