Uninstalling all Autodesk Products from your Computer

Here’s a good one for you. We added a new tool in our Longbow Converter App which allows you to uninstall all Autodesk products from your computer in one go…

  1. Obtain your copy of the Longbow Converter here
  2. Start the Converter tool
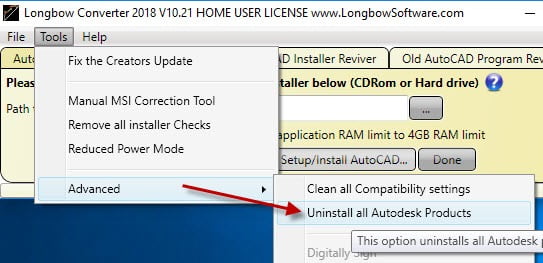
  3. Click the Tools->Advanced->Uninstall all Autodesk Products menu…

    Uninstall All Autodesk Products

    Uninstall All Autodesk Products

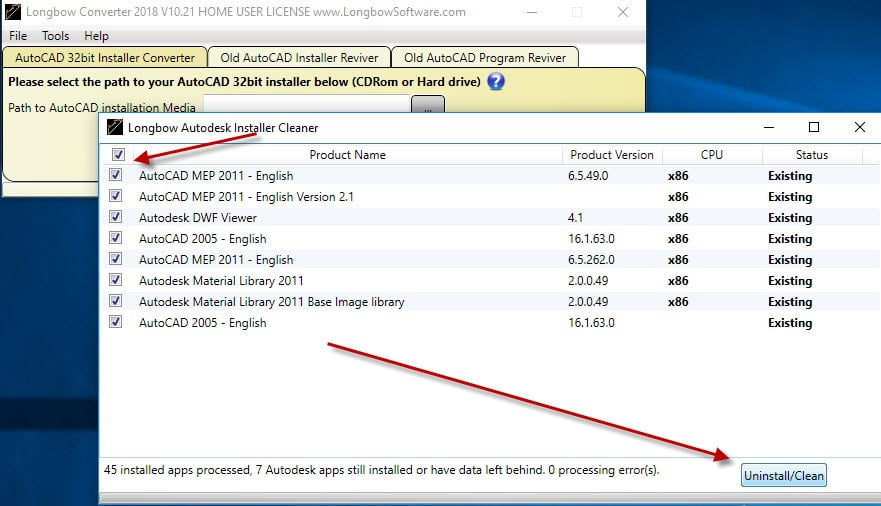
  4. The Converter will now list all of the Autodesk products installed on your computer, you can press F5 to refresh. Select which ones you want to be uninstalled, then click Uninstall/Clean

    Uninstall and Clean

    Uninstall and Clean

  5. Note that you will have to interact with the setups, but the software does a really good job of cleaning everything off.

Copyright 2017 (c) Longbow Software

Installing Inventor R11 (2007) on Windows 7, Windows 8 and Windows 8.1

***** NOTE: This solution is currently broken, we are actively trying to resolve it – more soon *****

Installing Inventor 2007 on Windows 7, Windows 8 or Windows 8.1 32bit or 64bit can be very easily defined in these short steps…

NOTE: These steps do not bypass normal Autodesk licensing/authorization, you should expect to use your own serial numbers in the normal way.

  1. Obtain your copy of the Longbow Converter here – you will need V8.11 or newer
  2. Copy your entire Inventor R11/Inventor 2007 CD to your hard drive, to a folder path c:\Autodesk\inventor2007 
  3. Start the Longbow Converter tool, select the 2nd tab, pick the c:\Autodesk\inventor2007 folder, and click “Run Old Installer”. Read and understand all the prompts before pressing OK. Once the setup starts, stop and read the next step…
  4. In the setup program, navigate through each setup dialog as normal, with these exceptions…
    1. When you click the Install Autodesk Inventor 11 link from your setup you may see a dialog box appear saying – “This program has compatibility issues” – if this happens, simply check the “Don’t show this message again” and then click the “Run the program without getting help”.
    2. I recommend that you do not install Vault or Autodesk Data Management Server – disable these options in the setup
    3. When you arrive at the installation folder path setup dialog, **it’s vitally important to make sure you install to c:\inventor2007\ (not Program Files (x86)\Autodesk\)**
    4. If there are any errors installing .NET Framework Runtime 1.1 sp1 – simply ignore and continue.
    5. You may see an error “error 26001. Cannot connect to Internet Information Server. (-2147221164) ” – I’m not sure what causes this problem, most likely Autodesk has shutdown the service, but you should simply click “Ignore” if you see this message.
    6. You may see an additional error popup “Error 29001. Vault management error: The request failed with HTTP status 404: Not Found.” – simply ignore by clicking “OK”
  5. Once installed, make sure you fully close the Autodesk Inventor 11 setup program (because the Converter is waiting for the setup program to fully close) then go back to the Converter tool, select the 3rd tab, pick the newly installed c:\inventor2007 folder and click “Fix Old Program”.
  6. Next, before running your Inventor 2007, install all the sp’s in chronological order (NOTE if you cannot install the sp’s, see the Troubleshooting section below)
    1. Autodesk Inventor 11 Service Pack 1
    2. Autodesk Inventor 11 Service Pack 2
    3. Autodesk Inventor 11 Service Pack 3
    4. Autodesk Inventor 11 Service Pack 4
  7. Now you can run your Autodesk Inventor 11 on Windows 7, Windows 8 and Windows 8.1, both 32bit and 64bit.
    1. NOTE: When starting Inventor 11, if you see a warning dialog when you run saying “This program has known compatibility issues”, simply click “Don’t show this message again” and then click “Run the Program…”

Troubleshooting:

– If you cannot install your Inventor 11 Service Packs because of an error “The upgrade patch cannot be installed by the Windows Installer service because the program to be upgraded may be missing, or the upgrade patch may be a different version of the program. Verify that the program to be upgraded exists on your computer and that you have the correct upgrade patch” – rather than try and solve this issue, the easiest solution is:

  1. To go back to your old Windows XP machine and make sure that all of the sp’s are installed on your old Windows XP machine’s installation of inventor 11
  2. Next, simply copy all of the Inventor 11 program files and folders from your old Windows XP machine to a USB drive – copy the “contents” of C:\Program Files\Autodesk\Inventor
  3. Now transfer the USB to your new machine and copy the files that were on your old Windows XP machine’s C:\Program Files\Autodesk\Inventor folder into your newly installed c:\inventor2007 folder – you should see a question if you should overwrite all files, say YES

– If you are unable to activate your product, or the activation process crashes:

– If you have crashing problems using the File->Open or File->Save dialogs inside of Inventor please read this blog entry on the File->Open or File->Save Crash in AutoCAD

Copyright 2015 (c) Longbow Software

Installing AutoCAD Mechanical Desktop 2007 from an Inventor 11 CD on Windows 7, Windows 8 and Windows 10.

If you have an Autodesk Inventor 11 CD, you may simply need to install AutoCAD MDT 2007 from that CD…

Installing AutoCAD Mechanical 2007 from your Inventor 11 CD on Windows 10, Windows 7, Windows 8 or Windows 8.1 32bit or 64bit can be very easily defined in these short steps…

IMPORTANT NOTE: Autodesk no longer supply License Activation codes for this version of AutoCAD. The best way is to transfer your existing license to the new PC but there are other options, we document them here

  1. Obtain your copy of the Longbow Converter here (you need V7.29 or newer)
  2. Next, copy your Autodesk Inventor 11 CD to your hard drive, to folder path  c:\Autodesk\Inventor2007
  3. Start the Longbow Converter tool
    1. Select the 2nd tab titled “Old AutoCAD Installer Reviver
    2. Using the ‘…’ button, pick the folder where you just copied your Inventor 11 CD to c:\Autodesk\Inventor2007
      1. The Converter should say “Inventor 2007 Setup found, …”
    3. Next, click the ‘Run Old Installer‘ button.
      1. Read and understand all the prompts before pressing OK. Once the setup starts, stop and read the next step…
  4. In the setup program.
    1. navigate through each setup dialog as normal, except when you get to the Products Install dialog – Uncheck *all* products except “Autodesk Mechanical Desktop 2007
    2. Install as normal
    3. If asked to Reboot, do not reboot
  5. Once installed, make sure you fully close the setup application (because the Converter is waiting for the setup program to fully close)
    1. Go back to the Converter tool and select the 3rd tab titled “Old AutoCAD Program Reviver
    2. Using the ‘…’ button, pick the newly installed c:\Program Files (x86)\Autodesk\MDT 2007 folder
    3. Next, click the ‘Fix Old Program‘ button.
  6. Now you can run your Autodesk Mechanical Desktop 2007 on Windows 10, Windows 7 and Windows 8, both 32bit and 64bit.
    1. NOTE: When starting AutoCAD, if you see a warning dialog when you run saying “This program has known compatibility issues”, simply click “Don’t show this message again” and then click “Run the Program…”

Troubleshooting

– If you are unable to activate your product, or the activation process crashes: