Installing WordPerfect 6 on Windows 7, Windows 8 and Windows 10

If you are having problems installing your WordPerfect 6 on your new PC, like you are unable to run the setup.exe as shown below, then read on…

Windows 16bit setup error - This app can't run on your PC

Windows 16bit setup error – This app can’t run on your PC

Unfortunately, WordPerfect 6 is a pure 16bit application which means that it cannot be run on 64bit Windows 7, Windows 8 or Windows 10.

However, it can only run on *32bit* Windows 7, Windows 8 or Windows 10 using the Longbow Reviver app.

Install Word Perfect 6 on Windows

  1. Obtain your copy of the Longbow Reviver tool here – you need version 4.10 or newer
  2. Using Windows Explorer, copy your entire WordPerfect 6 install CD media to your hard drive, to a folder path c:\InstallCDs\WordPerfect6
  3. Start the Longbow Reviver tool
    1. select the 1st tab named “Old Installer Reviver
    2. then using the ‘…’ button pick the  c:\InstallCDs\WordPerfect6\INSTPROG folder
    3. Now click the ‘Fix and Run Old Installer’ button
    4. Read and understand all the prompts that appear, then continue by clicking OK.
    5. Install as normal
    6. Close setup – Do not reboot if prompted to do so
  4. Now WordPerfect 6 is installed
    1. Now go back to the Longbow Reviver app…
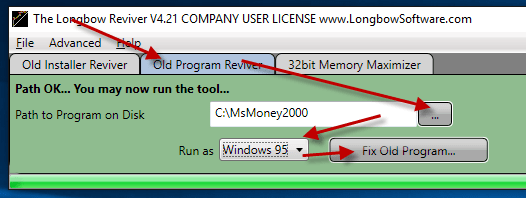
    2. select the 2nd tab “Old Program Reviver
    3. using the ‘…’ button pick the newly installed c:\WPWIN60 folder
    4. Set the Run As dropdown to Windows 95
    5. next, click ‘Fix Old Program’
      1. Say ‘No’ if the Reviver tool asks if you want to re-register…
  5. Now you can happily run your WordPerfect 6 on Windows 10, Windows 7, Windows 8 or Windows 8.1 32bit (sorry, but not  64bit!)

Copyright 2018 (c) Longbow Software

Installing AutoCAD Architecture 2011 32bit on Windows 7, Windows 8 and Windows 10

NOTE: This blog post specifically solves issues related to these error messages on installation of AutoCAD ADT 2011…

  • “This operating system is not supported by AutoCAD® Architecture® 2011”
  • “You cannot install this product on the current operating system”
  • “You are attempting to use a 32-bit installer on a 64-bit operating system”
  • “This is a 32-bit AutoCAD® Architecture® 2011. It cannot be installed on 64-bit Windows”

How to install AutoCAD ADT 2011

  1. Obtain your purchased copy of the Longbow Converter here
  2. Start In the Converter App and note the user interface
  3. Select the 1st tab named “AutoCAD 32bit Installer Converter
    1. Using the “. . .” button, selection your AutoCAD installation CD
    2. Next, click the “Convert button and follow instructions
  4. Once the conversion process is complete
    1. click Install/Run Setup to start setup
    2. Simply install as normal, remembering to…
      1. Close the setup program when the installation is complete.
      2. Now back in the Converter app and make sure it’s completed the final stage of processing using the “Old AutoCAD Program Reviver” tab
  5. Now run your AutoCAD as normal

Installing ADT 2011 Service Packs

We recommend that you download and install the latest Service Packs from Autodesk which can be found here. You must install Update 1, then Update 2

Troubleshooting

– If your AutoCAD crashes while interacting with the Ribbon click here

– If you are unable to activate your product, or the activation process crashes:

– If you have crashing problems using the File->Open or File->Save dialogs inside of AutoCAD please read this blog entry on the File->Open or File->Save Crash in AutoCAD

Copyright 2019 (c) Longbow Software

Installing 64bit AutoCAD Civil 3d 2013 on Windows 10 64bit

Your 64bit AutoCAD Civil3d 2013 was never designed to run in Windows 10 (this version of Windows is newer than AutoCAD 2013). In order for your AutoCAD Civil3d 2013 to run as it did in previous versions of Windows, you need to follow these easy steps…

Install 64bit AutoCAD Civil 3D 2009

  1. Make sure all previous installed versions of AutoCAD 2009 are uninstalled first.
  2. Obtain your copy of the Longbow Converter here
  3. Start the Converter tool
    1. Pick the 1st tab named “AutoCAD 32bit Installer Converter
    2. Using your mouse, right click the tab text “AutoCAD 32bit Installer Converter” so that it changes to “AutoCAD 64bit Installer Converter
    3. Next, using the “…” button, select your AutoCAD installation CD and follow the instructions presented by the Converter tool user interface.
  4. Once the conversion process is complete
    1. click Install/Run Setup to start setup
    2. Simply install as normal, remembering to…
      1. Close the setup program when the installation is complete.
      2. Now back in the Converter app and make sure it’s completed the final stage of processing using the “Old AutoCAD Program Reviver” tab
  5. Next install the AutoCAD Civil 3d 2013 sp2 from here
  6. Now run your AutoCAD as normal

NOTE: These steps do not bypass normal Autodesk licensing/authorization, you should expect to use your own serial numbers in the normal way

Troubleshooting

– If your AutoCAD is running really slowly, try disabling your integrated graphics card so you can run your high-performance card instead

– If you are unable to activate your product, or the activation process crashes:

– If you have crashing problems using the File->Open or File->Save dialogs inside of AutoCAD please read this blog entry on the File->Open or File->Save Crash in AutoCAD

Copyright 2019 (c) Longbow Software

Installing Microsoft Money 2000 on Windows 7, Windows 8 and Windows 10

Installing Microsoft Money 2000 on WIndows 7, Windows 8 and Windows 10 (both 32bit and 64bit) can be very easily defined in these short steps…

  1. First, you need to purchase a copy of the Longbow Reviver tool here (you need V4.21 or later)
  2. Using Windows Explorer, backup your entire Microsoft Money 2000 installation CD to your hard drive, to a folder path c:\InstallCDs\Microsoft Money 2000
  3. Start the Longbow Reviver tool
    1. select the 1st tab “Old Installer Reviver
    2. then using the ‘…’ button pick the  c:\InstallCDs\Microsoft Money 2000 folder

      Selecting the Microsoft Money 2000 CD on Disk

      Selecting the Microsoft Money 2000 CD on Disk

    3. Now click the ‘Fix and Run Old Installer’ button
    4. Read and understand all the prompts that appear, then continue by clicking OK.
    5. Once the Microsoft Money 2000 setup appears, install as normal *except* when prompted for the installation path, set it to c:\MsMoney2000 e.g.

      Setting the Microsoft Monet 2000 installation folder

      Setting the Microsoft Monet 2000 installation folder

    6. Once the setup is complete
      1. Do not reboot (if prompted to do so)
  4. Now Microsoft Money 2000 is installed, next
    1. Make sure the Microsoft Money 2000 setup is completely closed, then in the Longbow Reviver tool…
    2. Select the 2nd tab “Old Program Reviver
    3. Using the ‘…’ button, pick the newly installed C:\MsMoney2000 folder
    4. Set the Run As dropdown to Windows 95 Windows NT 4 (sp5)
    5. next, click ‘Fix Old Program’
      1. Say ‘No’ if the Reviver tool asks if you want to re-register… e.g.

        Fixing the Microsoft Money program files

        Fixing the Microsoft Money program files

  5. Now you can happily run your Microsoft Money 2000 on Windows 7, Windows 8 or Windows 10!

Copyright 2018 (c) Longbow Software