
Follow these instructions to install and run your existing 32-bit AutoCAD Mechanical Desktop 2009 (MDT 2009) on 64-bit Windows 11. You may see one of these messages when you start the original installer.
- “This operating system is not supported by AutoCAD Mechanical® 2009”
- “You cannot install this product on the current operating system”
- “You are attempting to use a 32-bit installer on a 64-bit operating system”
- “This is a 32-bit AutoCAD Mechanical® 2009. It cannot be installed on 64-bit Windows”
The Longbow Converter resolves these setup compatibility errors. It converts your 32-bit installation media, launches setup, and prepares the installed program so MDT 2009 can run directly on Windows 11 without a virtual machine.
Ransomware Protection on Windows 11
Windows 11 has ransomware protection that includes Controlled folder access. If Windows Security reports that it blocked the trusted installer or MDT 2009 from writing to a protected folder, check the notification and allow that specific app before trying again.
How to install AutoCAD Mechanical Desktop 2009
- If you need the Converter, get the Longbow Converter for MDT 2009. If you already purchased it, use the download link in your Longbow order email.

- If Windows marks the Converter ZIP from Longbow Software as blocked, right-click the file and select Properties. If the Unblock option appears, select it and click OK.
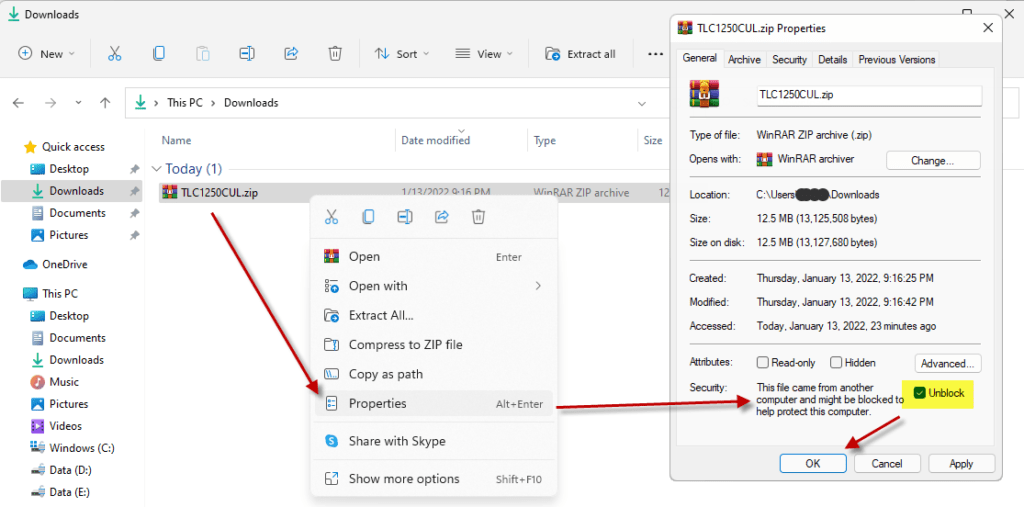
- Extract the ZIP and run the Longbow Converter installer.
- Have your original 32-bit MDT 2009 media ready. Insert the disc and close any setup window that starts. If you have a self-extracting Autodesk download, unpack it to a folder such as
C:\Autodesk\MDT2009. Note the actual folder and close setup if it starts. - Start the Longbow Converter.
- Select the 1st tab named “AutoCAD 32bit Installer Converter“
- Using the “. . .” button, select your MDT 2009 disc or the extracted setup folder
- Next, click the “Convert“ button and follow instructions
- Once the conversion process is complete
- click Install/Run Setup to start setup
- Complete the MDT 2009 installation, then follow these steps
- Fully close the setup program when the installation is complete.
- Back in the Converter app and make sure it has completed the final stage of processing using the “Old AutoCAD Program Reviver” tab – it should be green stating “SUCCESS!!“
- Start Mechanical Desktop 2009 from its Windows shortcut.
Installing AutoCAD MDT 2009 Service Pack 3
- Download Mechanical Desktop 2009 Service Pack 3 (32-bit). Close MDT 2009 and run
mdt2009_swl_sp3_x86.exe. See the Autodesk SP3 readme for the installation instructions.
Troubleshooting
- If you have crashing problems using the File->Open or File->Save dialogs inside of AutoCAD please read this blog entry on the File->Open or File->Save Crash in AutoCAD
Copyright 2026 (c) Longbow Software