Follow these instructions to solve issues around installing/running your legacy AutoCAD LDT 2002 on Windows 11. It requires the purchase of our Longbow Converter App which provides the framework to allow your old AutoCAD to install and run natively on Windows 11.
NOTE: We currently only support US unlocked versions of 2002 on 64bit OS. European or locked US support 2002 is limited only to 32bit Windows 11.
Ransomware Protection Windows 11 and AutoCAD
Just before we start note that Windows 11 comes with a Ransomware Protection which includes Controlled Folder Access. Controlled folder access blocks applications from writing to your Documents, Pictures, Videos, Music, Public and Favorites folders. AutoCAD versions all the way to AutoCAD 2021 write to certain user Public folders and are therefore blocked by this feature. This can cause issues with all sorts of things including activating your AutoCAD license and even running AutoCAD. Ransomware Protection is an important feature of Windows 11 but it will affect your AutoCAD unless you allow AutoCAD and its dependent applications access to the controlled folders.
How to install Autodesk LDT 2002

- If you don’t yet have a copy of the Longbow Converter App you can purchase it here or click on the download link we sent you via email in order to download the Converter App to your PC.
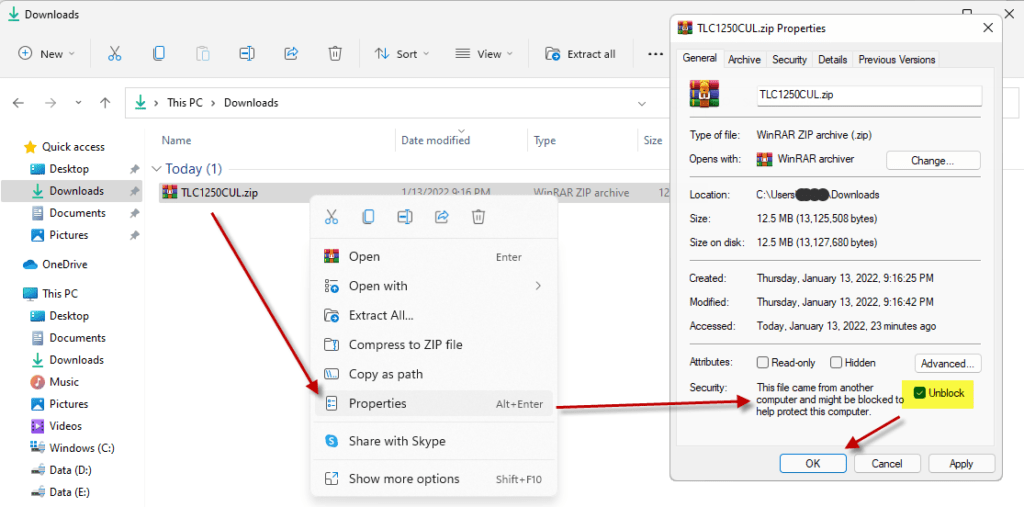
- Before installing the Converter App, make sure the files downloaded from our site are not blocked by Windows SmartScreen… Windows 11 is finicky, click the TLC zip first to make sure it’s fully selected then Right+click the file and select Properties. Be sure to check the Unblock checkbox as shown below and Click OK…

- Double click the zip file to open it and install the TLC application as normal. By the way, TLC stands for The Longbow Converter
 Start the Longbow Converter tool
- Select the 2nd tab named “Old AutoCAD Installer Reviver”
- Using the “. . .” button, pick your LDT 2002 CD ROM
- Now click the “Run Old Installer” button
- Next, just follow the Converter’s instructions.
- Once the AutoCAD setup starts, stop and read the next step
- In the setup program, navigate through each setup dialog as normal, except when you get to the installation folder **it’s vitally important to make sure you install to c:\ldt2002 (not Program Files (x86)\Autodesk Land Desktop 3 as usually prompted by default)**
- Now carry on with the install as usual
- Do not reboot if asked to do so
- Once installed…
- Be sure to completely close the setup application
- Now go back to the Converter app and make sure it’s completed the final stage of processing using the “Old AutoCAD Program Reviver” tab, it should say “SUCCESS!!”
- Finally, reboot your PC and run your AutoCAD as normal
- Now you can happily run your LDT 2002!
Installing LDT 3 Service Packs
You must first install sp1, followed by sp2…
LDT 3 sp1 – software lock/unlocked with html documentation
LDT 3 sp2 – software lock/unlocked with html documentation
- Unzip the sp1 into a folder called c:\Autodesk\LDT3 sp1
- Next, start the Converter, select the 3rd tab “Old AutoCAD Program Reviver” select the c:\Autodesk\LDT3 sp1 folder, then click Fix.
- If asked if this is a service pack by the Converter tool, say yes.
- Now run the sp1 as you need from Windows Explorer.
- Repeat for sp2
Installing Civil Design 3
Using the Longbow Converter solution, you can also install the Civil Design add-on to LDT 3.
- Using Windows Explorer, copy your entire Civil Design 3 CD to your hard drive, to a folder path c:\Autodesk\ldt2002 – Civil Design 3
- Start the Longbow Converter tool, select the 2nd tab, pick the c:\Autodesk\ldt2002 – Civil Design 3 folder, and click Run. Read and understand all the prompts before pressing OK. Once the setup starts, stop and read the next step…
- In the setup program, navigate through each setup dialog as normal
- Now your Civil Design 3 is up and running with LDT.
Installing Survey 3
Using the Longbow Converter solution, you can also install the Survey add-on to LDT 3.
- Using Windows Explorer, copy your entire Survey 3 CD to your hard drive, to a folder path c:\Autodesk\ldt2002 – Survey 3
- Start the Longbow Converter tool, select the 2nd tab, pick the c:\Autodesk\ldt2002 – Survey 3 folder, and click Run. Read and understand all the prompts before pressing OK. Once the setup starts, stop and read the next step…
- In the setup program, navigate through each setup dialog as normal
- Now your Survey 3 is up and running with LDT.
Installing Raster Design 3
Using the Longbow Converter solution, you can also install the Raster Design add-on to LDT 3.
- Using Windows Explorer, copy your entire Survey 3 CD to your hard drive, to a folder path c:\Autodesk\ldt2002 – Raster Design 3
- Start the Longbow Converter tool, select the 2nd tab, pick the c:\Autodesk\ldt2002 – Raster Design 3 folder, and click Run. Read and understand all the prompts before pressing OK. Once the setup starts, stop and read the next step…
- In the setup program, navigate through each setup dialog as normal
- Now your Raster Design 3 is up and running with LDT.
Troubleshooting
– If you have crashing problems using the File->Open or File->Save dialogs inside of AutoCAD please read this blog entry on the File->Open or File->Save Crash in AutoCAD
Copyright 2024 (c) Longbow Software
