Installing AutoSolids A2K on Windows 7, Windows 8 and Windows 10

Installing your AutoSolids 2K on Windows 7, Windows 8, Windows 8.1 or Windows 10 32bit or 64bit can be very easily defined in these short steps.

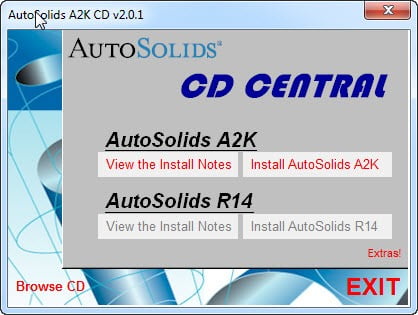
AutoSolids A2K AutoRun.exe

AutoSolids A2K AutoRun.exe

A quick word of advice: best to follow the instructions below precisely and to the letter, including folder names and paths, that way you will reduce the risk of having any problems…

  1. Obtain your copy of the Longbow Converter here
  2. Using Windows Explorer, click on this link to download the AutoSolids 2K install disk and unzip the contents to c:\InstallDisks\AutoSolids2000 (setup.exe must be in this folder)
  3. Next, start the Longbow Converter tool and select the 2nd tab named “Old AutoCAD Installer Reviver”. Using the “…” button pick the folder path c:\InstallDisks\AutoSolids2000 folder and click “OK”.
    1. Next, click the “Run Old Installer” button, it will start processing.
    2. When the Converter asks if this is a plugin to AutoCAD, click “Yes”
    3. Read and understand all prompts as they appear, before pressing OK to dismiss them.
    4. Now, I know it’s unheard of these days, but at this point expect to wait at least 45 minutes for your AutoSolids 2K setup.exe program to appear.
    5. Once the AutoSolids 2K setup starts, stop and read the next step…
      1. Note: If your AutoSolids 2K setup does not start after 45 minutes, read the Troubleshooting section below.
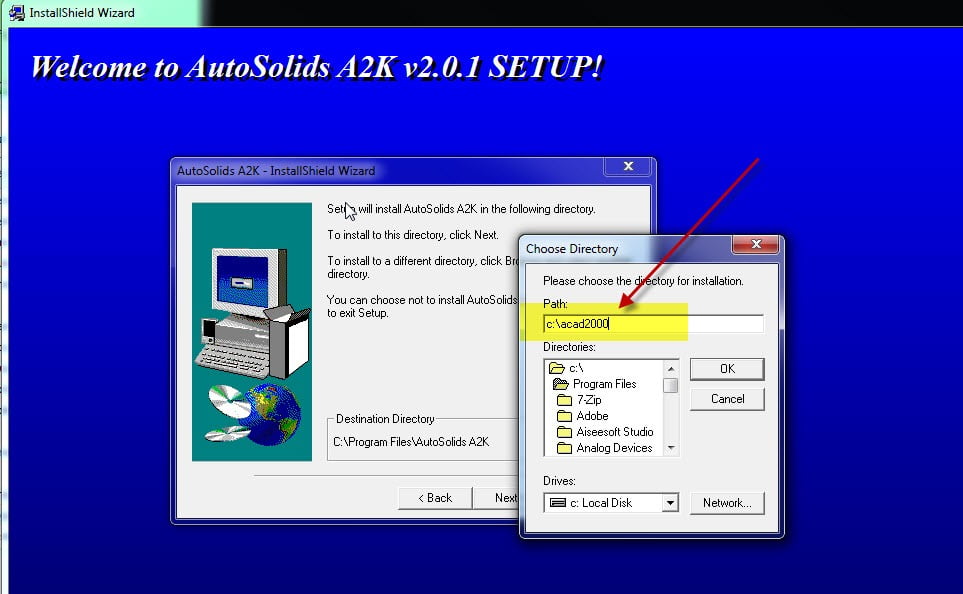
  4. In the setup program, navigate through each setup dialog as normal, except when you get to the installation folder input dialog, **it’s vitally important to make sure you install to c:\acad2000 (not C:\Program Files\AutoSolids A2K as normally prompted)** – see image…

    AutoSolids A2K Custom Install Path

    AutoSolids A2K Custom Install Path

  5. Now carry on with the install (do not reboot once the install is complete).
    1. Do not reboot if prompted to do so
  6. Now start AutoCAD 2000, your AutoSolids 2K should now be working as normal.
    1. If not, see Troubleshooting section below
Troubleshooting:
  • If your AutoSolids A2K setup is not starting after 45 minutes, try rebooting, then restart the steps above.
    • If it is still failing, most likely it’s because of another application on your system which is preventing our setup routine from starting (perhaps anti-virus, or similar) – try installing AutoSolids A2K using the same instructions as above but from Windows Safe Mode
  • If your AutoSolids A2K is not loaded
    • Try loading the c:\acad2000\AutoSolidsTB.mnu via the MENULOAD command in AutoCAD
    • If you now see the AutoSolid A2K menus but the program isn’t running, using the APPLOAD command try loading the c:\acad2000\AutoSolids.arx
  • If you have crashing problems using the File->Open or File->Save dialogs inside of AutoCAD please read this blog entry on the File->Open or File->Save Crash in AutoCAD
Copyright 2016 (c) Longbow Software

Authorization/Activation problems with AutoCAD 2006 and AutoCAD 2007

After you activate and then restart your Autodesk 2006 or 2007 product, you receive error 0.1.0011 or 11.1.6011 and are required to reactivate.

This problem can occur for Autodesk’s 2006/2007-based products on computers with SATA Raid controllers.

Note: This update must be applied to all computers that share a license. Therefore, if you apply this update to one computer and then want to use the Portable License Utility to transfer the license to another computer, be sure to install the update on that computer, too.

If this update is applied to a computer that does not have a SATA Raid controller, the license on that computer will be broken. You will need to reactivate the product to repair the license.

Affected Products

  • AutoCAD 2006/2007
  • AutoCAD Electrical 2006/2007
  • AutoCAD LT 2006/2007
  • AutoCAD Mechanical 2006/2007
  • Autodesk 3ds Max 8/9
  • Autodesk Architectural Desktop 2006/2007
  • Autodesk Building Systems 2006/2007
  • Autodesk Civil 3D 2006/2007
  • Autodesk Inventor Professional 10/11
  • Autodesk Inventor Series 10/11
  • Autodesk Land Desktop 2006/2007
  • Autodesk Map 3D 2006/2007
  • Autodesk Raster Design 2006/2007
  • Autodesk AutoCAD Revit Series 8.0 / Autodesk Revit Building 8.0
  • Autodesk AutoCAD Revit Series 8.1 / Autodesk Revit Building 8.1
  • Autodesk Revit Structure 1.0
  • Autodesk Survey 2006/2007
  • Autodesk Utility Design 2006/2007
  • Autodesk Viz 2006/2007

Installation Instructions

Autodesk 2006 products

  1. Close all applications and log in as Administrator.
  2. Download the AdskBindHotfix.zip file to a location on your local computer.
  3. On your local computer, unzip the AdskBindHotfix.zip and double-click the AdskBindHotfix.exe inside.

    A message will indicate when your product(s) have been successfully updated.

Autodesk 2007 products

  1. Close all applications and log in as Administrator.
  2. Download the BindHotfix_2007.zip file to a location on your local computer.
  3. On your local computer, unzip the BindHotfix_2007.zip and double click both of the .reg files within.
    1. Click Yes when prompted, “Are you sure you want to add this information…” for both .reg files.


Copyright 2015 (c) Longbow Software

Installing AutoCAD Mechanical 2004 from Inventor Series 7 CD on Windows 7, Windows 8 and Windows 10

Installing AutoCAD Mechanical 2004 from Inventor Series 7 CD on Windows 7, Windows 8 and Windows 10 32bit or 64bit can be very easily defined in these short steps…

NOTE: These steps do not bypass normal Autodesk licensing/authorization, you should expect to use your own serial numbers in the normal way.

How to install MDT 2004 from Inventor 7 CD

  1. Obtain your copy of the Longbow Converter here
  2. Using Windows Explorer, copy Disk 2 (not Disk 1) of your Inventor Series 7 CD to your hard drive, to folder path c:\Autodesk\InstallCDs\mdt2004
  3. Start the Longbow Converter tool…
    1. Select the 2nd tab named “Old AutoCAD Installer Reviver
    2. Pick the ‘…’ button and select the folder path c:\Autodesk\InstallCDs\mdt2004\Bin\ACADFeui
    3. Now click the “Run Old Installer…” button
      1. Read and understand all the prompts before pressing OK. Once the setup starts, stop and read the next step…
  4. In the setup program…
    1. navigate through each setup dialog as normal, except when you get to the installation folder, **it’s vitally important to make sure you install to c:\mdt2004 (not Program Files (x86)\AutoCAD Mechanical 2004**
    2. If you see an error in install “.NET Runtime Optimization Service has stopped working” – simply ignore by clicking the “Close Program” button
  5. Once installed, go back to the Converter tool…
    1. select the 3rd tab named “Old AutoCAD Program Reviver
    2. pick the newly installed c:\mdt2004 folder
    3. click “Fix Old Program…
  6. Now you can run happily your MDT 2004 in Windows 7, Windows 8 and Windows 10 both 32bit and 64bit.
    1. NOTE: If you see a warning dialog when you run saying “This program has known compatibility issues“, simply click “Don’t show this message again” and then click “Run the Program…”

Troubleshooting

If you have crashing problems using the File->Open or File->Save dialogs inside of AutoCAD please read this blog entry on the File->Open or File->Save Crash in AutoCAD
Copyright 2020 (c) Longbow Software

Install 32bit AutoCAD Mechanical 2016 on Windows 7, Windows 8 and Windows 10

NOTE: This blog post specifically solves issues related to these error messages on installation of 32bit AutoCAD Mechanical 2016 on 64bit Windows…

  • “This operating system is not supported by AutoCAD® Mechanical® 2016”
  • “You cannot install this product on the current operating system”
  • “You are attempting to use a 32-bit installer on a 64-bit operating system”
  • “This is a 32-bit AutoCAD® Mechanical® 2016. It cannot be installed on 64-bit Windows”

Installing 32bit AutoCAD Mechanical 2016 on Windows 7, Windows 8, Windows 8.1 or Windows 10 64bit can be very easily defined in these short steps…

NOTE: These steps do not bypass normal Autodesk licensing/authorization, you should expect to use your own serial numbers in the normal way.

  1. Obtain your copy of the Longbow Converter here
  2. If you have CDs (if not check (3) below):
    1. Using Windows Explorer, copy Disk 1 of your AutoCAD Mechanical 2016 install media to your hard drive, to a folder path c:\Autodesk\MDT2016
    2. If you have more CD’s, copy them all directly over the top of Disk 1, overwrite all files in your previously copied c:\Autodesk\MDT2016 folder
  3. If you have a single self extracting exe downloaded from Autodesk called something like Mechanical_2016_English_Win_32_64bit_en-us_Setup.exe
    1. Simply run the exe, it will ask to unzip to a folder inside of c:\Autodesk, make a note of the folder for later use (we’ll refer to it from here as c:\Autodesk\MDT2016), now click OK. Wait until all of the files have extracted, when they do, the AutoCAD Mechanical 2016 setup will automatically launch – simply close it and move to the next step.
  4. Now, start the Longbow Converter tool, select the 1st tab, pick the c:\Autodesk\MDT2016 folder, and click the Convert button.
  5. Once the conversion process is complete, click Install/Run Setup to start setup. Simply install as normal.
    1. Once installed, we recommend you disable the AutoCAD Communication Center/InfoCenter toolbar as it uses a lot of memory, causes slow startup and most people don’t use it anyway!
  6. Now you can happily run your AutoCAD Mechanical 2016 32bit on Windows 7, Windows 8, Windows 8.1 and Windows 10!

Troubleshooting:

– If you are unable to activate your product, or the activation process crashes:

– If you have crashing problems using the File->Open or File->Save dialogs inside of AutoCAD please read this blog entry on the File->Open or File->Save Crash in AutoCAD
Copyright 2016 (c) Longbow Software

Installing AutoCAD Mechanical 2006 on Windows 7, Windows 8 and Windows 10

Installing AutoCAD Mechanical (MDT) 2006 on Windows 10, Windows 7, Windows 8 or Windows 8.1 32bit or 64bit can be very easily defined in these short steps…

IMPORTANT NOTE: Autodesk no longer supply License Activation codes for this version of AutoCAD. The best way is to transfer your existing license to the new PC but there are other options, we document them here

How to install AutoCAD Mechanical 2006

  1. Obtain your copy of the Longbow Converter here
  2. Using Windows Explorer, copy your entire MDT 2006 CD to your hard drive, to a folder path c:\Autodesk\mdt2006 
  3. Start the Longbow Converter tool, select the 2nd tab “Old AutoCAD Installer Reviver“, pick the c:\Autodesk\mdt2006 folder, and click Run. Read and understand all the prompts before pressing OK. Once the setup starts, stop and read the next step…
  4. In the setup program, navigate through each setup dialog as normal, except when you get to the installation folder, **it’s vitally important to make sure you install to c:\mdt2006 (not Program Files (x86)\AutoCAD Mechanical 2006 as usually prompted by default)**
  5. Once installed, go back to the Converter tool, select the 3rd tab “Old AutoCAD Program Reviver“, pick the newly installed c:\mdt2006 folder and click Fix.
  6. Now you can happily run your MDT 2006 on Windows 10, Windows 7 and Windows 8.

Installing the MDT 2006 Service Pack 2

  1. Click one of these to download the MDT 2006 sp2 (you will either have a locked or unlocked version labeled on your original CD)
    1. Download the unlocked MDT 2006 sp2 (Acm2006_unl_SP2.exe)
    2. Download the locked MDT 2006 sp2 (Acm2006_swl_SP2.exe)
  2. Now Copy the *SP2.exe to folder path c:\Autodesk\sp
  3. Start the Converter, select the 3rd tab, pick the c:\Autodesk\sp folder and click Fix.
  4. Now run the *SP2.exe from Windows explorer to install.

Troubleshooting

– If you are unable to activate your product, or the activation crashes:

– If you have crashing problems using the File->Open or File->Save dialogs inside of AutoCAD please read this blog entry on the File->Open or File->Save Crash in AutoCAD

 
Copyright 2016 (c) Longbow Software