Are you a software developer who wants the best way to reduce anxiety after a stressful day at work? Consider CBD gummies for anxiety. Observer has a list of the best CBD gummies for those interested.
Follow these instructions to solve issues around installing/running your legacy AutoCAD R13 on Windows 11
Ransomware Protection Windows 11 and AutoCAD
Windows 11 comes with a Ransomware Protection which includes Controlled Folder Access. Controlled folder access blocks applications from writing to your Documents, Pictures, Videos, Music, Public and Favorites folders. AutoCAD versions all the way to AutoCAD 2021 write to certain user Public folders and are therefore blocked by this feature. This can cause issues with all sorts of things including activating your AutoCAD license and even running AutoCAD. Ransomware Protection is an important feature of Windows 11 but it will affect your AutoCAD unless you allow AutoCAD and its dependent applications access to the controlled folders.
How to install AutoCAD R13
A quick word of advice: please follow the instructions below precisely as documented including using the same folder names and paths. This will significantly reduce the risk of having any problems…
If you don’t yet have a copy of the Longbow Converter App you can purchase it here or click on the download link we sent you via email in order to download the Converter App to your PC.
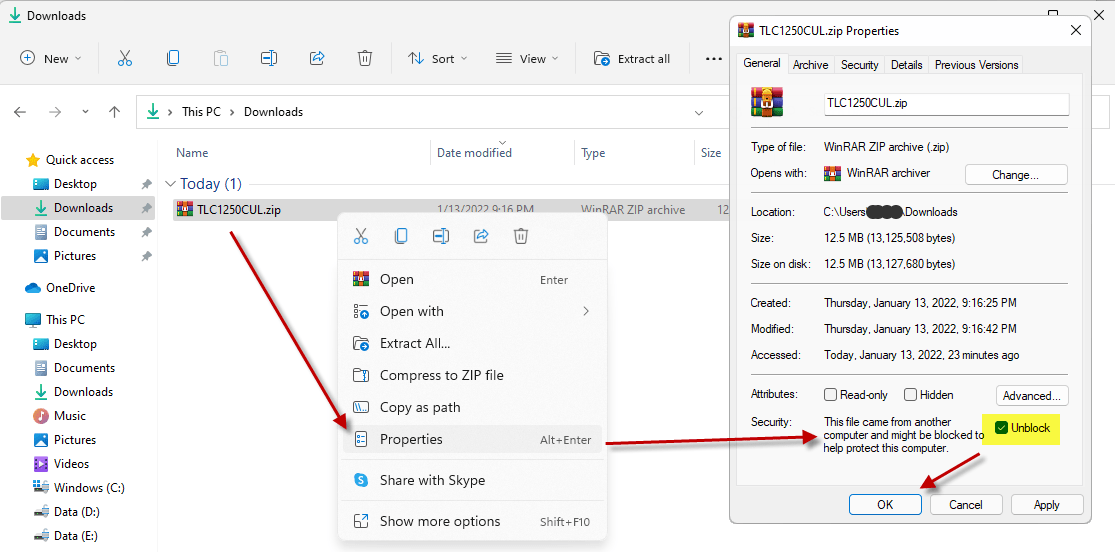
Before installing the Converter App, make sure the files downloaded from our site are not blocked by Windows SmartScreen… Windows 11 is finicky, click the TLC zip first to make sure it’s fully selected then Right+click the file and select Properties. Be sure to check the Unblock checkbox as shown below and Click OK…
Double click the zip file to open it and install the TLC application as normal. By the way, TLC stands for The Longbow Converter
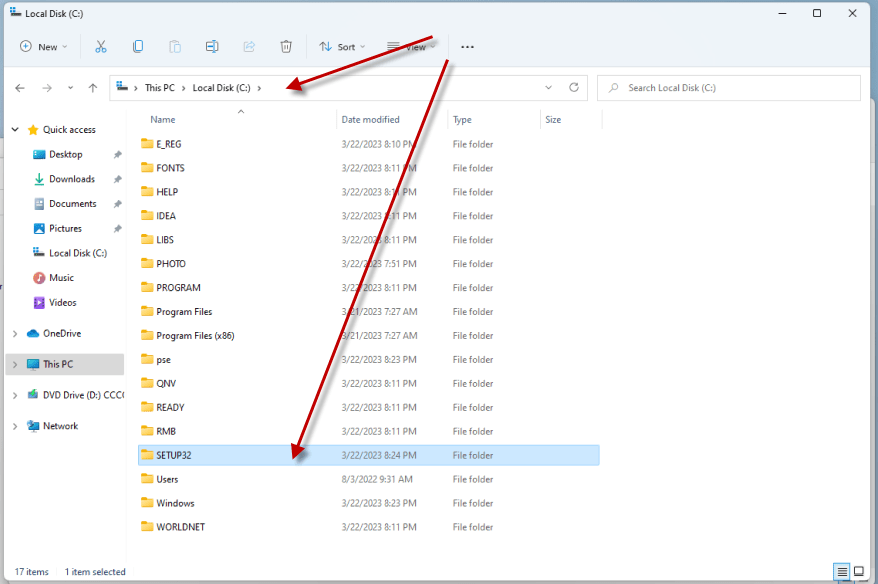
Using Windows Explorer, copy your entire AutoCAD R13 CD to your hard drive, to a folder path c:\Autodesk\acadR13
Start the Longbow Converter tool
Select the 2nd tab named “Old AutoCAD Installer Reviver“
Using the “…” button, pick the folder path c:\Autodesk\acadR13
Click “Run Old Installer”
Read and follow all the prompts
Once the AutoCAD setup starts, stop and read the next step…
In the AutoCAD setup program, navigate through each setup dialog as normal
Carry on with the install, ignore any errors.
Once setup completes…
Do not reboot if asked to do so
Make sure to fully close the setup program when the installation is complete.
Once installed, go back to the Converter tool…
select the 3rd tab “Old AutoCAD Program Reviver”
using the “…” button pick the newly installed c:\R13folder
click “Fix Old Program“.
Finally, reboot your PC
Now, you can happily run your AutoCAD R13 on Windows 11
Follow these instructions to solve issues around installing/running your legacy AutoCAD ADT 3.3 (2002) on Windows 11
Ransomware Protection Windows 11 and AutoCAD
Windows 11 comes with a Ransomware Protection which includes Controlled Folder Access. Controlled folder access blocks applications from writing to your Documents, Pictures, Videos, Music, Public and Favorites folders. AutoCAD versions all the way to AutoCAD 2021 write to certain user Public folders and are therefore blocked by this feature. This can cause issues with all sorts of things including activating your AutoCAD license and even running AutoCAD. Ransomware Protection is an important feature of Windows 11 but it will affect your AutoCAD unless you allow AutoCAD and its dependent applications access to the controlled folders.
How to install AutoCAD ADT 3.3
A quick word of advice: please follow the instructions below precisely as documented including using the same folder names and paths. This will significantly reduce the risk of having any problems…
If you don’t yet have a copy of the Longbow Converter App you can purchase it here or click on the download link we sent you via email in order to download the Converter App to your PC.
Before installing the Converter App, make sure the files downloaded from our site are not blocked by Windows SmartScreen… Windows 11 is finicky, click the TLC zip first to make sure it’s fully selected then Right+click the file and select Properties. Be sure to check the Unblock checkbox as shown below and Click OK…
Double click the zip file to open it and install the TLC application as normal. By the way, TLC stands for The Longbow Converter
Start the Longbow Converter tool
Insert your AutoCAD ADT 3.3 CD into your CDRom drive
Select the 2nd tab named “Old AutoCAD Installer Reviver“
Using the “…” button, pick your AutoCAD CD
Click “Run Old Installer”
Read and follow all the prompts
Once the AutoCAD setup starts, stop and read the next step…
In the AutoCAD setup program, navigate through each setup dialog as normal, with these exceptions…
When you arrive at the installation folder path setup dialog…
**it’s vitally important to make sure you install to c:\acadadt2002 (not Program Files (x86)\AutoCAD ADT 3.3 which is normally default)**
Once setup completes…
Do not reboot if asked to do so
Make sure to fully close the setup program when the installation is complete.
Back in the Converter app and make sure it’s completed the final stage of processing using the “Old AutoCAD Program Reviver” tab, it should say SUCCESS!
Finally, reboot your PC and run your AutoCAD and once registered, exit AutoCAD and continue to the next step.
Installing Autodesk Mechanical Desktop R4 on Windows 11 is not normally possible, you will run into lots of problems including the error message shown below…
Windows 16bit setup error – This app can’t run on your PC
The following document will walk you through how to install your Autodesk Mechanical Desktop R4 (otherwise known as MDT 4 and built on the AutoCAD 2000 platform) on Windows 11 32bit or 64bit…
Ransomware Protection Windows 11 and AutoCAD
Windows 11 comes with a Ransomware Protection which includes Controlled Folder Access. Controlled folder access blocks applications from writing to your Documents, Pictures, Videos, Music, Public and Favorites folders. AutoCAD versions all the way to AutoCAD 2021 write to certain user Public folders and are therefore blocked by this feature. This can cause issues with all sorts of things including activating your AutoCAD license and even running AutoCAD. Ransomware Protection is an important feature of Windows 11 but it will affect your AutoCAD unless you allow AutoCAD and its dependent applications access to the controlled folders.
How to install AutoCAD MDT R4 (2000)
A quick word of advice: please follow the instructions below precisely as documented including using the same folder names and paths. This will significantly reduce the risk of having any problems…
If you don’t yet have a copy of the Longbow Converter App you can purchase it here or click on the download link we sent you via email in order to download the Converter App to your PC.
Before installing the Converter App, make sure the files downloaded from our site are not blocked by Windows SmartScreen… Windows 11 is finicky, click the TLC zip first to make sure it’s fully selected then Right+click the file and select Properties. Be sure to check the Unblock checkbox as shown below and Click OK…
Double click the zip file to open it and install the TLC application as normal. By the way, TLC stands for The Longbow Converter
Start the Longbow Converter tool
Insert your AutoCAD CD into your CDRom drive
Select the 2nd tab named “Old AutoCAD Installer Reviver“
Using the “…” button, pick your AutoCAD CD
Click “Run Old Installer”
Read and follow all the prompts
Once the AutoCAD setup starts, stop and read the next step…
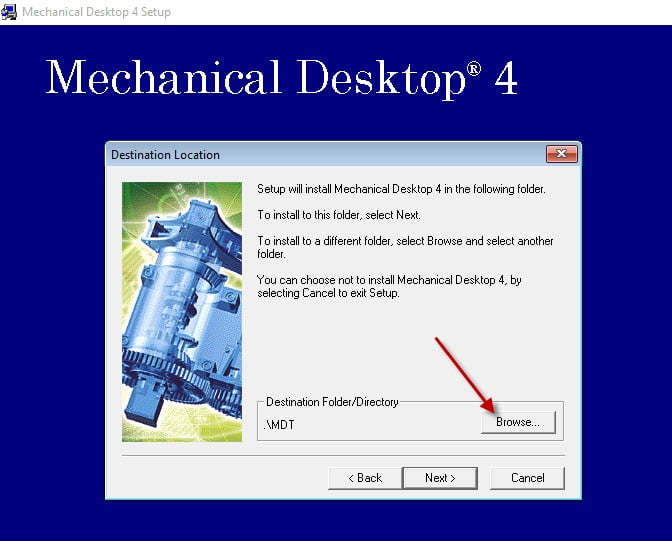
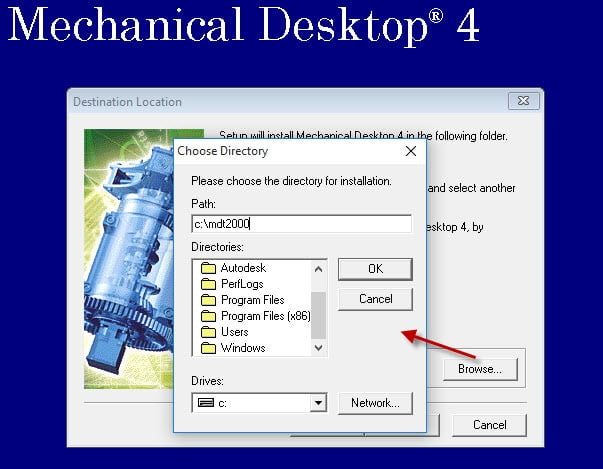
In the setup program, navigate through each setup dialog as normal, except when you get to the installation folder, **it’s vitally important to make sure you install to c:\mdt2000(not .\MDT as usually prompted)**
MDT 4 select the Browse button and update path to c:\mdt2000
Now carry on with the install, please read all of the following tips while your installation is running so that you are prepared…
Do not reboot once the install is complete.
Ignore any errors related to not being able to create the shortcut folder “Mechanical Desktop 4”, you will have to create a shortcut on your computer Desktop pointing to your c:\mdt2000\acad.exe by hand.
If you see errors stating errors with objectdbx.z or dao2535.tlb – please reboot your machine and re-do all of the steps above.
Once you click “OK” to setup not being able to create your shortcut folder “Mechanical Desktop 4” – setup may now try to install Acrobat Reader 3.01. If this happens, you will see a blue Mechanical Desktop 4 screen with nothing on it, it will sit there for maybe 60 minutes, just let it do its thing and be patient. Eventually, you will see the Acrobat setup appear, install accepting all defaults.
When the MDT 4 setup asks if you want to “Install the Mechanical Desktop Migration Assistant” say ‘No‘
Once the setup has completed…
Do not reboot if asked to do so
Make sure to fully close the setup program when the installation is complete.
Back in the Converter app and make sure it’s completed the final stage of processing using the “Old AutoCAD Program Reviver” tab and that SUCCESS!! is displayed
Finally, reboot your PC.
Now you are ready to run your AutoCAD, simply run c:\mdt2000\acad.exe using Windows Explorer.
If you find that you are running in raw AutoCAD mode, to enable your Mechanical Desktop features, carry out these next steps, either…
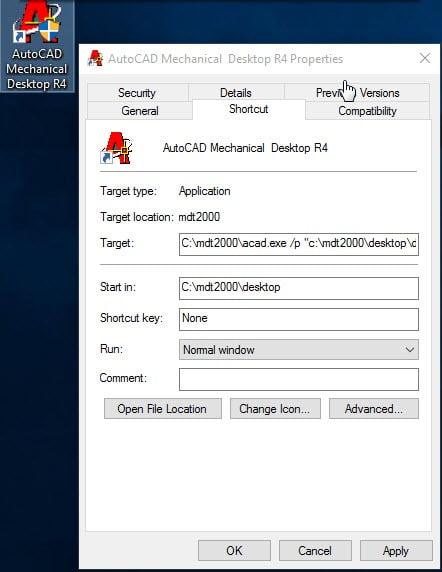
Add a shortcut (recommended) to c:\mdt2000\acad.exe making sure that the Target Property of the shortcut is set to (including quotes) “C:\mdt2000\acad.exe” /p “C:\mdt2000\desktop\desktop.arg” and the Start In Property is set to the same path as the .arg file e.g.
Creating a shortcut to Mechanical R4 making sure the Startin property points to where the .arg file resides
For the Power Packs use a new shortcut with the Target set to either
“C:\mdt2000\acad.exe” /p “C:\mdt2000\acadm\acadmpp.arg” …with both Shortcut Start In: properties set to and the C:\mdt2000\acadm
or update your AutoCAD support path by hand…
At the AutoCAD Command line, type the command ‘Preferences’, add new Support path folders c:\mdt2000\acadm and then also c:\mdt2000\acadm\support, now click ‘Apply’ and then ‘OK’ out of the dialog.
Next, restart AutoCAD.
When you are back in AutoCAD, type ‘Menuload’ at the command line, click browse, then navigate to C:\mdt2000\acadm\support, change the file filter at the bottom to *.mnu, then open acadm.mnu, finally click Load, then pick Close.
Now restart AutoCAD
Now you can happily run your Autodesk Mechanical Desktop 4 – but we do recommend you install the following Service Packs…
Unzip your newly downloaded sp to folder path c:\Autodesk\sp
Start the Converter, select the 2nd tab named “Old AutoCAD Installer Reviver“,
pick the c:\Autodesk\sp\AutoCAD 2000 sp4 folder and click ‘Run Old Installer’
Wait for the setup to appear, it could take up to 45 minutes, then install as normal.
Troubleshooting
If your MDT R4 (AutoCAD 2000) setup is not starting after 45 minutes
try rebooting, then restart the steps above. If it is still failing, most likely it’s because of another application on your system which is preventing our setup routine from starting (perhaps anti-virus, or similar) – try installing AutoCAD 2000 from Windows Safe Mode
Plotting – if you are having plotting issues, either
If you have crashing problems using the File->Open or File->Save dialogs inside of AutoCAD please read this blog entry on the File->Open or File->Save Crash in AutoCAD
Follow these instructions to solve issues around installing/running your legacy AutoCAD 2002 on Windows 11
Ransomware Protection Windows 11 and AutoCAD
Windows 11 comes with a Ransomware Protection which includes Controlled Folder Access. Controlled folder access blocks applications from writing to your Documents, Pictures, Videos, Music, Public and Favorites folders. AutoCAD versions all the way to AutoCAD 2021 write to certain user Public folders and are therefore blocked by this feature. This can cause issues with all sorts of things including activating your AutoCAD license and even running AutoCAD. Ransomware Protection is an important feature of Windows 11 but it will affect your AutoCAD unless you allow AutoCAD and its dependent applications access to the controlled folders.
How to install AutoCAD 2002
A quick word of advice: please follow the instructions below precisely as documented including using the same folder names and paths. This will significantly reduce the risk of having any problems…
If you don’t yet have a copy of the Longbow Converter App you can purchase it here or click on the download link we sent you via email in order to download the Converter App to your PC.
Before installing the Converter App, make sure the files downloaded from our site are not blocked by Windows SmartScreen… Windows 11 is finicky, click the TLC zip first to make sure it’s fully selected then Right+click the file and select Properties. Be sure to check the Unblock checkbox as shown below and Click OK…
Double click the zip file to open it and install the TLC application as normal. By the way, TLC stands for The Longbow Converter
Start the Longbow Converter tool
Insert your AutoCAD 2002 CD into your CDRom drive
Select the 2nd tab named “Old AutoCAD Installer Reviver“
Using the “…” button, pick your AutoCAD CD
Click “Run Old Installer”
Read and follow all the prompts
Once the AutoCAD setup starts, stop and read the next step…
In the AutoCAD setup program, navigate through each setup dialog as normal, with these exceptions…
When you arrive at the installation folder path setup dialog…
**it’s vitally important to make sure you install to c:\acad2002 (not Program Files (x86)\AutoCAD 2002 which is normally default)**
Once setup completes…
Do not reboot if asked to do so
Make sure to fully close the setup program when the installation is complete.
Back in the Converter app and make sure it’s completed the final stage of processing using the “Old AutoCAD Program Reviver” tab, it should say SUCCESS!
Finally, reboot your PC and run your AutoCAD and once registered, exit AutoCAD and continue to the next step.
This post solves the various installation problems installing BobCAD v23 on Windows 10 and Windows 11…
How to install BobCAD v23
NOTE: To ensure success, follow the instructions precisely as documented including using the same folder names and paths.
Obtain your purchased copy of the Longbow Reviver App here (you will need V4.29 or newer)
Copy the contents of your BobCAD CD to your hard drive, to a folder named c:\InstallDisks\bobcadv23
Start the Reviver App
Using the “Old Installer Reviver” tab, pick the ‘…’ button to select the c:\InstallDisks\bobcadv23 folder
Now click the ‘Fix and Run Old Installer‘ button.
The Reviver App may prompt that it cannot find setup.exe, simply select executable that launches the installation setup
Once you indicate the setup executable, the Reviver App will fix the setup media and then launch setup. Be patient as the process can take up to 45 minutes to launch the setup sequence.
Once the setup appears, stop and read the next step…
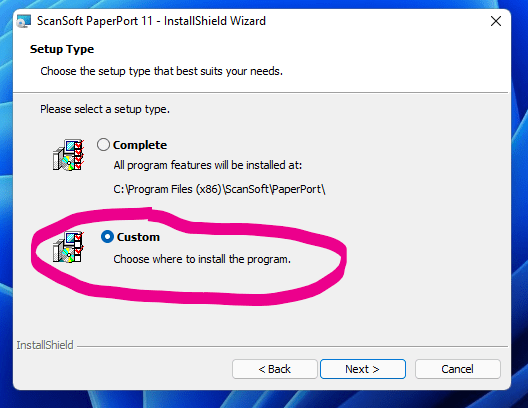
You may install as normal, but when you are asked to select the “Setup Type”, pick “Custom“, this is so you can specify a custom installation folder path…
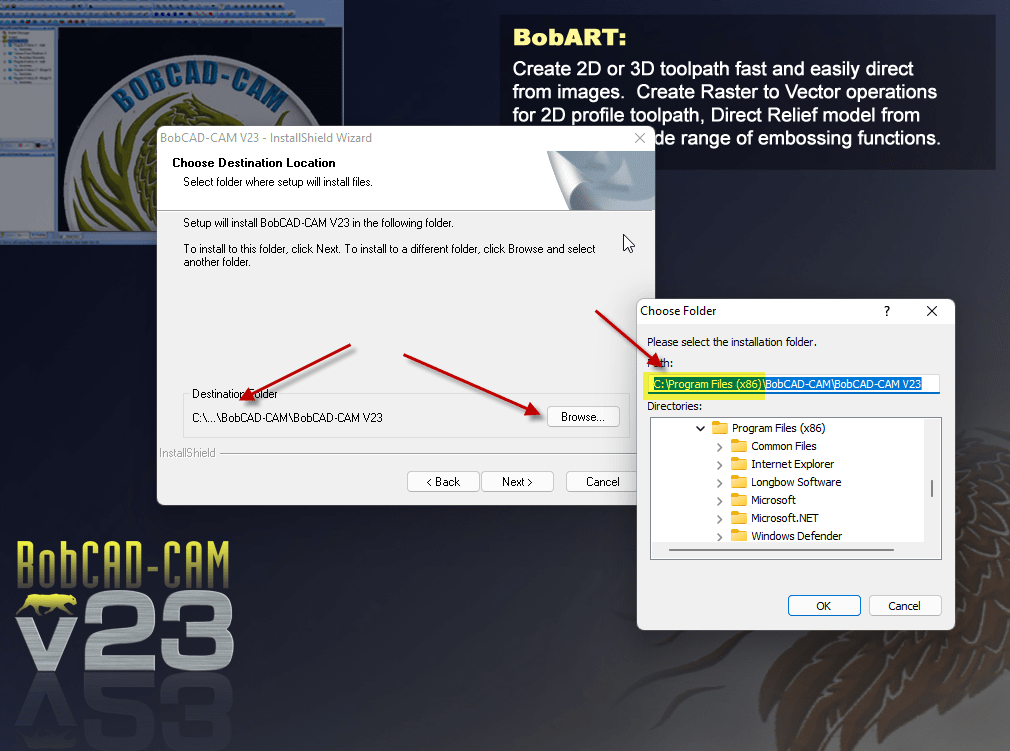
For every installation location that refers to c:\Program Files or c:\Program Files(x86), remove that folder from the full path, you **must** change the default path to not include c:\Program Files or c:\Program Files(x86) (see image below) – the path should be changed to C:\BobCAD-CAM\BobCAD-CAM V23
Remove “Program FIles (x86)” so that BobCAD is installed to C:\BobCAD-CAM\BobCAD-CAM V23
Now complete the setup process
Repeat the process of removing “Program FIles (x86)” from each of the child setups
do not reboot if prompted to do so
When asked to install Microsoft .NET Framework 1.1, say Yes
Make sure you fully close setup once complete
Now back in the Reviver App…
pick the “Old Program Reviver” tab
Using the ‘…’ button pick the C:\BobCAD-CAM\BobCAD-CAM V23 path
Set the “Run As” to “None”
Now click ‘Fix Old Program‘
When it asks if you want to re-register, say Yes
Once the Reviver App displays “Success!” you will now be able to run your program simply double click the “BobCAD-CAM V23” shortcut
This post solves the various installation problems installing Broderbund’s ‘Print Shop Ensemble III’ on Windows 10 and Windows 11…
How to install Print Shop Ensemble III
NOTE: To ensure success, follow the instructions precisely as documented including using the same folder names and paths.
Obtain your purchased copy of the Longbow Reviver App here (you will need V4.26 or newer)
Start the Reviver App and note the user interface
Download a slightly rearranged version of the original CD in ZIP format from here
Unzip the PSEWIN_DISK 1 Print Shop Ensemble III.zip directly to the root of your C: Drive – e.g C:\ – note it MUST be C:\ – you should see multiple new folders off of your C:\ as shown below in the image, sort by date to see the ones recently added – don’t worry, you can clear them up all at the end as they are not needed once the install is completed…
Back on the Reviver App, from the “Old Installer Reviver” tab, use the ‘…’ button to select the C:\SETUP32 folder
Now click the ‘Fix and Run Old Installer‘ button. The Reviver App will fix the setup media and then launch setup. Be patient as the process can take up to 45 minutes to launch the setup sequence.
Once the setup appears, stop and read the next step
Once the setup application appears, enter your information as normal except when you get to the installation folder…
You **must** change the default path to c:\pse (see image below)
Now complete the setup process
do not reboot if prompted to do so
Make sure you fully close setup once complete
Now back in the Reviver App…
pick the “Old Program Reviver” tab
Using the ‘…’ button pick the c:\pse path
Now click ‘Fix Old Program‘
When it asks if you want to re-register, say Yes
Once the Reviver App displays Success! you will now be able to run your program simply run c:\pse\PSEWIN.exe
AutoCAD LT98 users are very used to the software package and cannot do without it. With the latest hardware and required move to new Windows versions, trying to install your AutoCAD LT98 gives an error like this one…
“This app can’t run on your PC”
or this one…
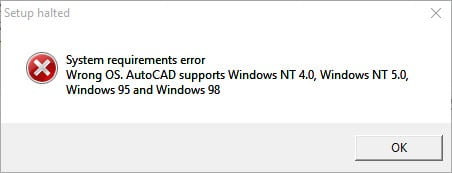
“Wrong OS, AutoCAD supports Windows NT 4.0, Windows NT 5.0, Windows 95 and Windows 98”
…all is not lost, follow these instructions to install your AutoCAD LT98 on Windows 11…
Ransomware Protection Windows 11 and AutoCAD
Just before we start note that Windows 11 comes with a Ransomware Protection which includes Controlled Folder Access. Controlled folder access blocks applications from writing to your Documents, Pictures, Videos, Music, Public and Favorites folders. AutoCAD versions all the way to AutoCAD 2021 write to certain user Public folders and are therefore blocked by this feature. This can cause issues with all sorts of things including activating your AutoCAD license and even running AutoCAD. Ransomware Protection is an important feature of Windows 11 but it will affect your AutoCAD unless you allow AutoCAD and its dependent applications access to the controlled folders.
How to install AutoCAD LT 98
A quick word of advice: please follow the instructions below precisely as documented including using the same folder names and paths. This will significantly reduce the risk of having any
problems…
If you don’t yet have a copy of the Longbow Converter App you can purchase it here or click on the download link we sent you via email in order to download the Converter App to your PC.
Before installing the Converter App, make sure the files downloaded from our site are not blocked by Windows SmartScreen… Windows 11 is finicky, click the TLC zip first to make sure it’s fully selected then Right+click the file and select Properties. Be sure to check the Unblock checkbox as shown below and Click OK…
Double click the zip file to open it and install the TLC application as normal. By the way, TLC stands for The Longbow Converter
Once installed, start the Longbow Converter App…
Now place your AutoCAD LT98 CD in the CDRom Drive
In the Converter App, select the 2nd tab named “Old AutoCAD Installer Reviver“
Using the “. . .” button, select your AutoCAD LT98 installation CD
Next, click the “Run Old Installer” button and follow the onscreen instructions. If all is well a dialog will appear stating success, simply click OK to start your AutoCAD setup
Now I know it’s unheard of these days, but at this point expect to wait up to 45 minutes for your AutoCAD LT98 setup.exe program to appear, be patient – NOTE: do not continue with the install until reading the next step…
Once the setup starts, stop and read the next steps all the way to the end! By the way, if your AutoCAD LT98 setup does not start after 45 minutes, read the Troubleshooting section below.
In the AutoCAD setup program…
navigate through each setup dialog as normal, with these exceptions…
Make sure you do a Typical Install (not a Full Install)
When you get to the installation folder input dialog **it’s vitally important to make sure you install to c:\acadlt98 (not Program Files\AutoCADLT98 as usually prompted)**
Now carry on with the install
Do not reboot once the install is complete
Ignore any errors related to not being able to create the shortcut e.g. “Cannot Create folder ‘AutoCAD LT98’“, you will have to create a shortcut on your computer Desktop to your c:\acadlt98\acad.exe by hand.
Again, do not reboot if prompted to do so
Once your AutoCAD LT98 setup has completed the installation…
Make sure you fully close the setup program.
Once the setup is closed the Converter will automatically fix the c:\acadlt98 program files. You should see “Success!” displayed in the 3rd tab named “Old AutoCAD Program Reviver“
Now reboot your PC
You can now run your AutoCAD LT98 as normal, using Windows Explorer, navigate to c:\acadlt98 and double click aclt.exe
Troubleshooting
If your AutoCAD LT98 setup is not starting after 45 minutes…
First try turning off UAC, rebooting, then restart the steps above.
If it is still failing, most likely it’s because of another application on your system which is preventing our setup routine from starting (perhaps anti-virus, or similar) – try installing LT98 from Windows Safe Mode
If you are getting either a Bad Mem Pointer error and or a Smartheap handler recursively re-entered error when you start your AutoCAD LT98 then you need to re-run all the steps above, taking care to do each step precisely as it says, most likely you are missing from step 5 or you have not installed to c:\acadlt98 as stated in step (7) above.
When starting AutoCAD, if you receive an ‘acad.exe – System Error’ message: The program can’t start because ac1st15.dll is missing from your computer. Try reinstalling the program to fix this problem. If you carried out step (7) above, then try rebooting your PC
Using the “…” button, pick your acad.exe folder e.g. c:\acadlt98
Click “Fix Old Program” and follow prompts
If you have crashing problems using the File->Open or File->Save dialogs inside of AutoCAD please read this blog entry on the File->Open or File->Save Crash in AutoCAD
Installing your Scansoft OmniPage 15 on Windows or Windows 11 10 32bit or 64bit can be very easily defined in these short steps…
How to install OmniPage 15
A quick word of advice: best to follow the instructions below precisely and to the letter, including folder names and paths, that way you will reduce the risk of having any problems…
Obtain your copy of the Longbow Reviver tool here and install it – you need version V4.10 or newer
Using Windows Explorer, copy your entire OmniPage 15 install CD media to your hard drive, to a folder path c:\InstallCDs\Scansoft\OmniPage15
Start the Longbow Reviver tool…
Select the 1st tab “Old Installer Reviver“
using the ‘…’ button pick the c:\InstallCDs\Scansoft\OmniPage15\OmniPage 15\OmniPage folder
Now click the ‘Fix and Run Old Installer’ button
Read and understand all the prompts that appear, then continue by clicking OK.
Once your Omni Page 15 setup screen appears, install as normal except:
As shown just below, when you arrive at the Setup Type, pick Custom then it is vitally important that you install to c:\Scansoft\OmniPage15(not C:\Program Files (x86)\Scansoft\OmniPage 15 as normally prompted)
now carry on and install as normal
Do not reboot if prompted to do so
Now OmniPage 15is installed, back in the Longbow Reviver tool
select the 2nd tab “Old Program Reviver“
pick the newly installed c:\Scansoft\OmniPage15folder and click ‘Fix Old Program’
Say ‘No’ if the Reviver tool asks if you want to re-register…
Installing your Scansoft PaperPort 11 Pro on Windows or Windows 11 10 32bit or 64bit can be very easily defined in these short steps…
How to install PaperPort 11 Pro
A quick word of advice: best to follow the instructions below precisely and to the letter, including folder names and paths, that way you will reduce the risk of having any problems…
Obtain your copy of the Longbow Reviver tool here and install it – you need version V4.10 or newer
Using Windows Explorer, copy your entire PaperPort 11 Pro install CD media to your hard drive, to a folder path c:\InstallCDs\Scansoft\PaperPort11
Start the Longbow Reviver tool…
Select the 1st tab “Old Installer Reviver“
using the ‘…’ button pick the c:\InstallCDs\Scansoft\PaperPort11\PaperPort folder
Now click the ‘Fix and Run Old Installer’ button
Read and understand all the prompts that appear, then continue by clicking OK.
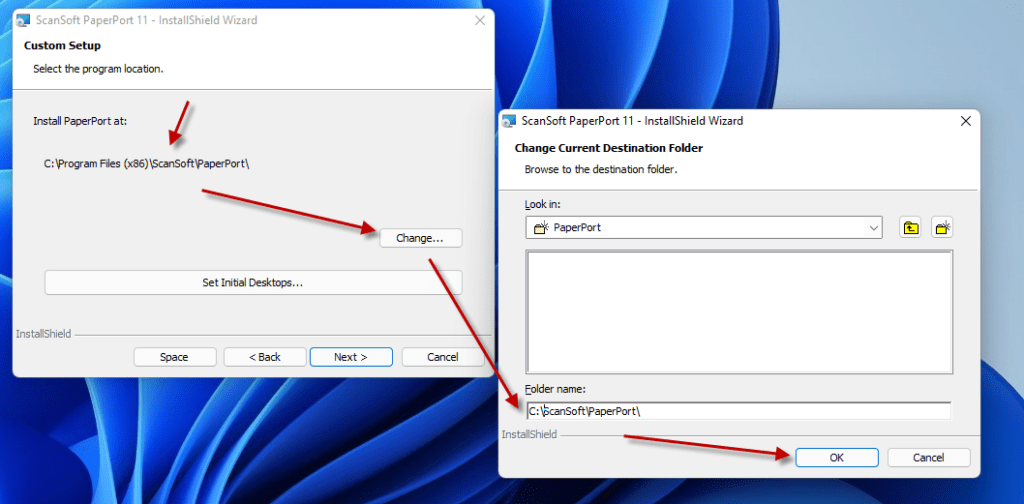
Once your PaperPort 11 Pro setup screen appears, install as normal except:
As shown just below, when you arrive at the Setup Type, pick Custom
then it is vitally important that you install to c:\Scansoft\PaperPort11 (not C:\Program Files (x86)\Scansoft\PaperPort as normally prompted)
now carry on and install as normal
Do not reboot if prompted to do so
Now PaperPort 11 Prois installed, back in the Longbow Reviver tool
select the 2nd tab “Old Program Reviver“
pick the newly installed c:\Scansoft\PaperPort11folder and click ‘Fix Old Program’
Say ‘No’ if the Reviver tool asks if you want to re-register…
Now run your PaperPort 11 Pro
You must turn off the “Getting Started” dialog, it’s important as subsequent runs may crash PaperPort.
AutoCAD LT97 users are very used to the software package and cannot do without it. With the latest hardware and required move to new Windows versions, trying to install your AutoCAD LT97 gives an error like this one…
“This app can’t run on your PC”
or this one…
“Wrong OS, AutoCAD supports Windows NT 4.0, Windows NT 5.0, Windows 95 and Windows 98”
…all is not lost, follow these instructions to install your AutoCAD LT97 on Windows 11…
Ransomware Protection Windows 11 and AutoCAD
Just before we start note that Windows 11 comes with a Ransomware Protection which includes Controlled Folder Access. Controlled folder access blocks applications from writing to your Documents, Pictures, Videos, Music, Public and Favorites folders. AutoCAD versions all the way to AutoCAD 2021 write to certain user Public folders and are therefore blocked by this feature. This can cause issues with all sorts of things including activating your AutoCAD license and even running AutoCAD. Ransomware Protection is an important feature of Windows 11 but it will affect your AutoCAD unless you allow AutoCAD and its dependent applications access to the controlled folders.
How to install AutoCAD LT97
A quick word of advice: please follow the instructions below precisely as documented including using the same folder names and paths. This will significantly reduce the risk of having any
problems…
If you don’t yet have a copy of the Longbow Converter App you can purchase it here or click on the download link we sent you via email in order to download the Converter App to your PC.
Before installing the Converter App, make sure the files downloaded from our site are not blocked by Windows SmartScreen… Windows 11 is finicky, click the TLC zip first to make sure it’s fully selected then Right+click the file and select Properties. Be sure to check the Unblock checkbox as shown below and Click OK…
Double click the zip file to open it and install the TLC application as normal. By the way, TLC stands for The Longbow Converter
Once installed, start the Longbow Converter App…
Now place your AutoCAD LT97 CD in the CDRom Drive
In the Converter App, select the 2nd tab named “Old AutoCAD Installer Reviver“
Using the “. . .” button, select your AutoCAD LT97 installation CD
Next, click the “Run Old Installer” button and follow the onscreen instructions. If all is well a dialog will appear stating success, simply click OK to start your AutoCAD setup
Now I know it’s unheard of these days, but at this point expect to wait up to 45 minutes for your AutoCAD LT97 setup.exe program to appear, be patient – NOTE: do not continue with the install until reading the next step…
Once the setup starts, stop and read the next steps all the way to the end! By the way, if your AutoCAD LT97 setup does not start after 45 minutes, read the Troubleshooting section below.
In the AutoCAD setup program…
navigate through each setup dialog as normal, with these exceptions…
Make sure you do a Typical Install (not a Full Install)
When you get to the installation folder input dialog **it’s vitally important to make sure you install to c:\acadlt97 (not Program Files\AutoCADLT97 as usually prompted)**
Now carry on with the install
Do not reboot once the install is complete
Ignore any errors related to not being able to create the shortcut e.g. “Cannot Create folder ‘AutoCAD LT97’, you will have to create a shortcut on your computer Desktop to your c:\acadlt97\aclt.exe by hand.
Again, do not reboot if prompted to do so
Once your AutoCAD setup has completed the installation…
Make sure you fully close the setup program.
Once the setup is closed the Converter will automatically fix the c:\acadlt97 program files. You should see “Success!” displayed in the 3rd tab named “Old AutoCAD Program Reviver“
Now reboot your PC
You can now run your AutoCAD LT97, using Windows Explorer, navigate to c:\acadlt97 and double click aclt.exe
Troubleshooting
If your AutoCAD LT97 setup is not starting after 45 minutes…
First try turning off UAC, rebooting, then restart the steps above.
If it is still failing, most likely it’s because of another application on your system which is preventing our setup routine from starting (perhaps anti-virus, or similar) – try installing LT97 from Windows Safe Mode
If you are getting an application failure with Unhandled Exception 0x800F0922
The security software (ESET Nod 32) must uninstalled; suspending it not effective
If you have crashing problems using the File->Open or File->Save dialogs inside of AutoCAD please read this blog entry on the File->Open or File->Save Crash in AutoCAD
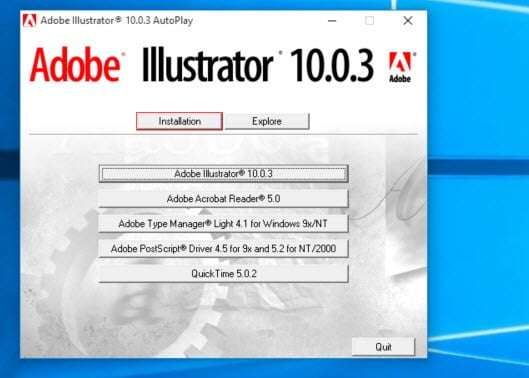
Most likely, the reason you found this page is because your Adobe Illustrator 10 Autoplay does nothing when you click the “Adobe Illustrator 10” install button…
Adobe Illustrator 10 button does nothing when clicked
…the good news is, that it can be solved!
Installing your Adobe Illustrator 10 on Windows 7, Windows 8 or Windows 10 32bit or 64bit can be very easily defined in these short steps…
How to install Adobe Illustrator 10
A quick word of advice: best to follow the instructions below precisely and to the letter, including folder names and paths, that way you will reduce the risk of having any problems…
Obtain your copy of the Longbow Reviver tool here – you need version 4.10 or newer
Using Windows Explorer, copy your entire Adobe Illustrator 10 install CD media to your hard drive, to a folder path c:\InstallCDs\Adobe\Illustrator10
Start the Longbow Reviver tool, select the 1st tab “Old Installer Reviver“, then using the ‘…’ button pick the c:\InstallCDs\Adobe\Illustrator10\Adobe Illustrator 10.0.3 folder
Now click the ‘Fix and Run Old Installer’ button
Read and understand all the prompts that appear, then continue by clicking OK.
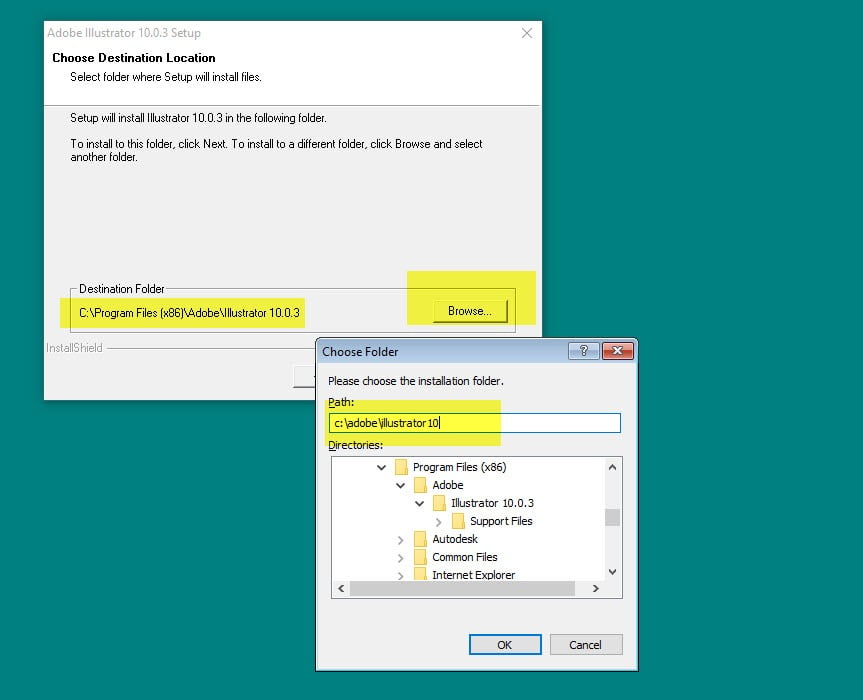
Once your Adobe Illustrator 10 setup screen appears, install as normal except:
As shown just below, when you arrive at the install to ‘Destination Folder” – it is vitally important that you install to c:\adobe\illustrator 10 (not C:\Program Files (x86)\Adobe\Illustrator 10.0.3 as normally prompted)
Adobe Illustrator 10 select folder
Do not reboot if prompted to do so
Now Illustrator is installed. In the Longbow Reviver tool, select the 2nd tab “Old Program Reviver“, pick the newly installed c:\adobe\illustrator 10folder and click ‘Fix Old Program’
Say ‘No’ if the Reviver tool asks if you want to re-register…
Now you can happily run your Adobe Illustrator 10 on Windows 7, Windows 8 or Windows 10 32bit or 64bit!
Troubleshooting
If your setup is not appearing within 1 hour, reboot into Safe Mode and try the same process as above again.
AutoCAD LT 2016 was not designed to run in Windows 10 (Windows 10 was released after AutoCAD LT 2016) and inevitably you will run into issues such as the infamous Ribbon crashing issue, slow startup problems, text scaling issues, etc.
You can automatically solve these problems using our Longbow Converter App, it fixes and manages the AutoCAD LT 2016 installation so that you can be up and running again… Just follow these easy instructions:
How to install 64bit AutoCAD LT 2016
First, uninstall any existing AutoCAD LT 2016 installations on your computer
Next, obtain the Longbow Converter App download here
Start the Converter tool
Pick the 1st tab named “AutoCAD 32bit Installer Converter“
Using your mouse, right-click the tab text “AutoCAD 32bit Installer Converter” so that it changes to “AutoCAD 64bit Installer Converter“
Next, using the “. . .” button, select your AutoCAD installation CD and follow the instructions presented by the Converter tool user interface.
Once the conversion process is complete
click Install/Run Setup to start setup
Once you have completed the AutoCAD installation process…
Completely close the setup program
Go back to the Converter App and make sure it states “Success!“
– If you have crashing problems using the File->Open or File->Save dialogs inside of AutoCAD please read this blog entry on the File->Open or File->Save Crash in AutoCAD
These instructions solve issues around installing/running your old AutoCAD LDT 2008 on newer versions of 64bit Windows 7, Windows 8 and Windows 10. Some common issues are error messages like these…
“This operating system is not supported by AutoCAD® Land Desktop 2008”
“You cannot install this product on the current operating system”
“You are attempting to use a 32-bit installer on a 64-bit operating system”
“This is a 32-bit AutoCAD® Land Desktop 2008. It cannot be installed on 64-bit Windows”
You can automatically solve these problems using our Longbow Converter App, it manages the AutoCAD LDT 2008 installation so that you can be up and running again, no problem… Just follow these instructions:
How to install AutoCAD LDT 2008
Obtain your purchased copy of the Longbow Converter here
Start the Converter App and note the user interface
Select the 1st tab named “AutoCAD 32bit Installer Converter“
Using the “. . .” button, selection your AutoCAD installation CD
Next, click the “Convert“ button and follow the App instructions
Once the conversion process is complete
click Install/Run Setup to start setup
Simply install as normal, then…
Make sure to close the setup program when the installation is complete.
Next, switch back in the Converter App and make sure it’s completed the final stage of processing using the “Old AutoCAD Program Reviver” tab
Now run your AutoCAD as normal
Troubleshooting
– If your AutoCAD crashes while interacting with the Ribbon click here
– If you are unable to activate your product, or the activation process crashes:
– If you have crashing problems using the File->Open or File->Save dialogs inside of AutoCAD please read this blog entry on the File->Open or File->Save Crash in AutoCAD
These instructions solve issues around installing/running your AutoCAD C3D 2008 on newer 64bit Windows 7, Windows 8 and Windows 10.
Some more common issues stopping you from using your AutoAD are error messages like these…
“This operating system is not supported by AutoCAD Civil3d 2008”
or
“FATAL ERROR: Unhandled 0x… Exception…”
You can solve all the problems with your AutoCAD C3D 2008 automatically by using our Longbow Converter App, it fixes and manages the AutoCAD C3D 2008 installation so that you can be up and running again.
NOTE: Autodesk no longer supply License Activation codes. Once you have installed your AutoCAD (following the instructions below) you will need to authorize/activate your AutoCAD yourself, find out how by clicking here
How to install Civil3d 2008
Obtain your purchased copy of the Longbow Converter here
Start the Converter App
Insert your AutoCAD C3D CD into your CDRom drive…
Select the 1st tab named “AutoCAD 32bit Installer Converter“
Using the “. . .” button, select your AutoCAD C3D installation CD
Next, click the “Convert“ button and follow instructions
Once the conversion process is complete
click Install/Run Setup to start setup
Simply install as normal, remembering to…
Fully close the AutoCAD setup application once complete
Do not reboot, if prompted
Close the Converter App.
Now run as normal
Installing the AutoCAD Civil3d 2008 Service Packs
Civil3d sp2 (Update 2) already contains sp1, so just install that…
Follow these instructions to solve issues around installing/running your old AutoCAD Mechanical 2005 on Windows 7, Windows 8 and Windows 10
IMPORTANT NOTE: Autodesk no longer supply License Activation codes for this version of AutoCAD. The best way is to transfer your existing license to the new PC but there are other options, we document them here
How to install MDT 2005
Obtain your purchased copy of the Longbow Converter here
Start the Longbow Converter tool
Insert your AutoCAD CD into your CDRom drive
Select the 2nd tab named “Old AutoCAD Installer Reviver“
Using the “…” button, path the to your AutoCAD CD
Click “Run Old Installer”
Read and follow all the prompts
Once the AutoCAD setup starts, stop and read the next step…
In the AutoCAD setup program, navigate through each setup dialog as normal, with these exceptions…
When you arrive at the installation folder path setup dialog…
it’s vitally important to make sure you install to c:\mdt2005 (not Program Files (x86)\AutoCAD Mechanical 2005)
While installing…
If you see an error in install “.NET Runtime Optimization Service has stopped working” – simply ignore by clicking the “Close Program” button
If a message box appears warning that “64bit .NET Unavailable” – simply click OK to carry on and install AutoCAD as normal – this does not affect anything.
Do not reboot if asked to do so
Once installed
Do not reboot if asked to do so
Make sure to fully close the setup program when the installation is complete.
Switch back to the Converter app and make sure it’s completed the final stage of processing using the “Old AutoCAD Program Reviver” tab – it should display “SUCCESS!”
Finally, reboot your PC and run your AutoCAD as normal
NOTE: When starting AutoCAD, if you see a warning dialog when you run saying “This program has known compatibility issues”
Click “Don’t show this message again”
then click “Run the Program…”
Troubleshooting
– If you are unable to activate your product, or the activation crashes:
If all else fails, call Autodesk – they can authorize your software for you; you will need to give them proof of purchase, your serial number and request code.
– If you have crashing problems using the File->Open or File->Save dialogs inside of AutoCAD please read this blog entry on the File->Open or File->Save Crash in AutoCAD
This post solves the various installation problems installing Broderbund’s ‘The Print Shop Deluxe 21’ on Windows 10…
How to install Print Shop Deluxe 21
NOTE: To ensure success, follow the instructions precisely as documented including using the same folder names and paths.
Obtain your purchased copy of the Longbow Reviver App here (you will need V4.26 or newer)
Start the Reviver App and note the user interface
Insert your Print Shop Deluxe CD into the CDRom drive
From the “Old Installer Reviver” tab, use the ‘…’ button to pick your Print Shop Deluxe CD.
Now click the ‘Fix and Run Old Installer‘ button
Follow the instructions for copying the CD
Once the CD is copied the Reviver App will run a process on the copy of the CD, then launch the setup.
Be patient as the process can take up to 45 minutes.
Once the setup appears, stop and read the next step
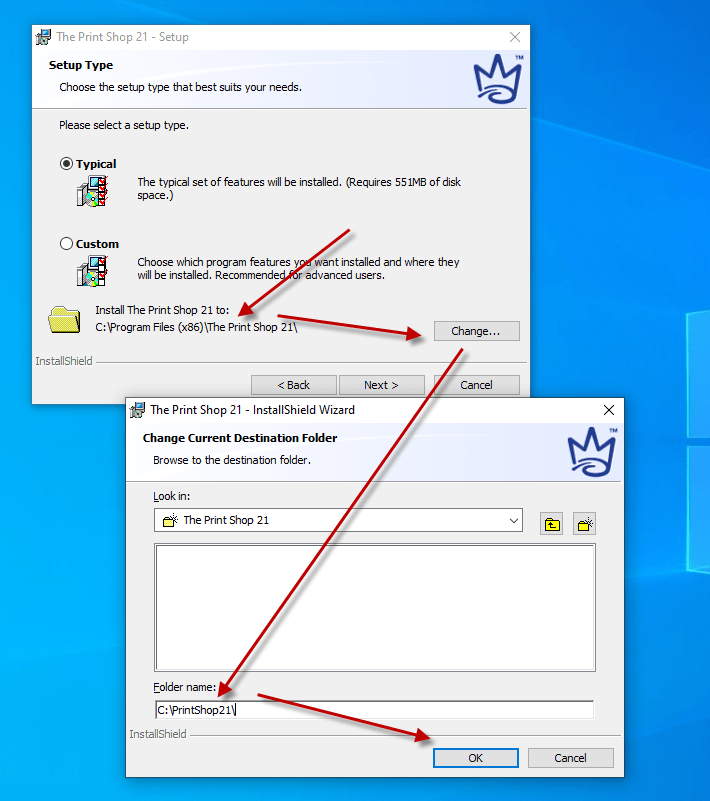
Once the setup application appears, enter your information as normal except when you get to the installation folder…
You **must** change the default path to c:\PrintShop21 (see image below)
do not reboot the PC if prompted to do so
Now complete the setup process
do not reboot if prompted to do so
fully close setup
Now back in the Reviver App…
pick the “Old Program Reviver” tab
Using the ‘…’ button pick the c:\PrintShop21 path
Now click ‘Fix Old Program‘
When it asks if you want to re-register, say Yes
Once the Reviver App displays Success! you will now be able to run your Print Shop
Troubleshooting
The “Save As PDF” feature does not work on 64bit Windows (because the driver installed is 16bit). To get round this issue simply “Print” and select a PDF print driver
These instructions solve issues around installing/running your old AutoCAD Mechanical 2011 on newer versions of 64bit Windows 7, Windows 8 and Windows 10. Some common issues are error messages like these
“This operating system is not supported by AutoCAD® Mechanical 2011”
“You cannot install this product on the current operating system”
“You are attempting to use a 32-bit installer on a 64-bit operating system”
“This is a 32-bit AutoCAD® Mechanical 2011. It cannot be installed on 64-bit Windows”
You can automatically solve these problems using our Longbow Converter App, it fixes and manages the AutoCAD Mechanical 2011 installation so that you can be up and running again… Follow these instructions:
How to install AutoCAD MDT 2011
Obtain your purchased copy of the Longbow Converter here
Start the Converter App and note the user interface
Select the 1st tab named “AutoCAD 32bit Installer Converter“
Using the “. . .” button, selection your AutoCAD installation CD
Next, click the “Convert“ button and follow instructions
Once the conversion process is complete
click Install/Run Setup to start setup
Simply install as normal, remembering to…
Close the setup program when the installation is complete.
Now back in the Converter app and make sure it’s completed the final stage of processing using the “Old AutoCAD Program Reviver” tab
Now run your AutoCAD as normal
NOTE: We highly recommend you install the service packs below
Installing AutoCAD MDT 2011 Service Packs
We recommend that you download and install the latest Service Packs from Autodesk which can be found here
AutoCAD LT 2015 was not designed to run in Windows 10 (Windows 10 was released after AutoCAD LT 2015) and inevitably you will run into issues such as the infamous Ribbon crashing issue, slow startup problems, text scaling issues, etc.
You can automatically solve these problems using our Longbow Converter App, it fixes and manages the AutoCAD LT 2015 installation so that you can be up and running again… Just follow these easy instructions:
How to install 64bit AutoCAD LT 2015
First, uninstall any existing AutoCAD LT 2015 installations on your computer
Next, obtain the Longbow Converter App download here
Start the Converter tool
Pick the 1st tab named “AutoCAD 32bit Installer Converter“
Using your mouse, right-click the tab text “AutoCAD 32bit Installer Converter” so that it changes to “AutoCAD 64bit Installer Converter“
Next, using the “. . .” button, select your AutoCAD installation CD and follow the instructions presented by the Converter tool user interface.
Once the conversion process is complete
click Install/Run Setup to start setup
Once you have completed the AutoCAD installation process…
Completely close the setup program
Go back to the Converter App and make sure it states “Success!“
Now you can run your AutoCAD as normal
Installing AutoCAD LT 2015 sp2
Service Pack 2 also includes all of the updates from Service Pack 1.
– If you have crashing problems using the File->Open or File->Save dialogs inside of AutoCAD please read this blog entry on the File->Open or File->Save Crash in AutoCAD
Apparently, a lot of people are still using Eudora 7 but have lots of issues running on Windows 10. Here’s how to easily get Eudora working on Windows 10, simply use our Longbow Reviver tool (for fixing legacy apps on new versions of Windows)
How to install Eudora
Obtain your purchased copy of the Longbow Reviver App here
Start the Reviver App and note the user interface
Insert your Eudora CD (or copy your Eudora_7.exe setup to c:\EudoraCD)
From the “Old Installer Reviver” tab, use the ‘…’ button to pick the CD (or if you copied your Eudora_7.exe setup then pick the c:\EudoraCD folder).
Now click the ‘Fix and Run Old Installer‘ button
Follow the Reviver App instructions
Once the setup appears, stop and read the next step
Once the setup application appears, go through the setup as normal except when you get to select the installation folder (Destination Install Folder)…
You **must** change the default path to c:\eudora (instead of C:\Program Files (x86)\Qualcomm\Eudora)
Also, do not run Eudora at the end of the setup because an extra step is needed to fix the installed program files.
Once the setup is completed
Make sure setup is closed down
Go back to the Reviver App and wait for Success! to be displayed.
In the Reviver App, pick the “Old Program Reviver” tab
Using the ‘…’ button pick the path c:\eudora
Now click ‘Fix Old Program‘
When the Reviver App asks if you want to re-register, say Yes
Once the Reviver App displays Success! you can run your c:\eudora\eudora.exe happily ever after
This post solves all of the problems related to installing and running ORCAD 9 on 64bit versions of Windows 7, Windows 8 and Windows 10. Common issues are like this one shown below which prevents installation…
Windows 16bit setup error – This app can’t run on your PC
How to install ORCAD 9
Obtain your purchased copy of the Longbow Reviver App here (you will need V4.25 or newer)
Start the Reviver App and note the user interface
Insert your ORCAD CD
From the “Old Installer Reviver” tab, use the ‘…’ button to pick your ORCAD CD.
Now click the ‘Fix and Run Old Installer‘ button
Follow the instructions for copying the CD
Once the CD is copied the Reviver App will run a process on the copy of the CD, then launch the setup.
Be patient as the process can take up to 45 minutes.
Once the setup appears, stop and read the next step
Once the setup application appears, go through the setup as normal except when you get to select the installation folder (Destination Directory)…
You **must** change the default path to c:\orcad9
do not run ORCAD at the end of the setup because an extra step is needed to fix the program files.
Once the setup is completed, go back to the Reviver App and wait for Success! to be displayed.
Finally, back in the Reviver App, pick the “Old Program Reviver” tab
Using the ‘…’ button pick the c:\orcad9 path
Now click ‘Fix Old Program‘
When the Reviver App asks if you want to re-register, say Yes
Once the Reviver App displays Success! you can run your c:\orcad9 happily ever after.
You may be running into various errors when you install your InstaForm on Windows 10, example…
Application Terminated: Error: Null object reference at line ….
It is possible to install Nova’s InstaForm Invoices & Estimates Pro 2.0 on Windows 10 and make it work just fine, just follow these instructions…
How to install Invoices & Estimates Pro 2.0
You will need to obtain the Longbow Reviver App from here
Using Windows Explorer, copy your entire InstaForm Invoices & Estimates Pro 2.0 CD to your hard drive, copy to a folder path c:\CDs\InstaForm
Start the Longbow Reviver App…
Select the 1st tab named “Old Installer Reviver” and using the ‘…’ button pick the C:\CDs\InstaForm\NXW folder
Next, click the ‘Fix and Run Old Installer’ button
Read and understand all the prompts that appear, then continue by clicking OK.
Install as normal, except:
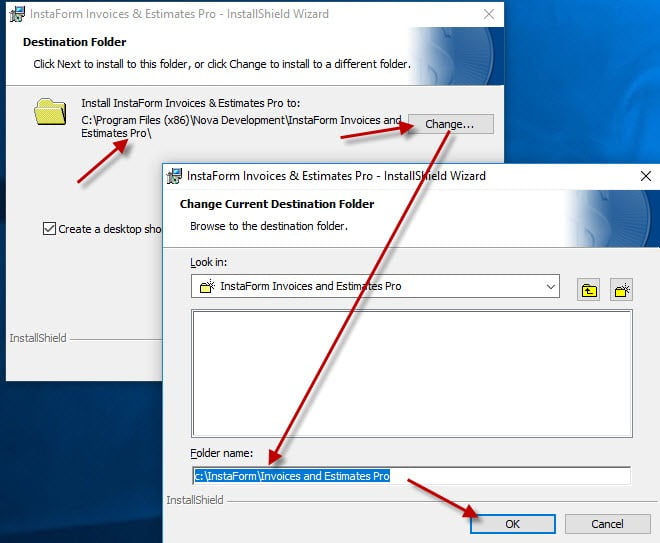
Be sure to install to precisely to this folder – c:\InstaForm\Invoices and Estimates Pro – not the folder prompted in setup which installs to Program Files…
Close setup – Do not reboot if prompted to do so
You must not install to Program Files
Now InstaForm Invoices & Estimates Pro 2.0 is installed, but we need to fix the program files…
Go back to the Longbow Reviver app…
Select the 2nd tab “Old Program Reviver” and using the ‘…’ button pick the newly installed folder c:\InstaForm\Invoices and Estimates Pro
Set the “Run As” dropdown to Windows XP sp2
Next, click ‘Fix Old Program’ then click ‘YES’ if the Reviver tool asks if you want to re-register…
Now you can happily run your InstaForm Invoices & Estimates Pro 2.0 on Windows 10!
AutoCAD Electrical 2012 was not designed to run in Windows 10 (Windows 10 was released after AutoCAD 2012) and inevitably you will run into issues such as the infamous Ribbon crashing issue, slow startup problems, text scaling issues, etc.
You can automatically solve these problems using our Longbow Converter App, it fixes and manages the AutoCAD Electrical 2012 installation so that you can be up and running again… Just follow these easy instructions:
How to install AutoCAD Electrical 2012
First, uninstall any existing AutoCAD Electrical 2012 installations on your computer
Next obtain a copy of the Longbow Converter App, download here
Start the Converter tool
Pick the 1st tab named “AutoCAD 32bit Installer Converter“
Using your mouse, click the “32bit” button so that it changes to “AutoCAD 64bit Installer Converter“
Next, using the “. . .” button, select your AutoCAD installation CD and follow the instructions presented by the Converter tool user interface.
Once the conversion process is complete
click Install/Run Setup to start setup
Once you have completed the AutoCAD installation process…
Completely close the setup program
Go back to the Converter App and make sure it states “Success!”
Now you can run your AutoCAD as normal
Troubleshooting
– If you are unable to activate your product, or the activation process crashes:
– If you have crashing problems using the File->Open or File->Save dialogs inside of AutoCAD please read this blog entry on the File->Open or File->Save Crash in AutoCAD
While installing AutoCAD you may run into a blocking issue whereby the DirectX runtime (which AutoCAD relies upon for its hardware 3D capability) fails to install for some reason (Error 1603). Solutions posted on Autodesk website show how to edit the setup.ini file to try and solve this issue, however, upon doing so you get a new error, for instance…
“Error: Please install DirectX before installing AutoCAD MEP 2013”
You can easily solve this issue (and others) by installing your AutoCAD using the Longbow Converter App. It manages the install and bypasses all issues like these automatically so you can be up and running again. You will need V11.19 or newer of the Converter App). But be aware of these caveats:
The Converter will allow you to ignore the DirectX failure and allow AutoCAD to correctly install, but DirectX won’t be installed. This means that:
2D will work fine
3D will fine, but only in Software mode (slower)
Everytime you start AutoCAD you will get a Heidi error, like this one…
“…the configured heidi driver cannot be loaded…“
to stop this, in AutoCAD, right click the Command Line->Options->System->Graphics Performance->HardWare Acceleration: Turn off
While attempting to install MapTech’s Terrain Navigator Professional on 64bit Windows 7, 8 or 10 you receive this error…
Windows 16bit setup error – This app can’t run on your PC
You can solve the problem with our Longbow Reviver solution
How to install Terrain Navigator Pro
First you need to purchase the Longbow Reviver here – sorry, it’s not free
Insert your Terrain Navigator CD into your computer
Next, start In the Reviver App
Click on the 1st tab named “Old Installer Reviver“
Using the “. . .” button, pick the path to the CD
Now click “Fix and Run Old installer”
Follow the on screen prompts…
BE PATIENT – Terrain Navigator Setup may take up to 90 minutes to start, when it does stop and read the next step
Once the Terrain Navigator Pro setup starts up
install as normal except when prompted for the installation path, don’t install to c:\Program Files\Maptech\Terrain Navigator Pro but instead install to c:\Maptech\Terrain Navigator Pro as shown below…
c:\Maptech\Terrain Navigator Pro as shown above
Once setup is complete, you can now happily run c:\Maptech\Terrain Navigator Pro\Terpro\terpro.exe
Recently, I had problems installing Office 2007 on Windows 10 64bit… The issue was unexplained; Office 2007 setup simply “failed installing PowerPoint” and then just gave up without any error messages. So here’s what I did to solve it:
How to install Office 2007
First step, purchase this tool, the Longbow Reviver here – sorry, it’s not free 🙁
Insert the Microsoft Office CD into your computer
Next, start In the Reviver App
Click on the tab named “Old Program Reviver“
Using the “. . .” button, pick the path to the CD
Select “Windows Vista” from the “Run As” dropdown
Now click “Fix Old Program“
Once the Reviver tool has completed, run setup.exe from the Microsoft CD to install as normal