Installing AutoCAD R14 Architectural Desktop (ADT) on Windows 7, Windows 8 and Windows 10

NOTE: We have had the best success installing this product using our Converter solution on Windows 8 and Windows 10, in fact, we strongly advise using Windows 10 for this product.

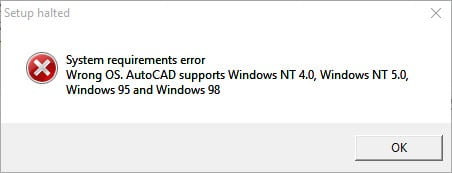
Installing your AutoCAD Architectural Desktop (R14.01) on Windows 7, Windows 8, Windows 8.1 or Windows 10 32bit or 64bit can be very easily defined in these short steps…

NOTE: These steps do not bypass normal Autodesk licensing/authorization, you should expect to use your own serial numbers in the normal way.

A quick word of advice: best to follow the instructions below precisely and to the letter, including folder names and paths, that way you will reduce the risk of having any problems…

  1. Obtain your copy of the Longbow Converter here
  2. Start the Longbow Converter tool
    1. select the 2nd tab named “Old AutoCAD Installer Reviver
    2. Using the ‘…’ button pick your AutoCAD ADT R14 CD and follow the instructions
    3. Be patient – expect to wait at least 45 minutes for your AutoCAD R14 setup.exe program to appear.
    4. Once the setup starts, stop and read the next step…
  3. In the setup program, navigate through each setup dialog as normal, except when you get to the installation folder, **it’s vitally important to make sure you install to c:\adtR14 (not .\AutoCAD or .\AutoCAD Architectural Desktop as usually prompted)**
    1. Now carry on with the install (do not reboot once the install is complete). Ignore any errors related to not being able to “…create the folder ‘AutoCAD Architectural Desktop'”, you will have to create a shortcut on your computer Desktop to your c:\adtR14\acad.exe by hand.
    2. Do not reboot if prompted to do so
  4. Once setup has finished
    1. go back to the Converter tool
    2. select the 3rd tab named “Old AutoCAD Program Reviver
    3. pick the newly installed c:\adtR14 folder and click “Fix Old Program
  5. Finally, create a shortcut to c:\adtR14\acad.exe – make sure the shortcut Target: is set to C:\adtR14\acad.exe /p “C:\adtR14\Desktop.arg”
  6. Now you can happily run your AutoCAD Architectural Desktop R14 on Windows 7, Windows 8, Windows 8.1 or Windows 10 32bit or 64bit
Troubleshooting:
  • If you are getting either a Bad Mem Pointer error and or a Smartheap handler recursively re-entered error when you start your AutoCAD Architectural Desktop then you need to re-run all the steps above, taking care to do each step precisely as it says.
  • If you are getting a WinHelp() error when pressing F1 to try and access the Help system then simply install the WinHelp (WinHlp32.exe) module from Microsoft
  • Issues with Calcomp Digitizer – Calcomp Digitizer not working 
  • If you have crashing problems using the File->Open or File->Save dialogs inside of AutoCAD please read this blog entry on the File->Open or File->Save Crash in AutoCAD
Copyright 2018 (c) Longbow Software

Installing plotupdate.exe for AutoCAD 2000 on 64bit Windows 7, Windows 8 and Windows 10

If you are receiving either an “Out of memory” or “Memory allocation error” while trying to plot inside of AutoCAD 2000, then you are most likely missing the AutoCAD 2000 patch called “plotupdate”.

This blog documents how to install the “plotupdate” patch on Windows7, Windows 8, Windows 8.1 and Windows 10 64bit. NOTE: You will have needed to install AutoCAD 2000 first

Here is the English readme for the AutoCAD 2000 plotupdate patch which explains what it specifically addresses. Click here for French, German, Italian and Spanish readme for plotupdate.exe

Here’s how to patch your AutoCAD 2000 with the plotupdate.exe

  1. Obtain your copy of the Longbow Converter here
  2. Next download the Plotupdate.exe for AutoCAD 2000 zip and unzip to the folder c:\Autodesk, it will unzip to c:\Autodesk\Plotupdate2000
    1. Note: Click here for French, German, Italian and Spanish plotupdate.exe
  3. Start the Longbow Converter tool
    1. Next, select the 2nd tab named ‘Old AutoCAD Installer Reviver
    2. Using the ‘…’ button select the path c:\Autodesk\Plotupdate2000 then click the ‘Run Old Installer‘ button
    3. When asked “Is this an installation media, a service pack/update or plug-in/app for AutoCAD?” say Yes
    4. Next, read and understand all the prompts before pressing OK… Now, I know it’s unheard of these days, but at this point expect to wait at least 45 minutes for the AutoCAD 2000 Plotupdate setup.exe program to appear.
    5. Once the setup starts, install as normal (simply accept all defaults).
  4. Now run your AutoCAD 2000 and plot as normal
    1. Important Tip: You can add new Plotters using the c:\acad2000\addplwiz.exe

Troubleshooting

If your PlotUpdate setup is not starting after 45 minutes

  • try rebooting, then restart the steps above. If it is still failing, most likely it’s because of another application on your system which is preventing our setup routine from starting (perhaps anti-virus, or similar)

If you still can’t get your plotter to work

  • Make sure your Anti-virus and/or Windows Firewall is not blocking splwow64.exe
    • Make sure your Anti-virus and/or Windows Firewall is not blocking splwow64.exe 
    • If the problem persists, you have 2 options
      • Install Autodesk’s free DWGTrueview App which allows full plotting using the latest version of AutoCAD 
      • Fix your AutoCAD 2000 install…
        • start the Converter App
        • Select the 3d tab “Old AutoCAD Program Reviver” 
        • Click the Tools Menu->Reduced Power Mode
        • Using the “…” button, pick your acad.exe folder e.g. c:\acad2000
        • Click “Fix Old Program” and follow prompts

Copyright 2019 (c) Longbow Software

Installing Softdesk 8 Imaging for AutoCAD R14 on Windows 7, Windows 8 and Windows 10

NOTE: We have had the best success installing this product using our Converter solution on Windows 8 and Windows 10

Installing Softdesk 8 Imaging for AutoCAD R14 on Windows 7, Windows 8, Windows 8.1 and Windows 10 32bit or 64bit can be very easily defined in these short steps.

A quick word of advice: best to follow the instructions below precisely and to the letter, including folder names and paths, that way you will reduce the risk of having any problems…

  1. First, obtain your copy of the Longbow Converter here
  2. Install your AutoCAD R14 by carefully following the steps detailed here
  3. Using Windows Explorer, copy your entire Softdesk 8 Imaging CD contents to your hard drive, to a folder path c:\Autodesk\imagingR14
  4. Start the Longbow Converter tool, select the 2nd tab, pick the c:\Autodesk\imagingR14 folder, and click Run.
    1. When asked “Is this an installation media, a service pack/update or plug-in/app for AutoCAD?” say Yes
    2. Next, read and understand all the prompts before pressing OK… Now, I know it’s unheard of these days, but at this point expect to wait at least 45 minutes for your Softdesk setup.exe program to appear. Once the setup starts, install as normal (simply accept all defaults).
  5. Next, start your AutoCAD R14. Once AutoCAD starts up fully, simply type preferences at the command line, select the Profiles tab, double click the Softdesk profile and make it the Current Profile. Finally, OK out of the preferences dialog.
  6. Now you can happily run your Softdesk 8 Imaging inside of AutoCAD R14 on Windows 7, Windows 8, Windows 8.1 or Windows 10 32bit or 64bit

Troubleshooting

If your setup is not starting after 45 minutes, try rebooting, then restart the steps above.

  • If it is still failing, most likely it’s because of another application on your system which is preventing our setup routine from starting (perhaps anti-virus, or similar) – try installing from Windows Safe Mode
Copyright 2015 (c) Longbow Software

Installing Autodesk Mechanical Desktop 3 on Windows 7, Windows 8 and Windows 10

NOTE: We have had the best success installing this product using our Converter solution on Windows 8 and Windows 10


Installing your Autodesk Mechanical Desktop R3 (otherwise known as MDT 3 and built on the AutoCAD R14.01 platform) on Windows 7, Windows 8, Windows 8.1 and Windows 10 32bit or 64bit can be very easily defined in these short steps…

Instructions on installing Autodesk Mechanical R2 can be found here…

NOTE: These steps do not bypass normal Autodesk licensing/authorization, you should expect to use your own serial numbers in the normal way.

A quick word of advice: best to follow the instructions below precisely and to the letter, including folder names and paths, that way you will reduce the risk of having any problems…
  1. Obtain your copy of the Longbow Converter here
  2. Using Windows Explorer, copy your entire MDT 3 CD to your hard drive, to a folder path c:\Autodesk\mdt3R14
  3. Start the Longbow Converter tool
    1. select the 2nd tab named “Old AutoCAD Installer Reviver
    2. pick the c:\Autodesk\mdt3R14 folder and click the “Run Old Installer” button.
      1. Read and understand all the prompts before pressing OK.
      2. Now, I know it’s unheard of these days, but at this point expect to wait up to 45 minutes for your Mechanical 3 setup.exe program to appear.
      3. Once the setup starts, stop and read the next step…
  4. In the setup program…
    1. navigate through each setup dialog as normal **except** when you get to the installation folder, **it’s vitally important to make sure you install to c:\mdt3R14 (not .\Mechanical as usually prompted)**
  5. Now carry on with the install…
    1. Do not reboot once the install is complete.
    2. Ignore any errors related to not being able to create the shortcut folder “Autodesk Mechanical 3”, you will have to create a shortcut on your computer Desktop pointing to your c:\mdt3R14\acad.exe by hand.
    3. You will also be prompted that Adobe reader 3.01 needs to be installed – when you press OK, again, expect to wait up to 45 minutes for the Adobe setup.exe program to appear install as normal accepting all defaults this time.
    4. Again, do not reboot if prompted to do so…
  6. Once installed, go back to the Converter tool…
    1. select the 3rd tab named “Old AutoCAD Program Reviver
    2. pick the newly installed c:\mdt3R14 folder and click “Fix Old Program“.
  7. At this point, you can actually run AutoCAD, simply run c:\mdt3R14\acad.exe using Windows Explorer… However…
  8. You will notice that you are running raw AutoCAD, to enable your Mechanical Desktop features, carry out these next steps, either…
    1. Add a shortcut (recommended) to C:\mdt3R14\acad.exe making sure that the Target Property of the shortcut is set to:C:\mdt3R14\acad.exe  /p C:\mdt3R14\desktop\desktop.arg
    2. or update your AutoCAD support path by hand…
      1. At the AutoCAD Command line, type the command ‘Preferences’, add new Support path folders c:\mdt3R14\acadm and then also c:\mdt3R14\acadm\support, now click ‘Apply’ and then ‘OK’ out of the dialog.
      2. Next, restart AutoCAD.
      3. When you are back in AutoCAD, type ‘Menuload’ at the command line, click browse, then navigate to C:\mdt3R14\acadm\support, change the file filter at the bottom to *.mnu, then open acadm.mnu, finally click Load, then pick Close.
      4. Now restart AutoCAD
  9. Now you can happily run your Autodesk Mechanical Desktop 3 on Windows 7, Windows 8, Windows 8.1 and Windows 10 32bit or 64bit
Troubleshooting:
Copyright 2017 (c) Longbow Software

Installing Ulead PhotoImpact 11 on Windows 10, Windows 7, Windows 8 and Windows 8.1

This blog post is specifically for installing Ulead PhotoImpact 11 on Windows 10, Windows 7, Windows 8 and Windows 8.1 both 32bit and 64bit.

For instructions on installing Ulead PhotoImpact 10 on Windows 10, Windows 7, Windows 8 and Windows 8.1 click here

Installing PhotoImpact 11 on Windows 10, Windows 7, Windows 8 or Windows 8.1 can be very easily defined in these short steps. NOTE: Be sure to use exactly same folder paths as specified below in order to ensure a clean install.

  1. Obtain your copy of the Longbow Reviver here
  2. Using Windows Explorer, copy your PhotoImpact 11 installation CD to c:\PhotoImpact11CD
    1. If your PhotoImpact 11 installation consists of a single file called “Ulead PI 11.exe“, then once you have copied it to c:\PhotoImpact11CD simply rename it to setup.exe
  3. Start the Longbow Reviver tool, select the first tab “Old Installer Reviver” tab, pick the newly copied c:\PhotoImpact10CD folder, then click the Fix and Run Old Installer button. Once completed, read and understand all messages from the Reviver tool…
  4. Next, your PhotoImpact 11 setup will startup and take you through the normal install process with this exception…
    1. When asked, make sure you install PhotoImpact 11 to c:\Ulead\PhotoImpact11 (not C:\Program Files (x86)\Ulead Systems\Ulead PhotoImpact 11)
  5. Once installed, be sure to close the PhotoImpact 11 main setup as the Reviver tool is waiting for it to close before allowing you to move to the next step.
  6. Now go back to the Reviver tool, select the 2nd tab “Old Program Reviver”, pick the newly installed c:\Ulead\PhotoImpact11 folder, then click “Fix Old Program“. If asked “Do you want to me to re-register your Program’s components…”, say No…
  7. Install the PhotoImpact 11 patch from here upi11 patch
  8. Next, start PhotoImpact 11
    1. if a dialog window appears on first launch which appears to hang the system, simply use task manager to End Process PhotoImpact 11 (restarting PhotoImpact 11 will now work)
    2. if the application hangs on first launch, simply use task manager to End Process PhotoImpact 11 (restarting PhotoImpact 11 will now work)
  9. You can now run your Ulead PhotoImpact 11 on Windows 10, Windows 7, Windows 8 and Windows 8.1 64bit
Copyright 2015 (c) Longbow Software

Installing Ulead PhotoImpact 10 on Windows 10, Windows 7, Windows 8 and Windows 8.1

This blog post is specifically for installing Ulead PhotoImpact 10, Ulead Photo Explorer 8.5 and Ulead COOL 360 on Windows 10, Windows 7, Windows 8 and Windows 8.1 both 32bit and 64bit (including

For instructions on installing Ulead PhotoImpact 11 on Windows 10, Windows 7, Windows 8 and Windows 8.1 click here

Installing PhotoImpact 10 on Windows 7, Windows 8 or Windows 8.1 can be very easily defined in these short steps. NOTE: Be sure to use exactly same folder paths as specified below in order to ensure a clean install.

  1. Obtain your copy of the Longbow Reviver here
  2. Using Windows Explorer, copy your PhotoImpact 10 installation CD to c:\PhotoImpact10CD
  3. Start the Longbow Reviver tool, select the first tab “Old Installer Reviver” tab, pick the newly copied c:\PhotoImpact10CD folder, then click the Fix and Run Old Installer button
  4. Once completed, read and understand all messages from the Reviver tool…
  5. Next, your PhotoImpact 10 setup will startup and take you through the normal install process with these exceptions..
    1. When asked, make sure you install PhotoImpact 10 to c:\Ulead\PhotoImpact10 (not C:\Program Files (x86)\Ulead Systems\Ulead PhotoImpact 10)
    2. When asked, make sure you install Photo Explorer 8.5 to c:\Ulead\PhotoExplorer85 (not C:\Program Files (x86)\Ulead Systems\Ulead Photo Explorer 8.5)
    3. When asked, make sure you install COOL 360 to c:\Ulead\Cool360 (not C:\Program Files (x86)\Ulead Systems\Ulead COOL 360)
  6. Once installed, be sure to close the PhotoImpact 10 main setup as the Reviver tool is waiting for it to close before allowing you to move to the next step.
  7. Finally, go back to the Reviver tool, select the 2nd tab “Old Program Reviver”, pick the newly installed c:\Ulead folder, then click “Fix Old Program“. If asked “Do you want to me to re-register your Program’s components…”, say No…
  8. You can now run your Ulead PhotoImpact 10, Ulead Photo Explorer 8.5 and Ulead COOL 360 Windows 10, Windows 7, Windows 8 and Windows 8.1 64bit
Copyright 2015 (c) Longbow Software

Installing Sheridan Developers Toolkit on 64bit Windows 10, Windows 7, Windows 8 and Windows 8.1

This blog post is specifically for installing Sheridan’s Developer Toolkit on 64bit Windows 10, Windows 7, Windows 8 and Windows 8.1.

For instructions on installing Sheridan’s Developer Toolkit on 32bit Windows 10, Windows 7, 8 and 8.1 click here

This blog specifically deals with installing ActiveTreeView, ActiveListBar, ActiveThread on 64bit Windows but it’s the same process for CalendarWidgets, Data Widgets and Design Widgets…

Installing Sheridan’s Developer Toolkit on 64bit Windows 10, Windows 7, Windows 8 or Windows 8.1 can be very easily defined in these short steps.

  1. Obtain your copy of the Longbow Reviver here
  2. Using Windows Explorer, copy your Sheridan install files from your old Windows XP machine’s c:\Sheridan folder onto a USB drive (or similar) then transfer the files onto your the new 64bit computer in exactly the same folder, c:\Sheridan
  3. Start the Longbow Reviver tool, select the “Old Program Reviver” tab, pick the newly copied c:\Sheridan folder, then click Fix Old Program
  4. When asked: “Do you want me to re-register your program’s components?” – say Yes
  5. Next, create a .reg file with these contents (see just below and example .reg file) – update the text <YOUR_SERIAL_NUMBER> to your supplied serial number, e.g. 111001000089898232 – you should also fill in MyCompanyName and MyUserName in order to fulfil Sheridan’s registration requirements.Windows Registry Editor Version 5.00

    [HKEY_LOCAL_MACHINE\SOFTWARE\Classes]

    [HKEY_LOCAL_MACHINE\SOFTWARE\Classes\Sheridan.ActiveListBar.ActiveX]
    @=””

    [HKEY_LOCAL_MACHINE\SOFTWARE\Classes\Sheridan.ActiveListBar.ActiveX\Version1]
    @=””

    [HKEY_LOCAL_MACHINE\SOFTWARE\Classes\Sheridan.ActiveListBar.ActiveX\Version1\CompanyName]
    @=”MyCompanyName”

    [HKEY_LOCAL_MACHINE\SOFTWARE\Classes\Sheridan.ActiveListBar.ActiveX\Version1\HelpFileDir]
    @=”C:\\Sheridan\\ActiveListBar\\HELP”

    [HKEY_LOCAL_MACHINE\SOFTWARE\Classes\Sheridan.ActiveListBar.ActiveX\Version1\InstallDir]
    @=”C:\\Sheridan\\ActiveListBar”

    [HKEY_LOCAL_MACHINE\SOFTWARE\Classes\Sheridan.ActiveListBar.ActiveX\Version1\ProductID]
    @=”{C6A130B1-1C72-499B-00BE-4923E28C4ED3}”

    [HKEY_LOCAL_MACHINE\SOFTWARE\Classes\Sheridan.ActiveListBar.ActiveX\Version1\SerialNumber]
    @=”<YOUR_SERIAL_NUMBER>”

    [HKEY_LOCAL_MACHINE\SOFTWARE\Classes\Sheridan.ActiveListBar.ActiveX\Version1\UserName]
    @=”MyUserName”

    [HKEY_LOCAL_MACHINE\SOFTWARE\Classes\Sheridan.ActiveThreed.ActiveX]
    @=””

    [HKEY_LOCAL_MACHINE\SOFTWARE\Classes\Sheridan.ActiveThreed.ActiveX\Version2]
    @=””

    [HKEY_LOCAL_MACHINE\SOFTWARE\Classes\Sheridan.ActiveThreed.ActiveX\Version2\CompanyName]
    @=”MyCompanyName”

    [HKEY_LOCAL_MACHINE\SOFTWARE\Classes\Sheridan.ActiveThreed.ActiveX\Version2\HelpFileDir]
    @=”C:\\Sheridan\\ActiveThreed\\HELP”

    [HKEY_LOCAL_MACHINE\SOFTWARE\Classes\Sheridan.ActiveThreed.ActiveX\Version2\InstallDir]
    @=”C:\\Sheridan\\ActiveThreed”

    [HKEY_LOCAL_MACHINE\SOFTWARE\Classes\Sheridan.ActiveThreed.ActiveX\Version2\SerialNumber]
    @=”<YOUR_SERIAL_NUMBER>”

    [HKEY_LOCAL_MACHINE\SOFTWARE\Classes\Sheridan.ActiveThreed.ActiveX\Version2\UserName]
    @=”MyUserName”

    [HKEY_LOCAL_MACHINE\SOFTWARE\Classes\Sheridan.ActiveTreeView.ActiveX]
    @=””

    [HKEY_LOCAL_MACHINE\SOFTWARE\Classes\Sheridan.ActiveTreeView.ActiveX\Version1]
    @=””

    [HKEY_LOCAL_MACHINE\SOFTWARE\Classes\Sheridan.ActiveTreeView.ActiveX\Version1\CompanyName]
    @=”MyCompanyName”

    [HKEY_LOCAL_MACHINE\SOFTWARE\Classes\Sheridan.ActiveTreeView.ActiveX\Version1\HelpFileDir]
    @=”C:\\Sheridan\\ActiveTreeView\\HELP”

    [HKEY_LOCAL_MACHINE\SOFTWARE\Classes\Sheridan.ActiveTreeView.ActiveX\Version1\InstallDir]
    @=”C:\\Sheridan\\ActiveTreeView”

    [HKEY_LOCAL_MACHINE\SOFTWARE\Classes\Sheridan.ActiveTreeView.ActiveX\Version1\ProductID]
    @=”{73174DE2-B54E-721E-5C27-4B8CD2C558A1}”

    [HKEY_LOCAL_MACHINE\SOFTWARE\Classes\Sheridan.ActiveTreeView.ActiveX\Version1\SerialNumber]
    @=”<YOUR_SERIAL_NUMBER>”

    [HKEY_LOCAL_MACHINE\SOFTWARE\Classes\Sheridan.ActiveTreeView.ActiveX\Version1\UserName]
    @=”MyUserName”

  6. Once you have created the .reg file, let’s say it’s called Sheridan.reg – simply double click on it using Windows Explorer – it will ask “Are you sure you want to continue?” say Yes. A success message should appear.
  7. Your Sheridan’s Developer Toolkit is now ready for use on Windows 10, Windows 7, Windows 8 and Windows 8.1 64bit
Copyright 2015 (c) Longbow Software

Installing Robolab Lego RCX Mindstorms on Windows 10, Windows 7, Windows 8 and Windows 8.1

This blog post is specifically for installing Robolab Lego RCX on Windows 7, Windows 8 and Windows 8.1…

Installing Lego RCX Windows 10, Windows 7, Windows 8 or Windows 8.1 can be very easily defined in these short steps.

  1. Obtain your copy of the Longbow Reviver here
  2. Using Windows Explorer, copy your Lego RCX  CD to c:\RobolabCD
  3. Rename the PC-Install.exe to setup.exe
  4. Now, start the Longbow Reviver tool, on the “Old Installer Reviver” tab click the “Disable Windows 64bit Device Driver Signing Verification” checkbox, so that it is set.
  5. Now reboot.
  6. When your computer has started up again, start the Longbow Reviver tool again, select the “Old Installer Reviver” tab, pick the c:\RobolabCD folder then click the Fix and Run Old Installer button.
  7. Once the conversion process is complete, the Robolab installer dialog will appear. Simply install as normal to the normal c:\Robolab folder.
  8. Once the installation process is complete, make sure you fully quit the Robolab installer then switch back to the Longbow Reviver tool, select the “Old Program Reviver” tab, pick the newly installed c:\Robolab folder, then click Fix Old Program
  9. Your Robolab Lego RCX is now ready for use.
Copyright 2015 (c) Longbow Software

Installing Sheridan Developers Toolkit on 32bit Windows 10, Windows 7, Windows 8 and Windows 8.1

This blog post is specifically for installing Sheridan’s Developer Toolkit on 32bit (for 64bit Sheridan Developer Toolkit installation click here) Windows 10, Windows 7, Windows 8 and Windows 8.1 – products VBAssist, ClassAssist, sp_Assist, ActiveTreeView, ActiveListBar, ActiveThread, CalendarWidgets, Data Widgets and Design Widgets…

Installing Sheridan’s Developer Toolkit on 32bit (not 64bit) Windows 7, Windows 8 or Windows 8.1 can be very easily defined in these short steps.

  1. Obtain your copy of the Longbow Reviver here
  2. Using Windows Explorer, copy your Sheridan CD to c:\SheridanCD
  3. Now, start the Longbow Reviver tool, select the 1st tab, pick the c:\SheridanCD folder then click the Fix and Run Old Installer button.
  4. Once the conversion process is complete, the Sheridan Developer Toolkit installer dialog will appear. Simply install as normal to the normal c:\Sheridan folder.
  5. Once the installation process is complete, make sure you fully quit the Sheridan installer then switch back to the Longbow Reviver tool, select “Old Program Reviver” tab, pick the newly installed c:\Sheridan folder, then click Fix Old Program
  6. Your Sheridan’s Developer Toolkit is now ready for use.
Copyright 2015 (c) Longbow Software

Installing Land Desktop 3 (LDT 2002) on Windows 7, Windows 8 and Windows 10

Installing Land Desktop 3 (LDT 2002) on Windows 7, Windows 8 or Windows 10 32bit or 64bit can be very easily defined in these short steps…

NOTE: These steps do not bypass normal Autodesk licensing/authorization, you should expect to use your own serial numbers in the normal way.

It is recommended that you follow these steps precisely as documented so as to eliminate the risk of something going wrong with the install…

Obtain your copy of the Longbow Converter here

How to install Land Desktop 2002 

  1. Obtain your copy of the Longbow Converter here
  2. Insert your LDT 2002 CD into your computer
  3. This image has an empty alt attribute; its file name is ProblemSolved-1.pngStart the Longbow Converter tool
    1. Select the 2nd tab named “Old AutoCAD Installer Reviver”
    2. Using the “. . .” button, pick your LDT 2002 CD ROM
      1. Now click the “Run Old Installer” button
      2. Next, just follow the Converter’s instructions.
    3. Once the AutoCAD setup starts, stop and read the next step
  4. In the setup program, navigate through each setup dialog as normal, except when you get to the installation folder **it’s vitally important to make sure you install to c:\ldt2002 (not Program Files (x86)\Autodesk Land Desktop 3 as usually prompted by default)**
    1. Now carry on with the install as usual
    2. Do not reboot if asked to do so
  5. Once installed…
    1. Be sure to completely close the setup application
    2. Now go back to the Converter app and make sure it’s completed the final stage of processing using the “Old AutoCAD Program Reviver” tab, it should say SUCCESS!!
    3. Finally, reboot your PC and run your AutoCAD as normal
  6. Now you can happily run your LDT 2002!

Installing LDT 3 Service Packs

You must first install sp1, followed by sp2…

LDT 3 sp1 – software lock/unlocked with html documentation

LDT 3 sp2 – software lock/unlocked with html documentation 

  1. Unzip the sp1 into a folder called c:\Autodesk\LDT3 sp1
  2. Next, start the Converter, select the 3rd tab “Old AutoCAD Program Reviver” select the c:\Autodesk\LDT3 sp1 folder, then click Fix.
    1. If asked if this is a service pack by the Converter tool, say yes.
  3. Now run the sp1 as you need from Windows Explorer.
  4. Repeat for sp2

Installing Civil Design 3

Using the Longbow Converter solution, you can also install the Civil Design add-on to LDT 3.

  1. Using Windows Explorer, copy your entire Civil Design 3 CD to your hard drive, to a folder path c:\Autodesk\ldt2002 – Civil Design 3 
  2. Start the Longbow Converter tool, select the 2nd tab, pick the c:\Autodesk\ldt2002 – Civil Design 3 folder, and click Run. Read and understand all the prompts before pressing OK. Once the setup starts, stop and read the next step…
  3. In the setup program, navigate through each setup dialog as normal
  4. Now your Civil Design 3 is up and running with LDT.

Installing Survey 3

Using the Longbow Converter solution, you can also install the Survey add-on to LDT 3.

  1. Using Windows Explorer, copy your entire Survey 3 CD to your hard drive, to a folder path c:\Autodesk\ldt2002 – Survey 3 
  2. Start the Longbow Converter tool, select the 2nd tab, pick the c:\Autodesk\ldt2002 – Survey 3 folder, and click Run. Read and understand all the prompts before pressing OK. Once the setup starts, stop and read the next step…
  3. In the setup program, navigate through each setup dialog as normal
  4. Now your Survey 3 is up and running with LDT.

Installing Raster Design 3

Using the Longbow Converter solution, you can also install the Raster Design add-on to LDT 3.

  1. Using Windows Explorer, copy your entire Survey 3 CD to your hard drive, to a folder path c:\Autodesk\ldt2002 – Raster Design 3 
  2. Start the Longbow Converter tool, select the 2nd tab, pick the c:\Autodesk\ldt2002 – Raster Design 3 folder, and click Run. Read and understand all the prompts before pressing OK. Once the setup starts, stop and read the next step…
  3. In the setup program, navigate through each setup dialog as normal
  4. Now your Raster Design 3 is up and running with LDT.

Troubleshooting

Copyright 2021 (c) Longbow Software

Installing AutoCAD LT 2000 on Windows 7, Windows 8 and Windows 10

Most users of AutoCAD LT 2000 are so used to it that they cannot do without it. With the latest hardware and required move to newer Windows versions, trying to install your AutoCAD LT 2000 gives an error like this one…

Windows 16bit setup error - This app can't run on your PC

Windows 16bit setup error – This app can’t run on your PC

Or maybe this error…

Setup Halted System requirements error Wrong OS, AutoCAD supports Windows NT 4.0, Windows NT 5.0, Windows 95 and Windows 98

Error while trying to install AutoCAD LT 2000 on newer versions of Windows

…all is not lost, just read on…

How to install AutoCAD LT 2000

A quick word of advice: best to follow the instructions below precisely and to the letter, including folder names and paths, that way you will reduce the risk of having any problems…
  1. Obtain your copy of the Longbow Converter here
    1. Before starting, we recommend turning off Windows UAC
  2. Once you have installed the Converter App, start by double clicking the Longbow Converter shortcut on your Desktop…
    1. Insert your AutoCAD LT 2000 CD
    2. Select the 2nd tab titled “Old AutoCAD Installer Reviver” by clicking on it
    3. Using the ‘…’ button select your AutoCAD LT 2000 CD
    4. Now click the “Run Old Installer” button.
      1. Read, understand and follow all the prompts
  3. Once the AutoCAD setup program appears navigate through each setup dialog as normal and do not deviate from the defaults except when you get to the installation folder – **it’s vitally important to make sure you install to c:\acadlt2000 (not Program Files (x86)\AutoCAD LT 2000 as usually prompted)** e.g.Setting custom install path for AutoCAD LT 2000
    1. Now complete the setup making sure to…
      1. ignore the error message that appears near the end about the shortcut cannot be created “Cannot create folder AutoCAD LT 2000” – you will simply need to create the program shortcut yourself by hand once the installation is finished.
      2. Do not reboot if prompted to do so
  4. Once setup has completed…
    1. Make sure to fully close the AutoCAD setup program
    2. Back in the Converter App, make sure it has completed the final stage of processing using the “Old AutoCAD Program Reviver” tab – it should display “SUCCESS” in green…
  5. Now Reboot your PC
  6. Now you are ready to run your AutoCAD LT 2000! Simply use Windows Explorer, navigate to c:\acadlt2000 and double click aclt.exe

Troubleshooting

Copyright 2021 (c) Longbow Software

Installing AutoCAD R13 on Windows 7, Windows 8 and Windows 10

Installing your AutoCAD R13 on Windows 7, Windows 8 or Windows 10 can be very easily defined in these short steps…

NOTE: These steps do not bypass normal Autodesk licensing/authorization, you should expect to use your own serial numbers in the normal way.

A quick word of advice: best to follow the instructions below precisely and to the letter, including folder names and paths, that way you will reduce the risk of having any problems…

How to install AutoCAD R13

  1. Obtain your copy of the Longbow Converter here
  2. Using Windows Explorer, copy your entire AutoCAD R13 CD to your hard drive, to a folder path c:\Autodesk\acadR13
  3. Start the Longbow Converter tool, select the 2nd tab, pick the c:\Autodesk\acadR13 folder, and click Run. Read and understand all the prompts before pressing OK. Now, I know it’s unheard of these days, but at this point expect to wait at least 45 minutes for your AutoCAD R13 setup.exe program to appear. Once the setup starts, stop and read the next step…
  4. In the setup program, navigate through each setup dialog as normal
  5. Now carry on with the install… Ignore any errors
  6. Once installed, go back to the Converter tool, select the 3rd tab, pick the newly installed c:\R13 folder and click Fix.
  7. Now you can happily run your AutoCAD R13
    1. Create a shortcut on your Desktop pointing to c:\R13\acad.exe (working folder c:\R13)

Troubleshooting

If you have crashing problems using the File->Open or File->Save dialogs inside of AutoCAD please read this blog entry on the File->Open or File->Save Crash in AutoCAD
Copyright 2021 (c) Longbow Software

Installing AutoCAD for Windows 95 (LT95) on Windows 7, Windows 8 and Windows 10

AutoCAD for Windows 95 (LT95) users are very used to the software package and cannot do without it. With the latest hardware and required move to new Windows versions, trying to install your AutoCAD LT95 gives an error like this one…

Windows 16bit setup error - This app can't run on your PC

“This app can’t run on your PC”

or this one…

Setup Halted System requirements error Wrong OS, AutoCAD supports Windows NT 4.0, Windows NT 5.0, Windows 95 and Windows 98“Wrong OS, AutoCAD supports Windows NT 4.0, Windows NT 5.0, Windows 95 and Windows 98”

…all is not lost…

How to install AutoCAD LT95

Obtain your copy of the Longbow Converter here, you will need minimum version 7.16.

  1. Using Windows Explorer
    1. copy all of your AutoCAD LT95 disks to your hard drive, to a folder path c:\Autodesk\acadLT95 (Each disk should be in a numbered sub-folder off c:\Autodesk\acadLT95 e.g. c:\Autodesk\acadLT95\1
  2. Once you have copied all the disks, start the Longbow Converter tool
    1. select the 2nd tab named “Old AutoCAD Installer Reviver
    2. pick the c:\Autodesk\acadLT95\1 folder (disk 1)
    3. Next click “Run Old Installer“.
      1. Read and understand all the prompts before pressing OK.
      2. Now, I know it’s unheard of these days, but at this point expect to wait at least 45 minutes for your AutoCAD LT95 setup.exe program to appear. Once the setup starts, stop and read the next step…
  3. In the setup program, navigate through each setup dialog as normal, except when you get to the installation folder, **it’s vitally important to make sure you install to c:\acadLT95 (not the Program Files (x86)\AutoCAD LT as usually prompted)**
    1. If prompted, do not reboot once the installation has completed
  4. Once installed
    1. go back to the Converter tool
    2. select the 3rd tab named “Old AutoCAD Program Reviver
    3. pick the newly installed c:\acadLT95 folder and click “Fix Old Program“.
    4. Once the Converter has completed with “Success!”, close the Converter app, reboot your PC!
  5. Now you can happily run your AutoCAD for Windows 95 on Windows 10, Windows 7 and Windows 8 32bit or 64bit. Simply navigate to c:\acadLT95 using Windows Explorer, and double click aclt.exe.

Troubleshooting

Copyright 2018 (c) Longbow Software

Installing Softdesk 8 for AutoCAD R14 on Windows 10, Windows 7, Windows 8 and Windows 8.1

NOTE: We have had the best success installing this product using our Converter solution on Windows 8 and Windows 10

Installing your Softdesk 8 for AutoCAD R14 on Windows 10, Windows 7, Windows 8 or Windows 8.1 32bit or 64bit can be very easily defined in these short steps.

A quick word of advice: best to follow the instructions below precisely and to the letter, including folder names and paths, that way you will reduce the risk of having any problems…

  1. First, obtain your copy of the Longbow Converter here
  2. Install your AutoCAD R14 by carefully following the steps detailed here
  3. Using Windows Explorer, copy your entire Softdesk CD to your hard drive, to a folder path c:\Autodesk\softdesk
  4. Start the Longbow Converter tool, select the 2nd tab, pick the c:\Autodesk\softdesk folder, and click Run. Read and understand all the prompts before pressing OK. Now, I know it’s unheard of these days, but at this point expect to wait at least 45 minutes for your Softdesk setup.exe program to appear. Once the setup starts, install as normal (simply accept all defaults).
  5. Next we need to initialize Softdesk on startup, so depending on what works best for you – either
    1. Start your AutoCAD R14 by running c:\acadR14\acad.exe. Once AutoCAD starts up fully, simply type preferences at the command line, select the Profiles tab, double click the Softdesk profile and make it the Current Profile. Finally, OK out of the preferences dialog.
    2. Another way to intialize Softdesk on startup is to create a Desktop shortcut to c:\acadR14\acad.exe – make sure the shortcut
      1. Target: is set to C:\acadR14\acad.exe /c c:\sdsk\programs /p “softdesk 8” 
      2. Working Directory: is set to C:\acadR14
  6. Now you can happily run your Softdesk tools inside of AutoCAD R14 on Windows 10, Windows 7, Windows 8 or Windows 8.1 32bit or 64bit

Troubleshooting

If your setup is not starting after 45 minutes, try rebooting, then restart the steps above.

  • If it is still failing, most likely it’s because of another application on your system which is preventing our setup routine from starting (perhaps anti-virus, or similar) – try installing from Windows Safe Mode
Copyright 2015 (c) Longbow Software

Installing AutoCAD Mechanical Desktop Release 2 on Windows 10, Windows 7, Windows 8 and Windows 8.1

NOTE: We have had the best success installing this product using our Converter solution on Windows 8 and Windows 10

Installing your Mechanical Desktop R2 (built on AutoCAD R14.01) on Windows 10, Windows 7, Windows 8 or Windows 8.1 32bit or 64bit can be very easily defined in these short steps…

Instructions on installing Autodesk Mechanical 3 can be found here…

NOTE: These steps do not bypass normal Autodesk licensing/authorization, you should expect to use your own serial numbers in the normal way.

A quick word of advice: best to follow the instructions below precisely and to the letter, including folder names and paths, that way you will reduce the risk of having any problems…

  1. Obtain your copy of the Longbow Converter here
  2. Using Windows Explorer, copy your entire Mechanical Desktop Release 2.0 CD to your hard drive, to a folder path c:\Autodesk\mdtR14
  3. Start the Longbow Converter tool, select the 2nd tab, pick the c:\Autodesk\mdtR14 folder, and click Run. Read and understand all the prompts before pressing OK. Now, I know it’s unheard of these days, but at this point expect to wait at least 45 minutes for your Mechanical Desktop setup.exe program to appear. Once the setup starts, stop and read the next step…
  4. In the setup program, navigate through each setup dialog as normal, except when you get to the installation folder, **it’s vitally important to make sure you install to c:\mdtR14 (not .\Mechanical as usually prompted)**
  5. Now carry on with the install (do not reboot once the install is complete) Ignore any errors related to not being able to create the shortcut, you will have to create a shortcut on your computer Desktop to your c:\mdtR14\acad.exe by hand. You will also be prompted that Adobe reader needs to be installed – when you press OK, expect to wait at least 45 minutes for the Adobe setup.exe program to appear install as normal accepting all defaults this time.
    1. Do not reboot if prompted to do so…
  6. Once installed, go back to the Converter tool, select the 3rd tab, pick the newly installed c:\mdtR14 folder and click Fix.
  7. Now you are ready to run AutoCAD, simply run c:\mdtR14\acad.exe using Windows Explorer.
  8. You will notice that you are running raw AutoCAD, to enable your Mechanical Desktop features, carry out these next steps…
    1. At the AutoCAD Command line, type the command ‘Preferences’, add new Support path folders c:\mdtR14\acadm and then also c:\mdtR14\acadm\support, now click ‘Apply’ and then ‘OK’ out of the dialog.
    2. Next, restart AutoCAD.
    3. When you are back in AutoCAD, type ‘Menuload’ at the command line, click browse, then navigate to C:\mdtR14\acadm\support, change the file filter at the bottom to *.mnu, then open acadm.mnu, finally click Load, then pick Close.
    4. Now restart AutoCAD
  9. Now you can happily run your Mechanical Desktop Release 2.0 on Windows 10, Windows 7, Windows 8 or Windows 8.1 32bit or 64bit
Troubleshooting:
Copyright 2015 (c) Longbow Software

Installing AutoCAD LT97 on Windows 7, Windows 8 and Windows 10

AutoCAD LT97 users are very used to the software package and cannot do without it. With the latest hardware and required move to new Windows versions, trying to install your AutoCAD LT97 gives an error like this one…

Windows 16bit setup error - This app can't run on your PC

“This app can’t run on your PC”

or this one…

Setup Halted System requirements error Wrong OS, AutoCAD supports Windows NT 4.0, Windows NT 5.0, Windows 95 and Windows 98“Wrong OS, AutoCAD supports Windows NT 4.0, Windows NT 5.0, Windows 95 and Windows 98”

…all is not lost…

How to install AutoCAD LT97

  1. Obtain your purchased copy of the Longbow Converter here
    1. Because Windows is constantly updating you will need the latest version of the Converter App
  2. Start In the Converter App
  3. Insert your AutoCAD LT97 CD into your CDRom drive…
    1. Select the 2nd tab titled “Old AutoCAD Installer Reviver
    2. Using the “. . .” button, select your AutoCAD LT97 installation CD
    3. Next, click the “Run Old Installer” button and follow the instructions
    4. Please be patient as the Converter starts your AutoCAD LT97 Setup…. expect to wait at least 45 minutes for your AutoCAD LT97 setup.exe program to appear.
      1. Once the setup starts, stop and read the next step…
  4. In the setup program…
    1. navigate through each setup dialog as normal except when you get to the installation folder input – **it’s vitally important to make sure you install to c:\acadLT97 (not .\AutoCAD LT97 as usually prompted)**
    2. Now carry on with the install…
    3. Ignore any errors related to not being able to create the shortcut Cannot create folder “AutoCAD LT 97” you will have to create a shortcut on your computer Desktop to your c:\acadLT97\aclt.exe by hand.
    4. Do not reboot if prompted to do so
    5. Make sure you fully close the setup program.
  5. Once the setup is closed the Converter will automatically fix the c:\acadLT97 program files.
    1. You should see “Success!” displayed in the 3rd tab named “Old AutoCAD Program Reviver
      1. Now, close the Converter App
      2. Reboot your PC
  6. Now you can happily run your AutoCAD LT97, using Windows Explorer, navigate to c:\acadLT97 and double click aclt.exe


Troubleshooting

  • If you are getting an application failure with Unhandled Exception 0x800F0922
    • The security software (ESET Nod 32) must uninstalled; suspending it not effective
  • If you are getting a WinHelp() error when pressing F1 to try and access the Help system then simply install the WinHelp (WinHlp32.exe) module from Microsoft

Copyright 2021 (c) Longbow Software

Installing AutoCAD LT98 on Windows 7, Windows 8, Windows 10

AutoCAD LT98 users are very used to the software package and cannot do without it. With the latest hardware and required move to new Windows versions, trying to install your AutoCAD LT98 gives an error like this one…

Windows 16bit setup error - This app can't run on your PC

“This app can’t run on your PC”

or this one…

Setup Halted System requirements error Wrong OS, AutoCAD supports Windows NT 4.0, Windows NT 5.0, Windows 95 and Windows 98“Wrong OS, AutoCAD supports Windows NT 4.0, Windows NT 5.0, Windows 95 and Windows 98”

…all is not lost…

How to install AutoCAD LT98

  1. Obtain your purchased copy of the Longbow Converter here
  2. Start In the Converter App
  3. Insert your AutoCAD LT98 CD into your CDRom drive…
    1. Select the 2nd tab titled “Old AutoCAD Installer Reviver
    2. Using the “. . .” button, select your AutoCAD LT98 installation CD
    3. Next, click the “Run Old Installer” button and follow the instructions
    4. Please be patient as the Converter starts your AutoCAD LT98 Setup…. expect to wait at least 45 minutes for your AutoCAD LT98 setup.exe program to appear.
      1. Once the setup starts, stop and read the next step…
  4. In the setup program…
    1. navigate through each setup dialog as normal except when you get to the installation folder input – **it’s vitally important to make sure you install to c:\acadLT98 (not .\AutoCAD LT98 as usually prompted)**
    2. Now carry on with the install…
    3. Ignore any errors related to not being able to create the shortcut Cannot create folder “AutoCAD LT 98” you will have to create a shortcut on your computer Desktop to your c:\acadLT98\aclt.exe by hand.
    4. Do not reboot if prompted to do so
  5. Once installed, go back to the Converter tool…
    1. select the 3rd tab – “Old AutoCAD Program Reviver”
    2. Using the “. . .” button, select the newly installed c:\acadLT98 folder
    3. Once you have selected the c:\acadLT98 folder simply click the “Fix Old Program” button.
    4. Once the Converter has completed with “Success!”, close the Converter app, reboot your PC!
  6. Now you can happily run your AutoCAD LT98! Simply use Windows Explorer, navigate to c:\acadLT98 and double click aclt.exe.
Troubleshooting:
  • If you are getting a WinHelp() error when pressing F1 to try and access the Help system then simply install the WinHelp (WinHlp32.exe) module from Microsoft
  • If your wheel mouse zoom is erratic (random zoom in / outs while scrolling), update the Control Panel->Mouse->Wheel->”Roll the wheel one notch to scroll” set to 3 lines or less
Copyright 2018 (c) Longbow Software

Installing AutoCAD 2000 from Windows Safe Mode

If you are reading this post, it’s because your AutoCAD 2000 setup program is not starting after following the 2000 installation steps that we documented here and you have reached the Troubleshooting section.

Why the setup is not starting is a big question, most likely it’s because a Windows Update or some other installer update is pending (in which case a reboot should solve) or it could be a security ‘feature’ a 3rd party anti-virus application or similar is imposing on your system which is in turn blocking your R14 setup. The thing is, it’s impossible for us to realistically diagnose the exact problem for you, so we came up with a fail safe solution – install using Windows Safe Mode, here’s how…

NOTE: These steps do not bypass normal Autodesk licensing/authorization, you should expect to use your own serial numbers in the normal way.

  1. Obtain your copy of the Longbow Converter here, install it.
  2. Using Windows Explorer, copy your entire AutoCAD 2000 CD to your hard drive, to a folder path c:\Autodesk\acad2000
  3. Boot your computer into Safe Mode using these instructions
  4. Once in Windows Safe Mode, start the Longbow Converter tool, select the 2nd tab “Old AutoCAD Installer Reviver“, pick the c:\Autodesk\acad2000 folder, and click Run. Read and understand all the prompts before pressing OK.
    1. Once the setup starts, stop and read the next step
  5. In the setup program, navigate through each setup dialog as normal, except when you get to the installation folder, **it’s vitally important to make sure you install to c:\acad2000 (not .\AutoCAD 2000 as usually prompted)**
  6. Now carry on with the install (do not reboot once the install is complete). Ignore any errors related to not being able to create the shortcut, you will have to create a shortcut on your computer Desktop to your c:\acad2000\acad.exe by hand.
    1. Do not reboot if prompted to do so
  7. Once installed, go back to the Converter tool, select the 3rd tab, pick the newly installed c:\acad2000 folder and click “Fix”.
  8. Now reboot your computer back into normal Windows mode
  9. Open Windows Explorer, navigate to c:\acad2000 and run acad.exe – you can now happily run your AutoCAD 2000 on Windows 10, Windows 7, Windows 8 or Windows 8.1 32bit or 64bit

Installing AutoCAD 2000 Service Pack 1

  1. Download AutoCAD 2000 sp1 from here
  2. Unzip your newly downloaded sp to folder path c:\Autodesk\sp
  3. Start the Converter, select the 2nd tab, pick the c:\Autodesk\sp\AutoCAD 2000 sp1 folder and click ‘Run’
  4. Wait for the setup to appear, it could take up to 45 minutes, then install as normal

Installing AutoCAD 2000 Service Pack 2

  1. Download AutoCAD 2000 sp2 from here
  2. Unzip your newly downloaded sp to folder path c:\Autodesk\sp
  3. Start the Converter, select the 2nd tab, pick the c:\Autodesk\sp\AutoCAD 2000 sp2 folder and click ‘Run’
  4. Wait for the setup to appear, it could take up to 45 minutes, then install as normal.
Copyright 2016 (c) Longbow Software