Installing AutoCAD 2000 from Windows Safe Mode

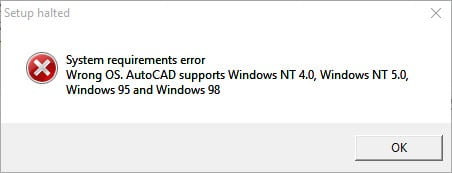
If you are reading this post, it’s because your AutoCAD 2000 setup program is not starting after following the 2000 installation steps that we documented here and you have reached the Troubleshooting section.

Why the setup is not starting is a big question, most likely it’s because a Windows Update or some other installer update is pending (in which case a reboot should solve) or it could be a security ‘feature’ a 3rd party anti-virus application or similar is imposing on your system which is in turn blocking your R14 setup. The thing is, it’s impossible for us to realistically diagnose the exact problem for you, so we came up with a fail safe solution – install using Windows Safe Mode, here’s how…

NOTE: These steps do not bypass normal Autodesk licensing/authorization, you should expect to use your own serial numbers in the normal way.

  1. Obtain your copy of the Longbow Converter here, install it.
  2. Using Windows Explorer, copy your entire AutoCAD 2000 CD to your hard drive, to a folder path c:\Autodesk\acad2000
  3. Boot your computer into Safe Mode using these instructions
  4. Once in Windows Safe Mode, start the Longbow Converter tool, select the 2nd tab “Old AutoCAD Installer Reviver“, pick the c:\Autodesk\acad2000 folder, and click Run. Read and understand all the prompts before pressing OK.
    1. Once the setup starts, stop and read the next step
  5. In the setup program, navigate through each setup dialog as normal, except when you get to the installation folder, **it’s vitally important to make sure you install to c:\acad2000 (not .\AutoCAD 2000 as usually prompted)**
  6. Now carry on with the install (do not reboot once the install is complete). Ignore any errors related to not being able to create the shortcut, you will have to create a shortcut on your computer Desktop to your c:\acad2000\acad.exe by hand.
    1. Do not reboot if prompted to do so
  7. Once installed, go back to the Converter tool, select the 3rd tab, pick the newly installed c:\acad2000 folder and click “Fix”.
  8. Now reboot your computer back into normal Windows mode
  9. Open Windows Explorer, navigate to c:\acad2000 and run acad.exe – you can now happily run your AutoCAD 2000 on Windows 10, Windows 7, Windows 8 or Windows 8.1 32bit or 64bit

Installing AutoCAD 2000 Service Pack 1

  1. Download AutoCAD 2000 sp1 from here
  2. Unzip your newly downloaded sp to folder path c:\Autodesk\sp
  3. Start the Converter, select the 2nd tab, pick the c:\Autodesk\sp\AutoCAD 2000 sp1 folder and click ‘Run’
  4. Wait for the setup to appear, it could take up to 45 minutes, then install as normal

Installing AutoCAD 2000 Service Pack 2

  1. Download AutoCAD 2000 sp2 from here
  2. Unzip your newly downloaded sp to folder path c:\Autodesk\sp
  3. Start the Converter, select the 2nd tab, pick the c:\Autodesk\sp\AutoCAD 2000 sp2 folder and click ‘Run’
  4. Wait for the setup to appear, it could take up to 45 minutes, then install as normal.
Copyright 2016 (c) Longbow Software

How to Adjust Internet Explorer 11 active scripting settings

Autodesk products like AutoCAD, Inventor, Revit, may give scripting errors when trying to activate, try these steps below to enable scripting inside of IE 11:


  1. Open Internet Explorer.

  2. Click the Tools menu (or if hidden select ALT+T on your keyboard), and then click Internet Options.

  3. On the Security tab, click the Custom level button.

  4. Scroll down the Security Settings list until you see Scripting and Active scripting.

  5. Click Enable, click OK, and then click OK again.

  6. Now try to activate your Autodesk product

Rolling back to IE 10 from IE 11 in Windows 7, Windows 8 and Windows 8.1

If you are encountering licensing issues, blank screens or even crashing when launching AutoCAD it could be because you are using a version of Microsoft Internet Explorer which is not compatible with your version of AutoCAD… (If you are primarily seeing script errors, then first check out how to enable scripting support in IE 11)

Here is a list of AutoCAD versions that most likely will be affected…

  • AutoCAD 2005
  • AutoCAD 2006
  • AutoCAD 2007
  • AutoCAD 2008
  • AutoCAD 2009
  • AutoCAD 2010
  • AutoCAD 2011
  • AutoCAD 2012
  • AutoCAD 2013

It could be because you have Microsoft Internet Explorer 11 installed on your system. The solution is to rollback to Microsoft Internet Explorer 10, or maybe back as far as Internet Explorer 8. Here’s how:


Windows 7 users

  1. Click Start then Control Panel
  2. Once in Control Panel select Programs
  3. From Programs click Turn Windows Features on or off
  4. Once in the Windows Features dialog, simply un-check Internet Explorer 11 and click OK. You will be asked to reboot, which you should do. Once you reboot, IE 11 will have been rolled back to IE 10
  5. NOTE: If you are still having problems, you can repeat the process from (1) to (4) again in order to downgrade from IE 10 to IE 9 to IE 8. Autodesk products usually do not need further downgrading than IE 8, so if you are still having issues even with IE 8 then it’s most likely something else wrong on your system.
  6. NOTE: If you cannot downgrade far enough, your only option is to upgrade to 7.24  (or newer) of the Longbow Converter tool which now supports Internet Explorer 7 emulation mode

Windows 8 users

  1. Move your mouse to the bottom left corner of the screen, then right click your mouse and select Control Panel
  2. Once in Control Panel select Programs
  3. From Programs click Turn Windows Features on or off
  4. Once in the Windows Features dialog, simply un-check Internet Explorer 11 and click OK. You will be asked to reboot, which you should do. Once you reboot, IE 11 will have been rolled back to IE 10
  5. NOTE: If you are still having problems, you can repeat the process from (1) to (4) again in order to downgrade from IE 10 to IE 9 to IE 8. Autodesk products usually do not need further downgrading than IE 8, so if you are still having issues even with IE8 then it’s most likely something else wrong on your system.
  6. NOTE: If you cannot downgrade far enough, your only option is to upgrade to 7.24  (or newer) of the Longbow Converter tool which now supports Internet Explorer 7 emulation mode.

Windows 8.1 users

Window 8.1 comes with Internet Explorer 11 pre-installed and cannot be rolled back. Your only option is to upgrade to 7.24 (or newer) of the Longbow Converter tool which now supports Internet Explorer 7 emulation mode.

Error code 1935 when installing AutoCAD 2008

If you are getting Error 1935. An error occurred during the installation of assembly ‘Microsoft.VC80.OpenMP.type=”win32″.version=”8.0.50727.42″ when installing your AutoCAD 2008, try these steps to resolve it:

  1. Delete all files (*.*) from your C:\Windows\System32\config\TxR folder
  2. Next start a cmd.exe prompt in administrator mode, then type at the command line:

    fsutil resource setautoreset true C:\

  3. Now Reboot
  4. Next install all Windows updates, rebooting until there are no more Windows Updates left to install
  5. Now try to install your AutoCAD 2008 again

Installing AutoCAD R14 from Windows Safe Mode

If you are reading this post, it’s because your AutoCAD R14 setup program is not starting after following the R14 installation steps that we documented here and you have reached the Troubleshooting section.

Why the setup is not starting is a big question, most likely it’s because a Windows Update or some other installer update is pending (in which case a reboot should solve) or it could be a security ‘feature’ a 3rd party anti-virus application or similar is imposing on your system which is in turn blocking your R14 setup. The thing is, it’s impossible for us to realistically diagnose the exact problem for you, so we came up with a fail safe solution – install using Windows Safe Mode, here’s how…

NOTE: These steps do not bypass normal Autodesk licensing/authorization, you should expect to use your own serial numbers in the normal way.

  1. Obtain your copy of the Longbow Converter here, install it.
  2. Using Windows Explorer, copy your entire AutoCAD R14 CD to your hard drive, to a folder path c:\Autodesk\acadR14
  3. Boot your computer into Safe Mode using these instructions
  4. Once in Windows Safe Mode, start the Longbow Converter tool, select the 2nd tab “Old AutoCAD Installer Reviver“, pick the c:\Autodesk\acadR14 folder, and click Run. Read and understand all the prompts before pressing OK.
    1. Once the setup starts, stop and read the next step
  5. In the setup program, navigate through each setup dialog as normal, except when you get to the installation folder, **it’s vitally important to make sure you install to c:\acadR14 (not .\AutoCAD R14 as usually prompted)**
  6. Now carry on with the install (do not reboot once the install is complete). Ignore any errors related to not being able to create the shortcut, you will have to create a shortcut on your computer Desktop to your c:\acadR14\acad.exe by hand.
    1. Do not reboot if prompted to do so
  7. Once installed, go back to the Converter tool, select the 3rd tab, pick the newly installed c:\acadR14 folder and click Fix.
  8. Now reboot your computer back into normal Windows mode
  9. Open Windows Explorer, navigate to c:\acadR14 and run acad.exe – you can now happily run your AutoCAD R14 on Windows 10, Windows 7, Windows 8 or Windows 8.1 32bit or 64bit
Copyright 2015 (c) Longbow Software


Installing Autodesk Civil 3D 2007 on Windows 7, Windows 8 and Windows 10

Installing AutoCAD Civil3d 2007 on Windows 10, Windows 7, Windows 8 or Windows 8.1 32bit or 64bit can be very easily defined in these short steps…

IMPORTANT NOTE: Autodesk no longer supply License Activation codes for this version of AutoCAD. The best way is to transfer your existing license to the new PC but there are other options, we document them here

  1. Obtain your copy of the Longbow Converter here
  2. Copy your Civil3d 2007 installation CD media to your hard drive, to a folder path c:\Autodesk\civil3d2007 
    1. NOTE: If you have more CD’s, simply copy the contents of each CD directly over the top of Disk 1, basically, overwrite all files in your previously copied c:\Autodesk\civil3d2007 folder with the files from each of the CDs
  3. Next, start the Longbow Converter tool, select the 2nd tab, pick the c:\Autodesk\civil3d2007 folder (where you copied your Civil3d CDs to on your hard drive), and click the Run Old Installer button. Read and understand all the prompts before pressing OK. Once the setup starts, stop and read the next step…
  4. In the setup program, navigate through each setup dialog as normal, with these exceptions… (if you cannot move past the first screen in the setup, see Trouble Shooting below)…
    1. When you click the Install link from your setup you may see a dialog box appear saying – “This program has compatibility issues” – simply check the “Don’t show this message again” and then click the “Run the program without getting help”.
    2. When you arrive at the installation folder path setup dialog, **it’s vitally important to make sure you install to c:\civil3d2007 (not C:\Program Files (x86)\Autodesk Civil 3D 2007 that is defaulted)**.
    3. If asked to reboot after the install, say NO
  5. Once installed, do not reboot, make sure you fully close the AutoCAD setup program (because the Converter is waiting for the setup program to fully close) then go back to the Converter tool, select the 3rd tab, pick the newly installed c:\civil3d2007 folder and click the Fix Old Program button.
  6. Now you can run your Autodesk Civil3d 2007 on Windows 10, Windows 7 and Windows 8, both 32bit and 64bit.
    1. NOTE: When starting AutoCAD, if you see a warning dialog when you run saying “This program has known compatibility issues”, simply click “Don’t show this message again” and then click “Run the Program…”

Troubleshooting:

– If you cannot navigate to the next page in the Setup (because clicking on the install links does nothing)…

  1. Having completed steps 1 through 3 above, Start Windows Explorer and navigate to c:\Autodesk\civil3d2007\bin\installer then run Setup.exe
  2. Once setup.exe starts, resume the instructions above starting at step 4 above

– If you are unable to activate your product, or the activation process crashes:

– If you have crashing problems using the File->Open or File->Save dialogs inside of AutoCAD please read this blog entry on the File->Open or File->Save Crash in AutoCAD

Copyright 2015 (c) Longbow Software

Installing Autodesk Civil 3D Land Desktop Companion 2007 on Windows 7, Windows 8 and Windows 10

Installing AutoCAD LDT 2007 on Windows 10, Windows 7, Windows 8 or Windows 8.1 32bit or 64bit can be very easily defined in these short steps…

IMPORTANT NOTE: Autodesk no longer supply License Activation codes for this version of AutoCAD. The best way is to transfer your existing license to the new PC but there are other options, we document them here

  1. Obtain your copy of the Longbow Converter here
  2. Copy your Land Desktop 2007 installation CD media to your hard drive, to a folder path c:\Autodesk\ldt2007 
    1. NOTE: If you have more CD’s, simply copy the contents of each CD directly over the top of Disk 1, basically, overwrite all files in your previously copied c:\Autodesk\ldt2007 folder with the files from each of the CDs
  3. Next, start the Longbow Converter tool, select the 2nd tab, pick the c:\Autodesk\ldt2007 folder (where you copied your LDT CDs to on your hard drive), and click the Run Old Installer button. Read and understand all the prompts before pressing OK. Once the setup starts, stop and read the next step…
  4. In the setup program, navigate through each setup dialog as normal, with these exceptions… (if you cannot move past the first screen in the setup, see Trouble Shooting below)…
    1. When you click the Install link from your setup you may see a dialog box appear saying – “This program has compatibility issues” – simply check the “Don’t show this message again” and then click the “Run the program without getting help”.
    2. When you arrive at the installation folder path setup dialog, **it’s vitally important to make sure you install to c:\ldt2007 (not C:\Program Files (x86)\Autodesk Land Desktop 2007\)**.
    3. If asked to reboot after the install, say NO
  5. Once installed, do not reboot, make sure you fully close the AutoCAD setup program (because the Converter is waiting for the setup program to fully close) then go back to the Converter tool, select the 3rd tab, pick the newly installed c:\ldt2007 folder and click the Fix Old Program button.
  6. Now you can run your Autodesk Land Desktop 2007 on Windows 10, Windows 7 and Windows 8, both 32bit and 64bit.
    1. NOTE: When starting AutoCAD, if you see a warning dialog when you run saying “This program has known compatibility issues”, simply click “Don’t show this message again” and then click “Run the Program…”

Troubleshooting:

– If you cannot navigate to the next page in the Setup (because clicking on the install links does nothing)…

  1. Having completed steps 1 through 3 above, Start Windows Explorer and navigate to c:\Autodesk\ldt2007\bin\installer then run Setup.exe
  2. Once setup.exe starts, resume the instructions above starting at step 4 above

– If you are unable to activate your product, or the activation process crashes:

– If you have crashing problems using the File->Open or File->Save dialogs inside of AutoCAD please read this blog entry on the File->Open or File->Save Crash in AutoCAD

Copyright 2015 (c) Longbow Software

Resolving The Longbow Converter “Error Code 2”

If you are getting an “Error Code: 2” message when converting your 32bit AutoCAD 2008 or newer, then here’s what you need to do…


The “Error Code: 2” message indicates that either the Converter was unable to write to the folder (most likely) or that the media was not copied in full (least likely).

  1. In the 1st tab of the Converter tool, you would have selected a path to your 32bit AutoCAD, let’s say for example it is c:\Autodesk\AutoCAD2013
  2. Start Windows Explorer, right click the c:\Autodesk\AutoCAD2013 folder and click Properties
  3. Now un-check Read-Only then click Apply, then Apply to All Files and Folders
  4. Now try again…

If you are still getting the “Error Code: 2” message, then find your specific AutoCAD version from here (on the left side), then use those instructions specifically to install your AutoCAD.

Copyright 2014 (c) Longbow Software

AutoCAD 32bit/64bit side-by-side installation compatibility chart

This blog has been written to help advise those who require 32bit versions of AutoCAD to reside on the same computer system as 64bit versions of AutoCAD.

Before we start, when installing 32bit AutoCAD on 64bit Windows, you should take care not to mix the same version/series of AutoCAD 32bit with the same version/series of the corresponding 64bit version of AutoCAD, on the same computer. The reason is that they were not designed to run in a side-by-side configuration and therefore may conflict. The same rule can generally be made for all Autodesk products.

NOTES:

  • When installing 32bit AutoCAD, we advise that you uninstall all previous versions of 64bit AutoCAD before installing your 32bit version of AutoCAD.
  • If you are installing multiple versions of AutoCAD, you should always install in chronological order, in other words, oldest to newest.
    • e.g AutoCAD 2004, Architecture 2004, Map 2005, AutoCAD 2007, Civil3d 2015
    • Failure to follow this simple rule can render you with missing entry point errors, un-explained crashing, un-installable Autodesk software and more.
  • For best results, we recommend that you install only 32bit versions of AutoCAD on your computer system, however, mixing is possible with care – refer to the chart below if you must have the 64bit version installed on the same computer.

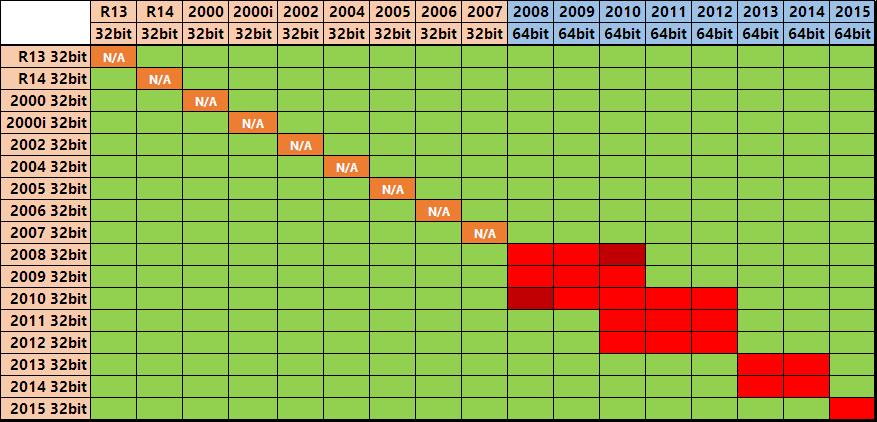
This chart shows which 32bit AutoCAD versions can be installed on the same system as 64bit AutoCAD versions…

  • Green means Should be OK
  • Red/Dark Red means Problems will occur, you should not do this
AutoCAD 32bit 64bit side by side configurations

Shows which versions of 32bit AutoCAD can be installed side by side to 64bit versions of AutoCAD

Copyright 2015 (c) Longbow Software

AutoCAD 2000 Patches and Utilities

Here are some long lost AutoCAD 2000 patches and utilities that you can still use in your AutoCAD…


  • PlotUpdate.exe – Fixes AutoCAD 2000 Heap error issues with system printers on Windows.
  • DBTrans.arx – migrates AutoCAD drawings from AutoCAD R11 or versions previous to R11, over to AutoCAD 2000
  • DDModify.lsp –  allows the user to get a listing comparable to the LIST
    ;;; command for most objects in AutoCAD 2000
  • PacknGo.arx – The initial AutoCAD 2000 version of the Pack&Go feature (PACK command) used system DLLs that may not be available on all systems. This fixes that issue.
  • pnpltpc2– contains 3 PC2 files (16penplotter.pc2, 7475a6pens.pc2 and 7586-8pens.pc2) that have been generated in AutoCAD R14 to accommodate the pen wrapping effect for pen plotters.
  • SwapContextMenu.arx – Allows AutoCAD 2000 user to swap default/edit/command mode context menus.

Copyright 2015 (c) Longbow Software