Installing AutoCAD 2010 32bit on Windows 7, Windows 8 and Windows 10

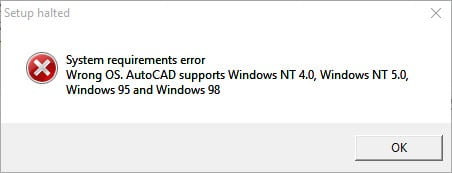
These instructions solve issues around installing/running your old AutoCAD 2010 on newer versions of 64bit Windows 7, Windows 8 and Windows 10. Some common issues are error messages like these…

“This operating system is not supported by AutoCAD 2010”

Checking License…”

You can automatically solve these problems using our Longbow Converter App, it fixes and manages the AutoCAD 2010 installation so that you can be up and running again… Follow these instructions:

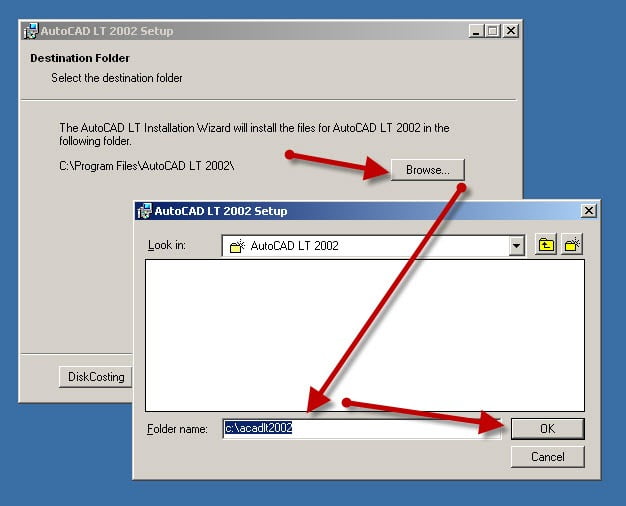
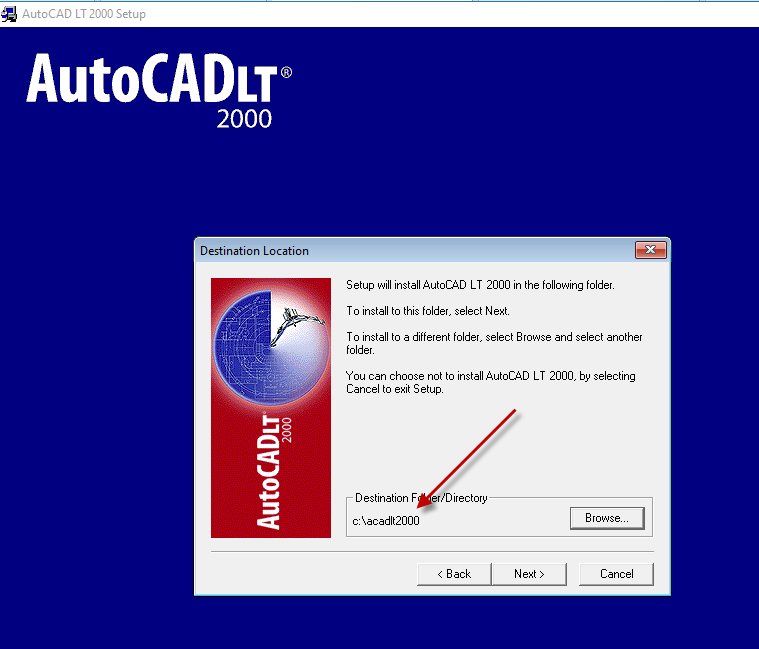
How to install AutoCAD 2010

  1. Obtain your purchased copy of the Longbow Converter here
  2. Start the Converter App and note the user interface
  3. Select the 1st tab named “AutoCAD 32bit Installer Converter
    1. Using the “. . .” button, selection your AutoCAD installation CD
    2. Next, click the “Convert button and follow instructions
  4. Once the conversion process is complete
    1. click Install/Run Setup to start setup
    2. Simply install as normal, remembering to…
      1. Close the setup program when the installation is complete.
      2. Now back in the Converter app and make sure it’s completed the final stage of processing using the “Old AutoCAD Program Reviver” tab
  5. Now run your AutoCAD as normal

Installing AutoCAD 2010 Service Packs

AutoCAD 2010 has 2 service packs, instead of calling them sp1 and sp2 they decided to call them Update1 and Update2. You only need to install Update2 because it already includes Update1.

  1. Download the AutoCAD 2010 Update 2 (sp2)
  2. Unzip and simply run the autocad2010update2.exe to install the update

Troubleshooting

  1. If your installed AutoCAD is hanging on startup then read this post first AutoCAD Freezes on startup (AutoCAD visible but the menus don’t appear)
  2. if your AutoCAD hangs on startup (stuck at the “Checking License…” message, try installing the 32bit version of AutoCAD 2010 on 64bit Windows – we’ve actually found the 32bit AutoCAD 2010 running on 64bit Windows is much more stable and actually faster than the 64bit version of AutoCAD 2010.
  3. If your AutoCAD crashes while interacting with the Ribbon click here
  4. If you are unable to activate your product, or the activation process crashes:
    1. Try uninstalling the July 2014 Microsoft security update
    2. Try downgrading your Internet Explorer (IE) from version 11 to version 10 by following the instructions detailed here
  5. If you have crashing problems using the File->Open or File->Save dialogs inside of AutoCAD please read this blog entry on the File->Open or File->Save Crash in AutoCAD
  6. If your Windows hangs on startup after installing please refer to this help blog
Copyright 2019 (c) Longbow Software

Installing 32bit AutoCAD Civil 3D 2010 on 64bit Windows 7, Windows 8 and Windows 10

These instructions solve issues around installing/running your old AutoCAD Civil 3d 2010 (C3D 2010) on newer versions of 64bit Windows 7, Windows 8 and Windows 10. Some common issues are error messages like these…

“This operating system is not supported by AutoCAD® Civil 3D® 2010”

“You cannot install this product on the current operating system”

“You are attempting to use a 32-bit installer on a 64-bit operating system”

“This is a 32-bit AutoCAD® Civil 3D® 2010. It cannot be installed on 64-bit Windows”

“Checking License”

You can automatically solve these problems using our Longbow Converter App. It fixes and manages the AutoCAD Civil 3d 2010 installation so that you can be up and running again… Follow these instructions:

How to install AutoCAD Civil 3d 2010

  1. Obtain your purchased copy of the Longbow Converter here
  2. Start the Converter App and note the user interface
  3. Select the 1st tab named “AutoCAD 32bit Installer Converter
    1. Using the “. . .” button, selection your AutoCAD installation CD
    2. Next, click the “Convert button and follow instructions
  4. Once the conversion process is complete
    1. click Install/Run Setup to start setup
    2. Simply install as normal, remembering to…
      1. Close the setup program when the installation is complete.
      2. Now back in the Converter app and make sure it’s completed the final stage of processing using the “Old AutoCAD Program Reviver” tab, it should display “Success!”
  5. You can now run your AutoCAD, but before using, you must install the sp3 update below.

Installing the Civil 3d sp3 (Update 3.1)

We recommend that you download and install the latest sp3 from Autodesk which can be found here – AutoCAD Civil 3d 2010 sp3

Troubleshooting

  1. If your installed AutoCAD is hanging on startup then read this post first AutoCAD Freezes on startup (AutoCAD visible but the menus don’t appear)
  2. if your AutoCAD hangs on startup (stuck at the “Checking License…” message, try installing the 32bit version of AutoCAD 2010 on 64bit Windows – we’ve actually found the 32bit AutoCAD 2010 running on 64bit Windows is much more stable and actually faster than the 64bit version of AutoCAD 2010.
  3. If your AutoCAD crashes while interacting with the Ribbon click here
  4. If you are unable to activate your product, or the activation process crashes:
    1. Try uninstalling the July 2014 Microsoft security update
    2. Try downgrading your Internet Explorer (IE) from version 11 to version 10 by following the instructions detailed here
  5. If you have crashing problems using the File->Open or File->Save dialogs inside of AutoCAD please read this blog entry on the File->Open or File->Save Crash in AutoCAD
  6. If your Windows hangs on startup after installing please refer to this help blog
Copyright 2019 (c) Longbow Software

Installing 64bit AutoCAD 2012 on Windows 8 and Windows 10

AutoCAD 2012 was not designed to run in Windows 10 (Windows 10 was released after AutoCAD 2012) and inevitably you will run into issues such as the infamous Ribbon crashing issue, slow startup problems, text scaling issues, etc.

You can automatically solve these problems using our Longbow Converter App, it fixes and manages the AutoCAD 2012 installation so that you can be up and running again… Just follow these easy instructions:

How to install 64bit AutoCAD 2012

  1. First, uninstall any existing AutoCAD 2012 installations on your computer
  2. Next obtain a copy of the Longbow Converter App, download here
  3. Start the Converter tool
    1. Pick the 1st tab named “AutoCAD 32bit Installer Converter
    2. Using your mouse, right-click the tab text “AutoCAD 32bit Installer Converter” so that it changes to “AutoCAD 64bit Installer Converter
    3. Next, using the “. . .  button, select your AutoCAD installation CD and follow the instructions presented by the Converter tool user interface.
  4. Once the conversion process is complete
    1. click Install/Run Setup to start setup
    2. Once you have completed the AutoCAD installation process…
      1. Completely close the setup program
      2. Go back to the Converter App and make sure it states “Success!
  5. Now you can run your AutoCAD as normal

Troubleshooting:

– If you are unable to activate your product, or the activation process crashes:

– If you have crashing problems using the File->Open or File->Save dialogs inside of AutoCAD please read this blog entry on the File->Open or File->Save Crash in AutoCAD

Copyright 2018 (c) Longbow Software

Installing 64bit AutoCAD 2011 on Windows 10

AutoCAD 2011 was not designed to run in Windows 10 (Windows 10 was released after AutoCAD 2011) and inevitably you will run into issues such as the infamous Ribbon crashing issue, slow startup problems, text scaling issues, etc.

You can automatically solve these problems using our Longbow Converter App, it fixes and manages the AutoCAD 2011 installation so that you can be up and running again… Just follow these easy instructions:

How to install 64bit AutoCAD 2011

  1. First, uninstall any existing AutoCAD 2011 installations on your computer
  2. Next, obtain the Longbow Converter App (V11.15 or higher), download here
  3. Start the Converter tool
    1. Pick the 1st tab named “AutoCAD 32bit Installer Converter
    2. Using your mouse, right-click the tab text “AutoCAD 32bit Installer Converter” so that it changes to “AutoCAD 64bit Installer Converter
    3. Next, using the “. . .  button, select your AutoCAD installation CD and follow the instructions presented by the Converter tool user interface.
  4. Once the conversion process is complete
    1. click Install/Run Setup to start setup
    2. Once you have completed the AutoCAD installation process…
      1. Completely close the setup program
      2. Go back to the Converter App and make sure it states “Success!
  5. Now you can run your AutoCAD as normal

Troubleshooting:

– If you are unable to activate your product, or the activation process crashes:

– If you have crashing problems using the File->Open or File->Save dialogs inside of AutoCAD please read this blog entry on the File->Open or File->Save Crash in AutoCAD

Copyright 2018 (c) Longbow Software

Installing 64bit AutoCAD 2009 on Windows 8 and Windows 10 64bit

AutoCAD 2009 was not designed to run in Windows 10 (Windows 10 was released after AutoCAD 2009) and inevitably you will run into issues such as random crashing out, slow startup problems, text scaling issues, etc.

You can automatically solve these problems using our Longbow Converter App, it fixes and manages the AutoCAD 2009 installation so that you can be up and running again… Just follow these easy instructions:

How to install 64bit AutoCAD 2009

  1. First, uninstall any existing AutoCAD 2009 installations on your computer
  2. Next, obtain the Longbow Converter App (V11.15 or higher), download here
  3. Start the Converter tool
    1. Pick the 1st tab named “AutoCAD 32bit Installer Converter
    2. Using your mouse, right-click the tab text “AutoCAD 32bit Installer Converter” so that it changes to “AutoCAD 64bit Installer Converter
    3. Next, using the “. . .  button, select your AutoCAD installation CD and follow the instructions presented by the Converter tool user interface.
  4. Once the conversion process is complete
    1. click Install/Run Setup to start setup
    2. Once you have completed the AutoCAD installation process…
      1. Completely close the setup program
      2. Go back to the Converter App and make sure it states “Success!
  5. Now you can run your AutoCAD as normal

Troubleshooting:

– If you are unable to activate your product, or the activation process crashes:

– If you have crashing problems using the File->Open or File->Save dialogs inside of AutoCAD please read this blog entry on the File->Open or File->Save Crash in AutoCAD

Copyright 2018 (c) Longbow Software

Install AutoCAD 2002 on Windows 7, Windows 8 and Windows 10

Installing AutoCAD 2002 on Windows 10, Windows 7, Windows 8 or Windows 8.1 32bit or 64bit can be very easily defined in these short steps…

NOTE: These steps do not bypass normal Autodesk licensing/authorization, you should expect to use your own serial numbers in the normal way.

  1. Obtain your copy of the Longbow Converter here
  2. Using Windows Explorer, backup your entire AutoCAD 2002 CD to your hard drive, to a folder path c:\Autodesk\CDs\acad2002 
  3. Start the Longbow Converter tool
    1. select the 2nd tab titled “Old AutoCAD Installer Reviver
    2. Using the ‘…’ button, pick the c:\Autodesk\CDs\acad2002 folder (where you just copied your 2002 CD)
    3. Click the “Run Old Installer” button.
      1. Read and understand all the prompts before pressing OK.
      2. Once the setup starts, stop and read the next step…
  4. In the setup program, navigate through each setup dialog as normal, except when you get to the installation folder, **it’s vitally important to make sure you install to c:\acad2002 (not Program Files (x86)\AutoCAD 2002 as usually prompted by default)**
    1. IMPORTANT NOTE: You may find that entering the path C:\acad2002 may not take (a bug in the AutoCAD 2002 installer). In that case, you will need to select the installation folder C:\Program Files (x86)\AutoCAD 2002 in step (5) below
    2. Do not reboot if prompted to do so
  5. Once installed, go back to the Converter tool…
    1. Select the 3rd tab titled “Old AutoCAD Program Reviver
    2. Using the ‘…’ button, pick the newly installed c:\acad2002 folder
    3. click “Fix Old Program“.
  6. Now run your AutoCAD 2002 and completely register as normal. Once registered, exit AutoCAD and continue to the next step…
  7. Next, obtain the AutoCAD 2002 sp1 from here unzip and save to c:\Autodesk\spdo not install yet
    1. Go back into the Converter
    2. Select the 3rd tab again
    3. titled “Old AutoCAD Program Reviver
    4. Using the ‘…’ button, select the c:\Autodesk\sp folder
    5. click “Fix Old Program
  8. Finally, install the AutoCAD 2002 sp1 by running the c:\Autodesk\sp\acad2002sp1.exe 
  9. Now, you can happily run your AutoCAD 2002 on Windows 10, Windows 7 and Windows 8.
Troubleshooting:
Copyright 2017 (c) Longbow Software

Installing AutoCAD 2006 on Windows 7, Windows 8 and Windows 10

Follow these instructions to solve issues around installing/running your old AutoCAD 2006 on newer versions of 64bit Windows 7, Windows 8 and Windows 10

IMPORTANT NOTE: Autodesk no longer supply License Activation codes for this version of AutoCAD. The best way is to transfer your existing license to the new PC but there are other options, we document them here

How to install AutoCAD 2006 

  1. Obtain your purchased copy of the Longbow Converter here
  2. Start the Longbow Converter tool
    1. Insert your AutoCAD CD into your CDRom drive
    2. select the 2nd tab named “Old AutoCAD Installer Reviver
    3. Using the “…” button, path the to your AutoCAD CD
    4. Click “Run Old Installer
      1. Read and follow all the prompts
      2. Once the AutoCAD setup starts, stop and read the next step…
  3. In the setup program, navigate through each setup dialog as normal, with these exceptions…
    1. When you click the Install link from your setup you may see a dialog box appear saying – “This program has compatibility issues
      1. simply check the “Don’t show this message again
      2. then click the “Run the program without getting help” button
    2. When you arrive at the installation folder path setup dialog, **it’s vitally important to make sure you install to c:\acad2006 (not Program Files (x86)\AutoCAD 2006)**.
  4. Once installed
    1. Do not reboot if asked to do so
    2. Make sure to fully close the setup program when the installation is complete.
    3. Back in the Converter app and make sure it’s completed the final stage of processing using the “Old AutoCAD Program Reviver” tab
  5. Finally, reboot your PC and run your AutoCAD as normal
    1. NOTE: When starting AutoCAD, if you see a warning dialog when you run saying “This program has known compatibility issues
      1. Click “Don’t show this message again”
      2. then click “Run the Program…”

Installing AutoCAD 2006 Service Pack 1

  1. English Users, Download your English AutoCAD 2006 sp1 from here
    1. Non-English users, Download your language specific AutoCAD 2006 sp1 from here
  2. Now copy your newly downloaded sp (for English users the filename is AutoCAD2006SP1.exe) to folder path c:\Autodesk\sp
  3. Start the Converter App
    1. select the 3rd tab named “Old AutoCAD Program Reviver
    2. Using the “. . .” button, pick the c:\Autodesk\sp folder
    3. click “Fix Old Program“.
  4. Now you can run the service pack exe installer from Windows explorer as normal
  5. Once completed, now run your AutoCAD!

Troubleshooting

– If you see a warning dialog when you run AutoCAD saying “This program has known compatibility issues”, simply click “Don’t show this message again” and then click “Run the Program…

– If you are unable to activate your product, or the activation process crashes:

– If you have crashing problems using the File->Open or File->Save dialogs inside of AutoCAD please read this blog entry on the File->Open or File->Save Crash in AutoCAD

Copyright 2019 (c) Longbow Software


Installing AutoCAD 2000i on Windows 7, Windows 8 and Windows 10

AutoCAD 2000i users are very used to the software package and cannot do without it. With the latest hardware and required move to new Windows versions, you will run into multiple problems trying to get your AutoCAD running again. Follow these steps to get your AutoCAD running again on new versions of Windows…

NOTE: Be sure to follow the instructions precisely as documented including using the exact same folder names and paths. These are vital for the process to complete successfully.

How to install AutoCAD 2000i

  1. Obtain your purchased copy of the Longbow Converter here
  2. Start In the Converter App and note the user interface
  3. Insert your AutoCAD 2000i CD into your computer
  4. Start the Longbow Converter tool
    1. Select the 2nd tab named “Old AutoCAD Installer Reviver
    2. Using the “” button pick your AutoCAD 2000i CD
    3. Click “Run Old Installer” and follow the Converter’s instructions.
    4. Once the AutoCAD 2000i setup starts, stop and read the next step…
  5. In the setup program, navigate through each setup dialog as normal, except when you get to the installation folder, **it’s vitally important to make sure you install to c:\acad2000i (not Program Files (x86)\AutoCAD 2000i as usually prompted by default)**
  6. Once setup has completed…
    1. Make sure to fully close the AutoCAD setup program 
    2. Back in the Converter app, make sure it has completed the final stage of processing using the “Old AutoCAD Program Reviver” tab – it should display “SUCCESS” in green…
    3. Now Reboot your PC
  7. Your AutoCAD 2000i is ready to run! Simply use Windows Explorer, navigate to c:\acad2000i and double click acad.exe (if you want a shortcut on the Desktop you will have to manually create it). 

Installing the AutoCAD 2000i sp2 service pack

  1. download the locked AutoCAD 2000i sp2 from here or download the unlocked AutoCAD 2000i sp2 from here
  2. Next, unzip and save the service pack file to c:\Autodesk\sp – do not install yet
  3. Go back into the Converter, select the 3rd tab, select the c:\Autodesk\sp folder and click Fix.
  4. Install the 2000i sp2 by running either the c:\Autodesk\sp\u090_u181p.exe for unlocked or c:\Autodesk\sp\u090_u181p_swl.exe for locked
  5. Once your sp is installed, start the Longbow Converter tool again; we are going to repeat some of the steps from the original installation before. Select the 2nd tab, pick the copy of your AutoCAD 2000i CD on your hard drive which last time was in c:\Autodesk\acad2000i folder, now select the 3rd tab, select the install folder c:\acad2000i now click Fix.
  6. Now, you can happily run your AutoCAD 2000i with sp2 on Windows 10, Windows 7 and Windows 8.


Troubleshooting

 
Copyright 2021 (c) Longbow Software

Installing AutoCAD 2007 on Windows 7, Windows 8 and Windows 10

If you are trying to install your old version of AutoCAD 2007 on new versions of Windows 10 you can run into lots of problems. Because there are so many issues, we created an App called the Longbow Converter to automatically smooth over installation and running issues for you.

All you need to do is follow these steps to install your AutoCAD 2007 on Windows 10 and make it work…

IMPORTANT NOTE: Autodesk no longer supply License Activation codes for this version of AutoCAD. The best way is to transfer your existing license to the new PC but there are other options, we document them here

How to install AutoCAD 2007

  1. Obtain your purchased copy of the Longbow Converter here
  2. Start the Longbow Converter tool
    1. Insert your AutoCAD 2007 CD into your CDRom drive
    2. select the 2nd tab named “Old AutoCAD Installer Reviver
    3. Using the “…” button, path the to your AutoCAD 2007 CD
    4. Click “Run Old Installer
      1. Read and follow all the prompts
      2. Once the AutoCAD 2007 setup starts, stop and read the next step…
  3. In the setup program, navigate through each setup dialog as normal, with these exceptions…
    1. When you click the Install link from your setup you may see a dialog box appear saying – “This program has compatibility issues” – simply check the “Don’t show this message again” and then click the “Run the program without getting help” button
    2. When you arrive at the installation folder path setup dialog, **it’s vitally important to make sure you install to c:\acad2007 (not Program Files (x86)\AutoCAD 2007)**.
    3. Once AutoCAD has installed, completely close setup
    4. Now go back to the Converter app and make sure it’s completed the final stage of processing using the “Old AutoCAD Program Reviver” tab
  4. Finally, reboot your PC and run your AutoCAD as normal
    1. NOTE: When starting AutoCAD, if you see a warning dialog when you run saying “This program has known compatibility issues”, simply click “Don’t show this message again” and then click “Run the Program…”

Installing AutoCAD 2007 Sp1

To install the sp for your AutoCAD…
  1. Download and unzip the AutoCAD 2007 Sp1
  2. Copy the autocad2007sp1.exe to folder path c:\Autodesk\sp
  3. Start the Converter, select the 3rd tab, pick the c:\Autodesk\sp folder and click Fix.
  4. Now you can run the autocad2007sp1.exe from Windows explorer and install normally.
  5. Next install sp2 just below…

Installing AutoCAD 2007 Sp2

To install the sp for your AutoCAD…
  1. Download and unzio the AutoCAD 2007 Sp2
  2. Copy the autocad2007sp2.exe to folder path c:\Autodesk\sp
  3. Start the Converter, select the 3rd tab, pick the c:\Autodesk\sp folder and click Fix.
  4. Now you can run the autocad2007sp2.exe from Windows explorer and install normally.

Troubleshooting

– If you are unable to activate your product, or the activation process crashes:

– If you have crashing problems using the File->Open or File->Save dialogs inside of AutoCAD please read this blog entry on the File->Open or File->Save Crash in AutoCAD

Copyright 2024 (c) Longbow Software

Installing AutoCAD 2005 on Windows 7, Windows 8 and Windows 10

Follow these instructions to solve issues around installing/running your old AutoCAD 2005 on Windows 7, Windows 8 and Windows 10

IMPORTANT NOTE: Autodesk no longer supply License Activation codes for this version of AutoCAD. The best way is to transfer your existing license to the new PC but there are other options, we document them here

How to install AutoCAD 2005 

  1. Obtain your purchased copy of the Longbow Converter here
  2. Start the Longbow Converter tool
    1. Insert your AutoCAD CD into your CDRom drive
    2. Select the 2nd tab named “Old AutoCAD Installer Reviver
    3. Using the “…” button, path the to your AutoCAD CD
    4. Click “Run Old Installer
      1. Read and follow all the prompts
      2. Once the AutoCAD setup starts, stop and read the next step…
  3. In the AutoCAD setup program, navigate through each setup dialog as normal, with these exceptions…
    1. When you arrive at the installation folder path setup dialog…
      1. it’s vitally important to make sure you install to c:\acad2005 (not Program Files (x86)\AutoCAD 2005)
    2. While installing…
      1. If you see an error in install “.NET Runtime Optimization Service has stopped working” – simply ignore by clicking the “Close Program” button
      2. When a message box appears warning that “64bit .NET Unavailable” – simply click OK to carry on and install AutoCAD as normal – this does not affect anything.
      3. Do not reboot if asked to do so
    3. Once installed
      1. Do not reboot if asked to do so
      2. Make sure to fully close the setup program when the installation is complete.
      3. Switch back to the Converter app and make sure it’s completed the final stage of processing using the “Old AutoCAD Program Reviver” tab – it should display “SUCCESS!”
  4. Finally, reboot your PC and run your AutoCAD as normal
    1. NOTE: When starting AutoCAD, if you see a warning dialog when you run saying “This program has known compatibility issues
      1. Click “Don’t show this message again
      2. then click “Run the Program…

Installing AutoCAD 2005 Sp1

To install the sp for your AutoCAD…
  1. Download AutoCAD 2005 Sp1
  2. Copy the service pack exe installer to folder path c:\Autodesk\sp
  3. Start the Converter App
    1. select the 3rd tab named “Old AutoCAD Program Reviver
    2. Using the “. . .” button, pick the c:\Autodesk\sp folder
    3. click “Fix Old Program“.
  4. Now you can run the service pack exe installer from Windows explorer as normal
  5. NOTE: If your AutoCAD now fails to start, you may now need to again re-run the Converter process from step (6) above

Troubleshooting

– If you are unable to activate your product, or the activation crashes:

– If you have crashing problems using the File->Open or File->Save dialogs inside of AutoCAD please read this blog entry on the File->Open or File->Save Crash in AutoCAD

Copyright 2021 (c) Longbow Software

Installing AutoCAD 2004 on Windows 7, Windows 8 and Windows 10

NOTE: We currently only support US unlocked versions of 2004 on 64bit OS. European or locked US support 2004 is limited only to 32bit Windows 7, 8 and Windows 10.

Follow these instructions to solve issues around installing/running your old AutoCAD 2004 on newer versions of 64bit Windows 7, Windows 8 and Windows 10

How to install AutoCAD 2004 

  1. Obtain your purchased copy of the Longbow Converter here
  2. Start the Longbow Converter tool
    1. Insert your AutoCAD CD into your CDRom drive
    2. Select the 2nd tab named “Old AutoCAD Installer Reviver
    3. Using the “…” button, path the to your AutoCAD CD
    4. Click “Run Old Installer
      1. Read and follow all the prompts
      2. Once the AutoCAD setup starts, stop and read the next step…
  3. In the AutoCAD setup program, navigate through each setup dialog as normal, with these exceptions…
    1. When you arrive at the installation folder path setup dialog…
      1. **it’s vitally important to make sure you install to c:\acad2004 (not Program Files (x86)\AutoCAD 2004)**.
    2. While installing…
      1. If you see an error in install “.NET Runtime Optimization Service has stopped working” – simply ignore by clicking the “Close Program” button
      2. Do not reboot if asked to do so
    3. Once installed
      1. Do not reboot if asked to do so
      2. Make sure to fully close the setup program when the installation is complete.
      3. Back in the Converter app and make sure it’s completed the final stage of processing using the “Old AutoCAD Program Reviver” tab
  4. Finally, reboot your PC and run your AutoCAD as normal
    1. NOTE: When starting AutoCAD, if you see a warning dialog when you run saying “This program has known compatibility issues
      1. Click “Don’t show this message again”
      2. then click “Run the Program…”

Installing AutoCAD 2004 Sp1

To install the sp for your AutoCAD…

  1. Download your AutoCAD 2004 Sp1
  2. Copy the service pack exe installer to folder path c:\Autodesk\sp
  3. Start the Converter App
    1. select the 3rd tab named “Old AutoCAD Program Reviver
    2. Using the “. . .” button, pick the c:\Autodesk\sp folder
    3. click “Fix Old Program“.
  4. Now you can run the service pack exe installer from Windows explorer as normal

Troubleshooting

  1. If you have crashing problems using the File->Open or File->Save dialogs inside of AutoCAD please read this blog entry on the File->Open or File->Save Crash in AutoCAD
Copyright 2019 (c) Longbow Software

Install 32bit AutoCAD 2009 LT on Windows 7, Windows 8 and Windows 10

These instructions solve issues around installing/running your AutoCAD LT 2009 on newer versions of Windows 7, Windows 8 and Windows 10 64bit

Some common issues are error messages like these…

“This operating system is not supported by AutoCAD LT 2008”

You can automatically solve these problems using our Longbow Converter App; it fixes and manages the AutoCAD LT 2009 installation so that you can be up and running again. Simply follow the instructions below 🙂

NOTE: Autodesk no longer supply License Activation codes. Once you have installed your AutoCAD (following the instructions below) you will need to authorize/activate your AutoCAD yourself, find out how by clicking here

How to install AutoCAD LT 2009

  1. Purchased a copy of the Longbow Converter here
  2. Start the Converter App
  3. Insert your AutoCAD LT 2009 CD into your CDRom drive…
    1. Select the 1st tab named “AutoCAD 32bit Installer Converter
    2. Using the “. . .” button, select your AutoCAD 2009 installation CD
    3. Next, click the “Convert button and follow instructions
  4. Once the conversion process is complete
    1. click Install/Run Setup to start setup
    2. Simply install as normal, remembering to…
      1. Fully close the AutoCAD setup application once complete
      2. Close the Converter App.
  5. Now run your AutoCAD as normal

Troubleshooting

– If you have a single self extracting exe downloaded from Autodesk

  1. Run the exe, it will ask to unzip to a folder inside of c:\Autodesk, make a note of the folder name for later use (we’ll refer to it from here as c:\Autodesk\AutoCADLT2009), now click OK.
  2. Wait until all of the files have extracted, when they do, the AutoCAD LT 2009 setup will automatically launch – simply close and move to step 3.2 above, making sure to select c:\Autodesk\AutoCADLT2009.

– If you are unable to activate your product, or the activation process crashes:

– If you have crashing problems using the File->Open or File->Save dialogs inside of AutoCAD please read this blog entry on the File->Open or File->Save Crash in AutoCAD

 
Copyright 2020 (c) Longbow Software


Installing 32bit AutoCAD LT 2010 on Windows 10, Windows 7, Windows 8 and Windows 8.1

NOTE: This blog post specifically solves issues related to these error messages on installation…

  • “This operating system is not supported by AutoCAD LT® 2010”
  • “You cannot install this product on the current operating system”
  • “You are attempting to use a 32-bit installer on a 64-bit operating system”
  • “This is a 32-bit AutoCAD LT® 2010. It cannot be installed on 64-bit Windows”

Installing AutoCAD LT 2010 32bit on Windows 10, Windows 7, Windows 8 or Windows 8.1 64bit can be very easily defined in these short steps…

NOTE: These steps do not bypass normal Autodesk licensing/authorization, you should expect to use your own serial numbers in the normal way.

  1. Obtain your copy of the Longbow Converter here
  2. If you have CDs (if not check (3) below):
    1. Using Windows Explorer, copy Disk 1 of your AutoCAD LT 2010 CD to your hard drive, to a folder path c:\Autodesk\AutoCADLT2010
    2. If you have more CD’s, copy them all directly over the top of Disk 1, overwrite all files in your previously copied c:\Autodesk\AutoCADLT2010 folder
  3. If you have a single self extracting exe downloaded from Autodesk
    1. Run the exe, it will ask to unzip to a folder inside of c:\Autodesk, make a note of the folder for later use (we’ll refer to it from here as c:\Autodesk\AutoCADLT2010), now click OK. Wait until all of the files have extracted, when they do, the AutoCAD LT 2010 setup will automatically launch – simply close it and move to the next step.
  4. Now, start the Longbow Converter tool, select the 1st tab, pick the c:\Autodesk\AutoCADLT2010 folder, and click the Convert button.
  5. Once the conversion process is complete, click Install/Run Setup to start setup. Simply install as normal.
  6. Windows 8, Windows 8.1 and Windows 10 users: Once the installation process is complete, go back to the Converter, select the 3rd tab, pick the newly installed C:\Program Files (x86)\AutoCAD 2010 folder, then click Fix
  7. Now you can happily run your AutoCAD LT 2010 32bit on Windows 10, Windows 7 and Windows 8.

Troubleshooting:

  1. If your installed AutoCAD is hanging on startup then read this post first AutoCAD Freezes on startup (AutoCAD visible but the menus don’t appear)
  2. if your AutoCAD hangs on startup (stuck at the “Checking License…” message, try installing the 32bit version of AutoCAD 2010 on 64bit Windows – we’ve actually found the 32bit AutoCAD 2010 running on 64bit Windows is much more stable and actually faster than the 64bit version of AutoCAD 2010.
  3. If your AutoCAD crashes while interacting with the Ribbon click here
  4. If you are unable to activate your product, or the activation process crashes:
    1. Try uninstalling the July 2014 Microsoft security update
    2. Try downgrading your Internet Explorer (IE) from version 11 to version 10 by following the instructions detailed here
  5. If you have crashing problems using the File->Open or File->Save dialogs inside of AutoCAD please read this blog entry on the File->Open or File->Save Crash in AutoCAD
  6. If your Windows hangs on startup after installing please refer to this help blog
Copyright 2015 (c) Longbow Software

Install Autodesk Architectural Desktop 3 on Windows 10, Windows 7, Windows 8 and Windows 8.1

Installing AutoCAD Autodesk Architectural Desktop 3 (AutoCAD 2000i) on Windows 10, Windows 7, Windows 8 or Windows 8.1 32bit or 64bit can be very easily defined in these short steps…

NOTE: These steps do not bypass normal Autodesk licensing/authorization, you should expect to use your own serial numbers in the normal way.

I recommend that you follow these steps precisely so to eliminate the risk of something going wrong with the install…
  1. Obtain your copy of the Longbow Converter here
  2. Using Windows Explorer, copy your entire Autodesk Architectural Desktop 3 CD to your hard drive, to a folder path c:\Autodesk\CDs\adt2000i 
  3. Start the Longbow Converter tool
    1. Select the 2nd tab named “Old AutoCAD Installer Reviver
    2. Pick the newly copied c:\Autodesk\CDs\adt2000i  folder
    3. Now click the “Run Old Installer” button.
    4. Read and understand all the prompts before clicking OK.
      1. Once the setup starts, stop and read the next step…
  4. In the setup program, navigate through each setup dialog as normal, except when you get to the installation folder, **it’s vitally important to make sure you install to c:\adt2000i (not Program Files (x86)\Autodesk Architectural Desktop 3 as prompted by default)**
    1. Next, install as normal
    2. Do not reboot is prompted to do so
  5. Once installed, go back to the Converter tool
    1. Select the 3rd tab named “Old AutoCAD Program Reviver”
    2. Pick the newly installed c:\adt2000i folder
    3. Click the “Fix Old Program” button.
  6. Now, you can happily run your Autodesk Architectural Desktop 3 on Windows 10, Windows 7 and Windows 8.
Troubleshooting:
If you have crashing problems using the File->Open or File->Save dialogs inside of AutoCAD please read this blog entry on the File->Open or File->Save Crash in AutoCAD
Copyright 2016 (c) Longbow Software

Installing AutoCAD Civil 3D 2006 on Windows 7, Windows 8 and Windows 10

Installing Civil3d 2006 on Windows 10, Windows 7, Windows 8 or Windows 8.1 32bit or 64bit can be very easily defined in these short steps…

IMPORTANT NOTE: Autodesk no longer supply License Activation codes for this version of AutoCAD. The best way is to transfer your existing license to the new PC but there are other options, we document them here

  1. Obtain your copy of the Longbow Converter here
  2. Using Windows Explorer, copy your entire Civil3d 2006 CD to your hard drive, to a folder path c:\Autodesk\civil3d2006 
  3. Start the Longbow Converter tool, select the 2nd tab, pick the c:\Autodesk\civil3d2006 folder, and click Run. Read and understand all the prompts before pressing OK. Once the setup starts, stop and read the next step…
  4. In the setup program, navigate through each setup dialog as normal, except when you get to the installation folder, **it’s vitally important to make sure you install to c:\civil3d2006 (not Program Files (x86)\AutoCAD Civil3d 2006 as usually prompted by default)**
  5. Once installed, go back to the Converter tool, select the 3rd tab, pick the newly installed c:\civil3d2006 folder and click Fix.
  6. Now you can happily run your Civil3d 2006 on Windows 10, Windows 7 and Windows 8.

Installing the Civil3d 2006 Service Pack 2

  1. For English users, click to Download the Civil3d 2006 sp2 (C3D2006_SP2.exe)
  2. For non-English click to select Civil3d 2006 sp2 language
  3. Now Copy the C3D2006_SP2.exe to folder path c:\Autodesk\sp
  4. Start the Converter, select the 3rd tab, pick the c:\Autodesk\sp folder and click Fix.
  5. Now run the C3D2006_SP2.exe from Windows explorer to install.

Troubleshooting:

– If you are unable to activate your product, or the activation crashes:

– If you have crashing problems using the File->Open or File->Save dialogs inside of AutoCAD please read this blog entry on the File->Open or File->Save Crash in AutoCAD

Copyright 2015 (c) Longbow Software

AutoCAD “There was a problem sending the command to the program”

If you are seeing the message “There was a problem sending the command to the program” when you double click a DWG file from Windows Explorer, then the solution is to follow the instructions listed for your AutoCAD version below:

If you do not see your version of AutoCAD listed, or you are not an AutoCAD user, leave me a comment below and I’ll check it out for you.

Copyright Longbow Software 2015

AutoCAD running slowly on Windows 10, Windows 7 and Windows 8

If your are running on Windows 10, Windows 7, Windows 8 or Windows 8.1 and your AutoCAD has suddenly started running slowly, or perhaps you are seeing “AutoCAD is not responding” message more than usual, then read on…

Check your installed programs… See if you have “Microsoft WSE 3.0 Runtime” installed, if so, simply uninstall it – it’s been replaced in Windows 7 and Windows 8 with WCF, which is built in.

Copyright 2015 (c) Longbow Software

Verifying License… AutoCAD not responding… Crash!

Windows 10, Windows 7, Windows 8 and Windows 8.1 users (32bit and 64bit) – If you are encountering Autodesk licensing issues such as blank Authorization code (authcode) screens or even crashing on startup with messages like “Verifying license…” then “AutoCAD has stopped responding” when launching AutoCAD, it could be caused by:

  1. The July 2014 Windows Security Update KB2962872
    1. these KB’s may also affect your system too – KB2943357, KB2977629 and KB2976627
  2. You are using a version of Microsoft Internet Explorer which is not compatible with your version of AutoCAD
    1. Try simply installing the latest version of Internet Explorer 11 from here – EIE11_EN-US_MCM_WIN764.EXE

NOTE: If you are primarily seeing script errors, then first check out how to enable scripting support in IE 11

Here is a list of AutoCAD versions (and other similarly labeled Autodesk products too) that most likely will be affected…

  • AutoCAD 2005
  • AutoCAD 2006
  • AutoCAD 2007
  • AutoCAD 2008
  • AutoCAD 2009
  • AutoCAD 2010
  • AutoCAD 2011
  • AutoCAD 2012
  • AutoCAD 2013
  • AutoCAD 2014

Windows Security Update KB2962872

This update can causes all Autodesk products to crash on licensing verification specifically when using these newer versions of Microsoft Internet Explorer

  • Internet Explorer 10
  • Internet Explorer 11

You can very easily uninstall KB2962872 using these short steps:

  1. Open your Windows Control Panel
  2. Navigate to Programs
  3. Click View Updates
  4. Now search for KB2962872, if KB2962872 is listed there, simply select it in the listbox and then click uninstall
  5. Let your machine take a while to think, now reboot.
  6. Now try your Autodesk product again.

If the KB2962872 doesn’t solve the problem, these KB’s may also affect your system – KB2943357, KB2977629 and KB2976627

Apparently, this is no longer relevant –  Another reason is that because you have Microsoft Internet Explorer 11 installed on your system. The solution is to rollback to Microsoft Internet Explorer 10, or maybe back as far as Internet Explorer 8

Failing that, I did find this link on the Autodesk website regarding ‘Script Errors in AutoCAD activation‘ – perhaps it helps  somehow. If that fails, and you haven’t yet tried it – Try simply installing the latest version of Internet Explorer 11 from here – EIE11_EN-US_MCM_WIN764.EXE

Copyright 2017 (c) Longbow Software

Installing AutoCAD 2005 LT on Windows 7, Windows 8, and Windows 10

Installing AutoCAD 2005 LT on Windows 7, Windows 8, Windows 8.1 or Windows 10 32bit or 64bit can be very easily defined in these short steps…

IMPORTANT NOTE: Autodesk no longer supply License Activation codes for this version of AutoCAD. The best way is to transfer your existing license to the new PC but there are other options, we document them here

  1. Obtain your copy of the Longbow Converter here (we recommend the latest version for LT 2005)
  2. Copy your AutoCAD 2005 LT CD to your hard drive, to a folder path c:\Autodesk\acadlt2005 
  3. Start the Longbow Converter tool
    1. select the 2nd tab named “Old AutoCAD Installer Reviver
    2. pick the c:\Autodesk\acadlt2005 folder
    3. click Run.
      1. Read and understand all the prompts before pressing OK.
      2. Once the setup starts, stop and read the next step…
  4. In your LT 2005 setup program…
    1. If you see a dialog titled “64-bit .NET Unavailable” – simply ignore it and click OK
    2. Now, navigate through each setup dialog as normal, except when you get to the installation folder, **it’s vitally important to make sure you install to c:\acadlt2005 (not Program Files (x86)\AutoCAD LT 2005**
    3. If you see an error in install “.NET Runtime Optimization Service has stopped working” – simply ignore by clicking the “Close Program” button
  5. Once installed
    1. go back to the Converter tool
    2. select the 3rd tab named “Old AutoCAD Program Reviver”
    3. pick the newly installed c:\acadlt2005 folder
    4. click Fix.
  6. Now you can run your AutoCAD LT 2005, but it’s a good idea to install the latest service packs.
    1. NOTE: If you see a warning dialog when you run saying “This program has known compatibility issues“, simply click “Don’t show this message again” and then click “Run the Program…
Installing AutoCAD 2005 LT Sp1
  1. Download the AutoCAD 2005 LT Sp1 (locked) from our good friends at CADStudio (as Autodesk no longer post older sp’s)
  2. Copy the ACLT2005sp1SWL.exe to folder path c:\Autodesk\sp
  3. Start the Converter, select the 3rd tab, pick the c:\Autodesk\sp folder and click Fix.
  4. Now run the ACLT2005sp1SWL.exe from Windows explorer
  5. NOTE: If your AutoCAD fails to start, you may now need to again re-run the Converter process from step (6) above
Troubleshooting:

– If you are unable to activate your product, or the activation crashes:

– If you have crashing problems using the File->Open or File->Save dialogs inside of AutoCAD please read this blog entry on the File->Open or File->Save Crash in AutoCAD

Copyright 2016 (c) Longbow Software

Installing Land Desktop 3 (LDT 2002) on Windows 7, Windows 8 and Windows 10

Installing Land Desktop 3 (LDT 2002) on Windows 7, Windows 8 or Windows 10 32bit or 64bit can be very easily defined in these short steps…

NOTE: These steps do not bypass normal Autodesk licensing/authorization, you should expect to use your own serial numbers in the normal way.

It is recommended that you follow these steps precisely as documented so as to eliminate the risk of something going wrong with the install…

Obtain your copy of the Longbow Converter here

How to install Land Desktop 2002 

  1. Obtain your copy of the Longbow Converter here
  2. Insert your LDT 2002 CD into your computer
  3. This image has an empty alt attribute; its file name is ProblemSolved-1.pngStart the Longbow Converter tool
    1. Select the 2nd tab named “Old AutoCAD Installer Reviver”
    2. Using the “. . .” button, pick your LDT 2002 CD ROM
      1. Now click the “Run Old Installer” button
      2. Next, just follow the Converter’s instructions.
    3. Once the AutoCAD setup starts, stop and read the next step
  4. In the setup program, navigate through each setup dialog as normal, except when you get to the installation folder **it’s vitally important to make sure you install to c:\ldt2002 (not Program Files (x86)\Autodesk Land Desktop 3 as usually prompted by default)**
    1. Now carry on with the install as usual
    2. Do not reboot if asked to do so
  5. Once installed…
    1. Be sure to completely close the setup application
    2. Now go back to the Converter app and make sure it’s completed the final stage of processing using the “Old AutoCAD Program Reviver” tab, it should say SUCCESS!!
    3. Finally, reboot your PC and run your AutoCAD as normal
  6. Now you can happily run your LDT 2002!

Installing LDT 3 Service Packs

You must first install sp1, followed by sp2…

LDT 3 sp1 – software lock/unlocked with html documentation

LDT 3 sp2 – software lock/unlocked with html documentation 

  1. Unzip the sp1 into a folder called c:\Autodesk\LDT3 sp1
  2. Next, start the Converter, select the 3rd tab “Old AutoCAD Program Reviver” select the c:\Autodesk\LDT3 sp1 folder, then click Fix.
    1. If asked if this is a service pack by the Converter tool, say yes.
  3. Now run the sp1 as you need from Windows Explorer.
  4. Repeat for sp2

Installing Civil Design 3

Using the Longbow Converter solution, you can also install the Civil Design add-on to LDT 3.

  1. Using Windows Explorer, copy your entire Civil Design 3 CD to your hard drive, to a folder path c:\Autodesk\ldt2002 – Civil Design 3 
  2. Start the Longbow Converter tool, select the 2nd tab, pick the c:\Autodesk\ldt2002 – Civil Design 3 folder, and click Run. Read and understand all the prompts before pressing OK. Once the setup starts, stop and read the next step…
  3. In the setup program, navigate through each setup dialog as normal
  4. Now your Civil Design 3 is up and running with LDT.

Installing Survey 3

Using the Longbow Converter solution, you can also install the Survey add-on to LDT 3.

  1. Using Windows Explorer, copy your entire Survey 3 CD to your hard drive, to a folder path c:\Autodesk\ldt2002 – Survey 3 
  2. Start the Longbow Converter tool, select the 2nd tab, pick the c:\Autodesk\ldt2002 – Survey 3 folder, and click Run. Read and understand all the prompts before pressing OK. Once the setup starts, stop and read the next step…
  3. In the setup program, navigate through each setup dialog as normal
  4. Now your Survey 3 is up and running with LDT.

Installing Raster Design 3

Using the Longbow Converter solution, you can also install the Raster Design add-on to LDT 3.

  1. Using Windows Explorer, copy your entire Survey 3 CD to your hard drive, to a folder path c:\Autodesk\ldt2002 – Raster Design 3 
  2. Start the Longbow Converter tool, select the 2nd tab, pick the c:\Autodesk\ldt2002 – Raster Design 3 folder, and click Run. Read and understand all the prompts before pressing OK. Once the setup starts, stop and read the next step…
  3. In the setup program, navigate through each setup dialog as normal
  4. Now your Raster Design 3 is up and running with LDT.

Troubleshooting

Copyright 2021 (c) Longbow Software

Installing Mechanical Desktop 6 on Windows 10, Windows 7, Windows 8 and Windows 8.1

Installing Mechanical Desktop 6 (MDT 2002) on Windows 10, Windows 7, Windows 8 or Windows 8.1 32bit or 64bit can be very easily defined in these short steps…

NOTE: These steps do not bypass normal Autodesk licensing/authorization, you should expect to use your own serial numbers in the normal way.

Before starting, a quick word of advice: best to follow the instructions below precisely and to the letter, including folder names and paths, that way you will reduce the risk of having any problems…
  1. Obtain your copy of the Longbow Converter here
  2. Copy your Mechanical Desktop 6 CD to your hard drive, to a folder path c:\Autodesk\mdt2002 
  3. Start the Longbow Converter tool, select the 2nd tab, pick the c:\Autodesk\mdt2002 folder, and click Run. Read and understand all the prompts before pressing OK. Once the setup starts, stop and read the next step…
  4. In the setup program, navigate through each setup dialog as normal, except when you get to the installation folder, **it’s vitally important to make sure you install to c:\mdt2002 (not Program Files (x86)\Mechanical 6**
  5. Once installed, go back to the Converter tool, select the 3rd tab, pick the newly installed c:\mdt2002 folder and click Fix.
  6. Now you can happily run your Mechanical Desktop 6.
Troubleshooting:
Copyright 2015 (c) Longbow Software

Installing AutoCAD LT 2002 on Windows 10, Windows 7, Windows 8 and Windows 8.1

If you are a seasoned AutoCAD LT 2002 user, no doubt you will at some point have run into the famous GEDIT 3 error and been very frustrated with it. That error occurs because of certain video card drivers and/or certain types of anti-virus software setups.

On Windows 10, Windows 7 and Windows 8, the GEDIT 3 error is even more prominent because of all the new security features that are inside of Windows 7 and 8. The good news is that it’s totally possible to eradicate the GEDIT 3 error by follow the instructions below:
 

How to install AutoCAD LT 2002 

  1. Obtain your purchased copy of the Longbow Converter here
  2. Start the Longbow Converter tool
    1. Insert your AutoCAD CD into your CDRom drive
    2. Select the 2nd tab named “Old AutoCAD Installer Reviver
    3. Using the “…” button, path the to your AutoCAD CD
    4. Click “Run Old Installer
      1. Read and follow all the prompts
      2. Once the AutoCAD setup starts, stop and read the next step…
  3. In the setup program, navigate through each setup dialog as normal, except when you get to the installation folder – **it’s vitally important to make sure you install to c:\acadlt2002 (not Program Files (x86)\AutoCAD LT 2002 as usually prompted by default)**
    1. IMPORTANT NOTE: For AutoCAD 2002 you may find that entering the path C:\acadlt2002 may not take (a bug in the AutoCAD 2002 installer). In that case, you will need to select the installation folder C:\Program Files (x86)\AutoCAD LT 2002 in step (5) below
    2. Do not reboot if prompted to do so

      You must change the default AutoCAD LT 2002 Install path
  4. Once installed
    1. Once installed
      1. Do not reboot if asked to do so
      2. Make sure to fully close the setup program when the installation is complete.
      3. Back in the Converter app and make sure it’s completed the final stage of processing using the “Old AutoCAD Program Reviver” tab.
  5. Now run your AutoCAD LT 2002 and completely register as normal. Once registered, exit AutoCAD and continue to the next step.
  6. Next, obtain the AutoCAD LT 2002 sp1 from here unzip and save to c:\Autodesk\spdo not install yet
  7. Next, obtain the AutoCAD LT 2002 sp2 from here (or AutoCAD LT 2002 sp2 locked version from here) and save to c:\Autodesk\sp do not install yet
  8. Go back into the Converter
    1. select the 3rd tab named “Old AutoCAD Program Reviver”
    2. Using the “. . .” button, select the c:\Autodesk\sp folder
    3. click “Fix Old Program“.
  9. Now Install the LT 2002 sp1 by running c:\Autodesk\sp\acad2002LTsp1.exe
    1. IMPORTANT NOTE: If you get a 114 error, contact Longbow Software Support to get them to fix it for you.
  10. Next, install the LT 2002 sp2 by running either the unlocked c:\Autodesk\sp\acltk044-k047unl.exe or the locked c:\Autodesk\sp\acltk044-k047swl.exe
    1. IMPORTANT NOTE: If you get a 114 error, contact Longbow Software Support to get them to fix it for you.
  11. Finally, reboot your PC and run AutoCAD as normal.

Troubleshooting

  • If you cannot install your AutoCAD LT 2002 Service Packs because of an error “114: Autocad LT 2002 update was not applied” – rather than try and solve this issue, the easiest solution is:
    1. To go back to your old Windows XP machine and make sure that all of the sp’s are installed on your old Windows XP machine’s installation of AutoCAD LT 2002
    2. Next, simply copy all of the AutoCAD LT 2002 program files and folders from your old Windows XP machine to a USB drive – copy the “contents” of C:\Program Files\AutoCAD LT 2002
    3. Now transfer the USB to your new machine and copy the files that were on your old Windows XP machine’s C:\Program Files\AutoCAD LT 2002 folder into your newly installed c:\acadlt2002 folder – you should see a question if you should overwrite all files, say YES
  • If you have crashing problems using the File->Open or File->Save dialogs inside of AutoCAD please read this blog entry on the File->Open or File->Save Crash in AutoCAD


Copyright 2019 (c) Longbow Software

Installing AutoCAD LT 2000i on Windows 7, Windows 8 and Windows 10

AutoCAD LT 2000i users are very used to the software package and cannot do without it. With the latest hardware and required move to new Windows versions, you will run into multiple problems trying to get your AutoCAD running again. Follow these steps to get your AutoCAD running again on new versions of Windows…

NOTE: Be sure to follow the instructions precisely as documented including using the exact same folder names and paths. These are vital for the process to complete successfully.

How to install AutoCAD LT 2000i

  1. Obtain your purchased copy of the Longbow Converter here
  2. Start In the Converter App and note the user interface
  3. Insert your AutoCAD LT 2000i CD into your computer
  4. Start the Longbow Converter tool
    1. Select the 2nd tab named “Old AutoCAD Installer Reviver
    2. Using the “” button pick your CD Rom with the AutoCAD CD inside
    3. Click “Run Old Installer” and follow the Converter’s instructions.
    4. Once the AutoCAD LT 2000i setup starts, stop and read the next step…
  5. In the setup program
    1. navigate through each setup dialog as normal, except when you get to the installation folder, **it’s vitally important to make sure you install to c:\acadlt2000i (not Program Files (x86)\AutoCAD  LT 2000i as usually prompted by default)**
    2. If you see an error message about “Windows Netmeeting 3.01: Command line option syntax error“, you can ignore this error by simply clicking OK
  6. Once setup has completed…
    1. Make sure to fully close the AutoCAD setup program
    2. Back in the Converter app, make sure it has completed the final stage of processing using the “Old AutoCAD Program Reviver” tab – it should display “SUCCESS” in green…
    3. Now Reboot your PC
  7. Your AutoCAD LT 2000 is ready to run! Simply use Windows Explorer, navigate to c:\acadlt2000i and double click aclt.exe (if you want a shortcut on the Desktop you will have to manually create it).

Installing the AutoCAD LT 2000i sp2 service pack

 
  1. download the locked AutoCAD LT 2000i sp2 from here or download the unlocked AutoCAD 2000i LT sp2 from here
  2. Next, unzip and save the service pack file to c:\Autodesk\sp – do not install yet
  3. Go back into the Converter, select the 3rd tab, select the c:\Autodesk\sp folder and click Fix.
  4. Install the LT 2000i sp2 by running either the c:\Autodesk\sp\u090_u181p.exe for unlocked or c:\Autodesk\sp\u090_u181p_swl.exe for locked
  5. Once your sp is installed, start the Longbow Converter tool again; we are going to repeat some of the steps from the original installation before. Select the 2nd tab, pick the copy of your AutoCAD LT 2000i CD on your hard drive which last time was in c:\Autodesk\acadlt2000i folder, now select the 3rd tab, select the install folder c:\acadlt2000i now click Fix.
  6. Now, you can happily run your AutoCAD LT 2000i with sp2 on Windows 10, Windows 7 and Windows 8.

Troubleshooting

Copyright 2021 (c) Longbow Software

Installing AutoCAD LT 2000 on Windows 7, Windows 8 and Windows 10

Most users of AutoCAD LT 2000 are so used to it that they cannot do without it. With the latest hardware and required move to newer Windows versions, trying to install your AutoCAD LT 2000 gives an error like this one…

Windows 16bit setup error - This app can't run on your PC

Windows 16bit setup error – This app can’t run on your PC

Or maybe this error…

Setup Halted System requirements error Wrong OS, AutoCAD supports Windows NT 4.0, Windows NT 5.0, Windows 95 and Windows 98

Error while trying to install AutoCAD LT 2000 on newer versions of Windows

…all is not lost, just read on…

How to install AutoCAD LT 2000

A quick word of advice: best to follow the instructions below precisely and to the letter, including folder names and paths, that way you will reduce the risk of having any problems…
  1. Obtain your copy of the Longbow Converter here
    1. Before starting, we recommend turning off Windows UAC
  2. Once you have installed the Converter App, start by double clicking the Longbow Converter shortcut on your Desktop…
    1. Insert your AutoCAD LT 2000 CD
    2. Select the 2nd tab titled “Old AutoCAD Installer Reviver” by clicking on it
    3. Using the ‘…’ button select your AutoCAD LT 2000 CD
    4. Now click the “Run Old Installer” button.
      1. Read, understand and follow all the prompts
  3. Once the AutoCAD setup program appears navigate through each setup dialog as normal and do not deviate from the defaults except when you get to the installation folder – **it’s vitally important to make sure you install to c:\acadlt2000 (not Program Files (x86)\AutoCAD LT 2000 as usually prompted)** e.g.Setting custom install path for AutoCAD LT 2000
    1. Now complete the setup making sure to…
      1. ignore the error message that appears near the end about the shortcut cannot be created “Cannot create folder AutoCAD LT 2000” – you will simply need to create the program shortcut yourself by hand once the installation is finished.
      2. Do not reboot if prompted to do so
  4. Once setup has completed…
    1. Make sure to fully close the AutoCAD setup program
    2. Back in the Converter App, make sure it has completed the final stage of processing using the “Old AutoCAD Program Reviver” tab – it should display “SUCCESS” in green…
  5. Now Reboot your PC
  6. Now you are ready to run your AutoCAD LT 2000! Simply use Windows Explorer, navigate to c:\acadlt2000 and double click aclt.exe

Troubleshooting

Copyright 2021 (c) Longbow Software