Users of AutoCAD Architectural Desktop 2i (aka AutoCAD ADT 2000) are very used to the software package and cannot do without it. With the latest hardware and required move to new Windows versions, trying to install your AutoCAD ADT 2000 gives an error like this one…

Windows 16bit setup error – This app can’t run on your PC
Or maybe this error…
Error trying to install AutoCAD ADT 2i on Windows 11
…all is not lost, just read on…
Ransomware Protection Windows 11 and AutoCAD
Just before we start note that Windows 11 comes with a Ransomware Protection which includes Controlled Folder Access. Controlled folder access blocks applications from writing to your Documents, Pictures, Videos, Music, Public and Favorites folders. AutoCAD versions all the way to AutoCAD 2021 write to certain user Public folders and are therefore blocked by this feature. This can cause issues with all sorts of things including activating your AutoCAD license and even running AutoCAD. Ransomware Protection is an important feature of Windows 11 but it will affect your AutoCAD unless you allow AutoCAD and its dependent applications access to the controlled folders.
How to install AutoCAD ADT 2000

- If you don’t yet have a copy of the Longbow Converter App you can purchase it here or click on the download link we sent you via email in order to download the Converter App to your PC.
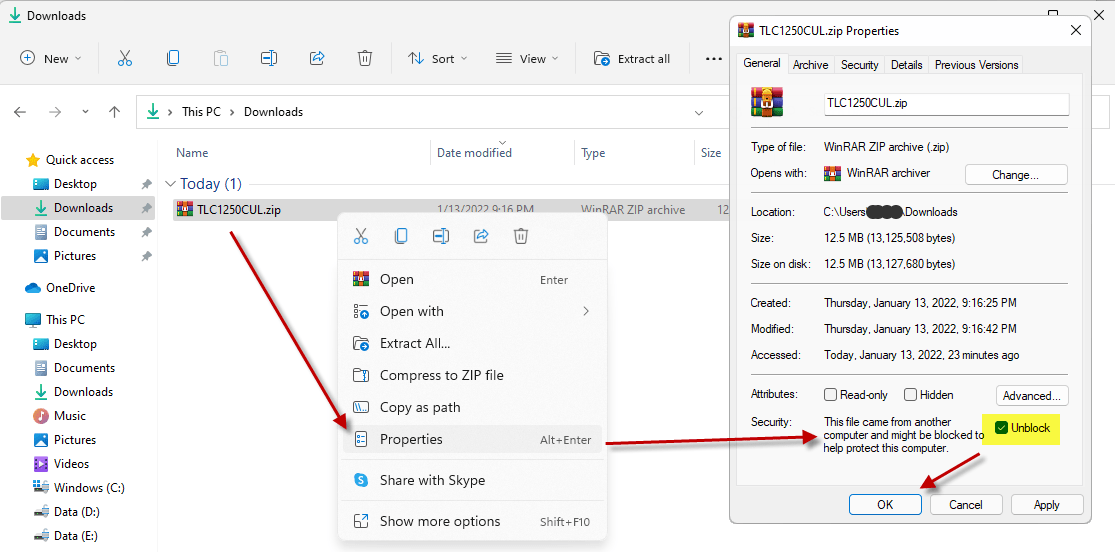
- Before installing the Converter App, make sure the files downloaded from our site are not blocked by Windows SmartScreen… Windows 11 is finicky, click the TLC zip first to make sure it’s fully selected then Right+click the file and select Properties. Be sure to check the Unblock checkbox as shown below and Click OK…

- Double click the zip file to open it and install the TLC application as normal. By the way, TLC stands for The Longbow Converter
- Now, start the Longbow Converter tool by double clicking the Longbow Converter shortcut on your Desktop… .
- Insert your AutoCAD ADT 2000 CD
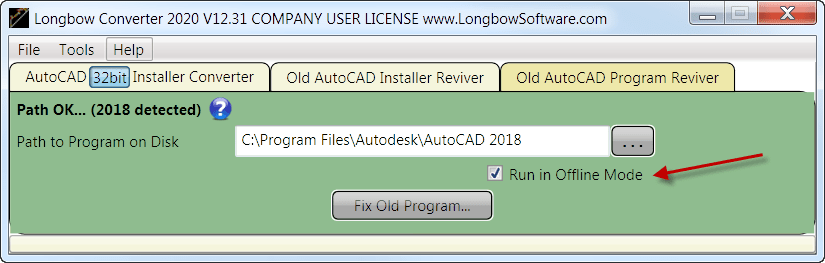
- Select the 2nd tab titled “Old AutoCAD Installer Reviver” by clicking on it
- Next, using the ‘…’ button select your AutoCAD ADT 2000 CD
- Next, click the “Run Old Installer” button and follow the onscreen instructions. If all is well a dialog will appear stating success, simply click OK to start your AutoCAD setup.
- For AutoCAD ADT 2000, the Migration Wizard almost instantly pops up
- simply click “Install….” as normal.
- Now, I know it’s unheard of these days, but at this point expect to wait at least 45 minutes for your AutoCAD ADT 2000 setup.exe program to fully appear – please be patient
- Once the setup starts, stop and read the next step…
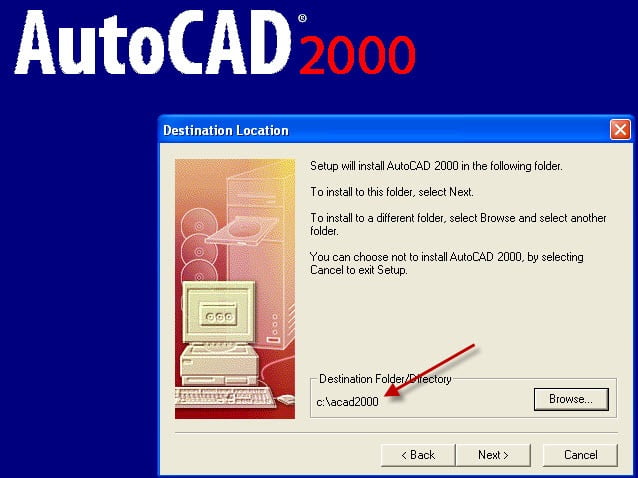
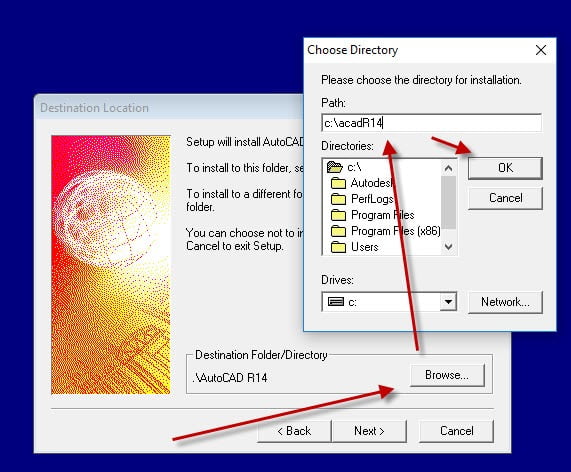
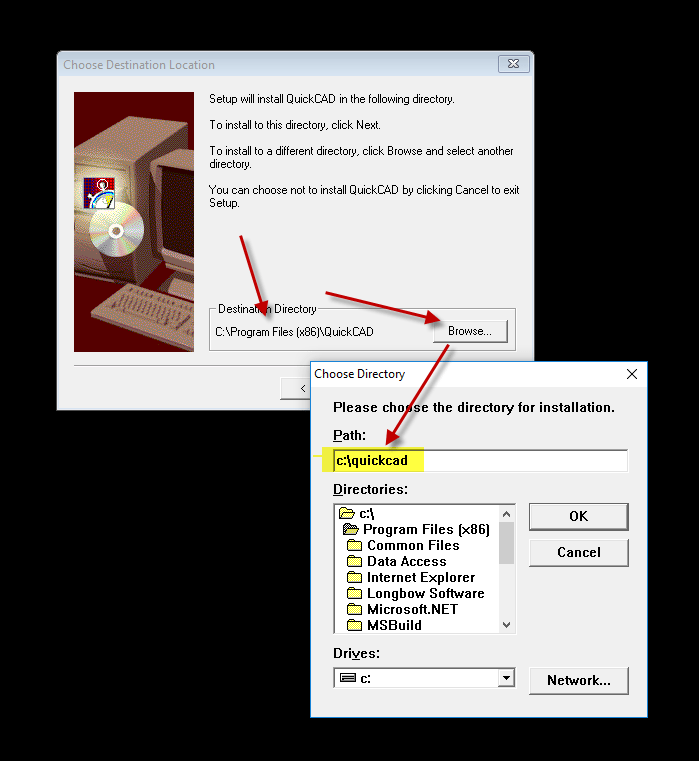
- In the setup program, navigate through each setup dialog as normal, except when you get to the installation folder **it’s vitally important to make sure you install to c:\adt2000 (not Program Files (x86)\AutoCAD Architectural Desktop as usually prompted)** e.g.
- Once you have set the Destination Folder to c:\adt2000, install as normal by selecting the Typical install
- Ignore the error message that the shortcut cannot be created “Cannot create folder AutoCAD Architectural Desktop” you will need to create the program shortcut by hand once the installation is finished.
- Do not reboot if prompted to do so
- Once setup has completed…
- Make sure to fully close the setup program
- Back in the Converter App…
- make sure it has completed the final stage of processing using the “Old AutoCAD Program Reviver” tab – it should display “SUCCESS” in green…
- Now Reboot your PC
- Your AutoCAD ADT 2i is ready to run as it is right now, simply use Windows Explorer, navigate to c:\adt2000 and double click acad.exe (if you want a shortcut on the Desktop you will have to manually create it)
Installing AutoCAD 2000 Express Tools
If you rely on AutoCAD 2000 Express Tools or you are seeing “Missing Application: RTEXT” Proxy dialog when you are loading on a drawing, here are the instructions for installing Express Tools Volume 9 for AutoCAD 2000
Installing AutoCAD 2000 Service Pack 1
- Download AutoCAD 2000 sp1 from here
- Unzip the downloaded zip file to folder path c:\Autodesk\sp
- Start the Converter
- select the 2nd tab named “Old AutoCAD Installer Reviver“
- pick the c:\Autodesk\sp\AutoCAD 2000 sp1 folder
- click ‘Run Old Installer‘
- Wait for the setup to appear, it could take up to 45 minutes, then install as normal
Installing AutoCAD 2000 Service Pack 2
- Download AutoCAD 2000 sp2 from here
- Unzip the downloaded zip file to folder path c:\Autodesk\sp
- Start the Converter
- select the 2nd tab named “Old AutoCAD Installer Reviver“
- pick the c:\Autodesk\sp\AutoCAD 2000 sp2 folder
- click ‘Run Old Installer‘
- Wait for the setup to appear, it could take up to 45 minutes, then install as normal
Installing AutoCAD 2000 3D Graphics System Update 1
If you use 3D a lot in AutoCAD 2000, you should read on to install the 3DUpdate…
- Download AutoCAD 2000 3D Graphics System Update1 from here
- Unzip your newly downloaded sp to folder path c:\Autodesk\update
- Start the Converter, select the 2nd tab, pick the c:\Autodesk\update folder and click ‘Run’
- Wait for the setup to appear, it could take up to 45 minutes, then install as normal.
NOTE: Some users have found that the 3D Graphics System Update runs through the install as normal but doesn’t actually update the modules. If you suspect this is true, contact Longbow Software Support.
Troubleshooting
- If your AutoCAD ADT 2000 setup is not starting after 45 minutes
- try rebooting, then restart the steps above. If it is still failing, most likely it’s because of another application on your system which is preventing our setup routine from starting (perhaps anti-virus, or similar) – try installing AutoCAD 2000 from Windows Safe Mode
- If when you start AutoCAD, you see error messages about missing missing aclst15.dll or missing ACUTIL15.dll or missing ACDB15.dll or missing acge15.dll
- In the Converter app Using the 3rd tab, pick your c:\adt2000 folder and click ‘Fix’. Then reboot…
- If this doesn’t fix the problem, contact Longbow Software Support.
- Plotting – if you are having plotting issues, either
- Install the AutoCAD 2000 plotupdate patch
- Download Autodesk DWG TrueView – it’s free and allows the latest plotters and plotting configurations.
- If you are getting a WinHelp() error when pressing F1 to try and access the Help system then simply install the WinHelp (WinHlp32.exe) module from Microsoft
- Issues with Calcomp Digitizer – Calcomp Digitizer not working
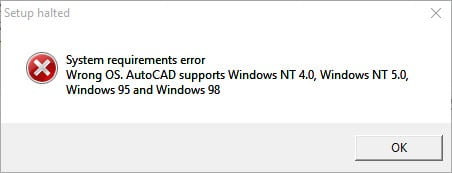
- If you still see the error “Wrong OS, AutoCAD supports Windows NT 4.0, Windows NT 5.0, Windows 95 and Windows 98” even after converting
- Copy the AutoCAD ADT 2000 CD fresh to your computer, then start from step (1) again
- If you still get the error, you need the latest version of the Longbow Converter tool
- If you have crashing problems using the File->Open or File->Save dialogs inside of AutoCAD please read this blog entry on the File->Open or File->Save Crash in AutoCAD