Run Adobe Acrobat X plugin in 32bit AutoCAD on Windows 7, Windows 8 and Windows 10 64bit

The Adobe Acrobat X plugin for AutoCAD only runs on 32bit AutoCAD, and 32bit AutoCAD only runs on 32bit Windows. This means that you will be stuck if you require the Adobe Acrobat X plugin for AutoCAD and move to newer hardware with 64bit Windows.

The Solution:  

Click on one of the links below to see how to install 32bit AutoCAD on 64bit Windows and then be able to install Adobe Acrobat X plugin.

Copyright 2017 (c) Longbow Software


Installing Corel Print House Magic on Windows 7, Windows 8 and Windows 10

Installing Corel Print House Magic on WIndows 7, Windows 8 and Windows 10 (both 32bit and 64bit) can be very easily defined in these short steps…

  1. First, you need to purchase a copy of the Longbow Reviver tool here
  2. Using Windows Explorer, copy your entire Corel Print House Magic installation CD to your hard drive, to a folder path c:\InstallCDs\CorelPrintHouseMagic
  3. Start the Longbow Reviver tool
    1. select the 1st tab “Old Installer Reviver
    2. then using the ‘…’ button pick the  c:\InstallCDs\CorelPrintHouseMagic folder
    3. Now click the ‘Fix and Run Old Installer’ button
    4. Read and understand all the prompts that appear, then continue by clicking OK.
    5. Install Corel Print House Magic as normal
    6. Do not reboot if prompted to do so
  4. Now Corel Print House Magic is installed
    1. Make sure the Corel Print House Magic setup is completely closed, then in the Longbow Reviver tool…
    2. Select the 2nd tab “Old Program Reviver
    3. Using the ‘…’ button, pick the newly installed c:\Coral folder
    4. and click ‘Fix Old Program’
    5. Say ‘No’ if the Reviver tool asks if you want to re-register…
  5. Now you can happily run your Corel Print House Magic on Windows 7, Windows 8 or Windows 10!

Copyright 2017 (c) Longbow Software

Installing Borland Delphi 3.0 on Windows 7, Windows 8 and Windows 10

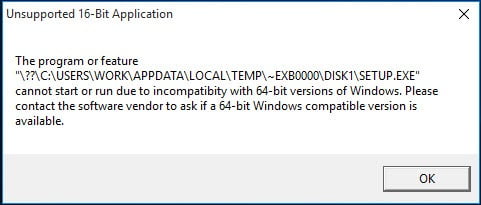
If you are trying to install Borland Delphi 3 on Windows 7, 8 or Windows 10 64bit you are probably running into one of these problems…

This app can't run on your PC. To find a version that runs with your PC check with the publisher

This app can’t run on your PC. To find a version that runs with your PC check with the publisher.

Unsupported 16-bit Application - the program or feature cannot start or run due to incompatibility with 64-bit versions of WIndows

Unsupported 16-bit Application – the program or feature cannot start or run due to incompatibility with 64-bit versions of Windows

Luckily, the Longbow Reviver tool can solve this, here’s what you need to do:

  1. Obtain your copy of the Longbow Reviver tool here
  2. Backup your Borland Delphi 3 CD to your Desktop, in a “Delphi 3” folder
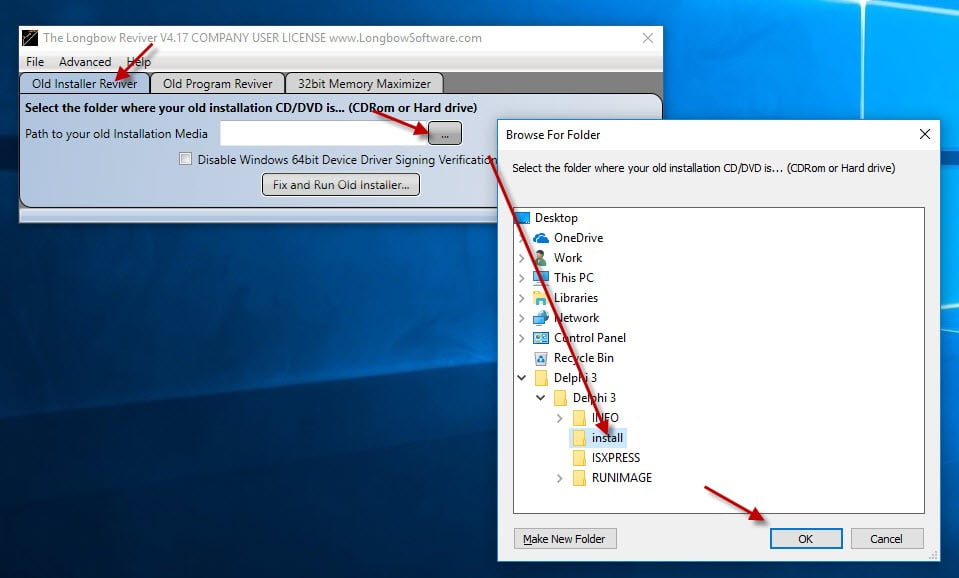
  3. Next, start the Longbow Reviver tool and select the “Old Installer Reviver” tab
    1. Using the “…” button select the path to the Desktop\Delphi 3\install folder…

      Selecting the Backup Copy of the Delphi 3 CD on your hard drive

      Selecting the Backup Copy of the Delphi 3 CD on your hard drive

    2. Once you have that selected, click OK and then pick the “Fix and Run Old Installer” button.
    3. Now, be patient, the process for initializing the Delphi 3 setup may take over an hour…
      1. Look out for a folder called _ISTMP0.DIR being created in the install folder, if it’s not there in an hour, restart your computer and try again…
      2. The _ISTMP0.DIR should slowly fill with about 21 files before the setup appears.
  4. Once your Delphi 3 setup appears
    1. step through the setup dialogs as normal until you get to the “Select Directories” dialog
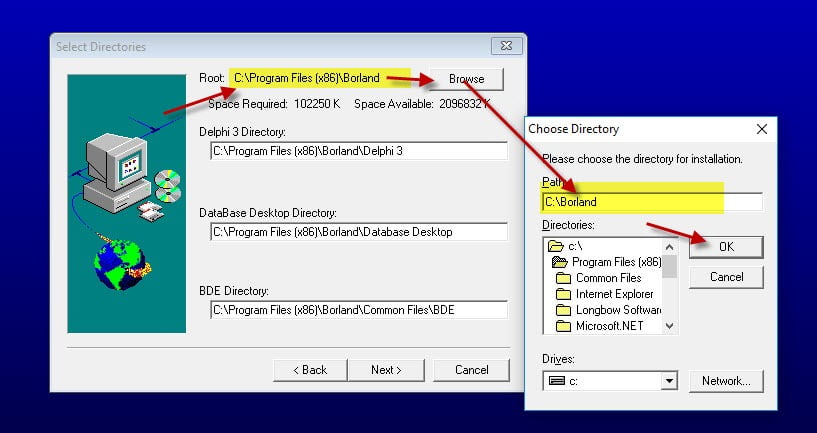
    2. Here, make sure you change the Root folder to c:\Borland (instead of c:\Program Files (x86)\Borland)

      e.g.

      Update the Borland Root pathto c:\Borland

      Update the Borland Root pathto c:\Borland

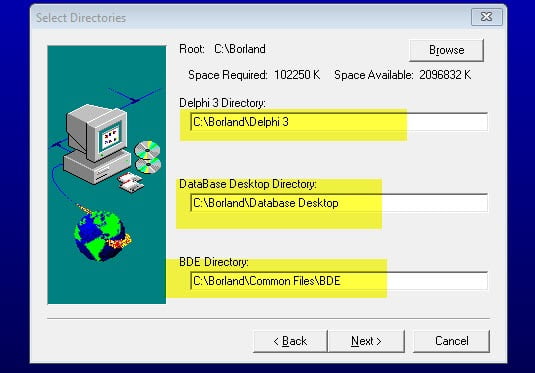
    3. Make sure they are setup like this…

      Updated the Borland Root path

      Updated the Borland Root path

    4. Now carry on and install as normal until complete
    5. Be patient, it takes a while to complete…
  5. Once the install is complete
    1. make sure the Delphi 3 setup is shutdown.
    2. Go back to the Reviver tool and select the 2nd tab named “Old Program Reviver
    3. Using the ‘…’ button, pick the newly installed c:\Borland folder
    4. Then pick the “Run Old Program” button
  6. Now your Delphi 3 should be up and running…

Copyright 2017 (c) Longbow Software

AutoCAD Freezes on startup (AutoCAD visible but the menus don’t appear)

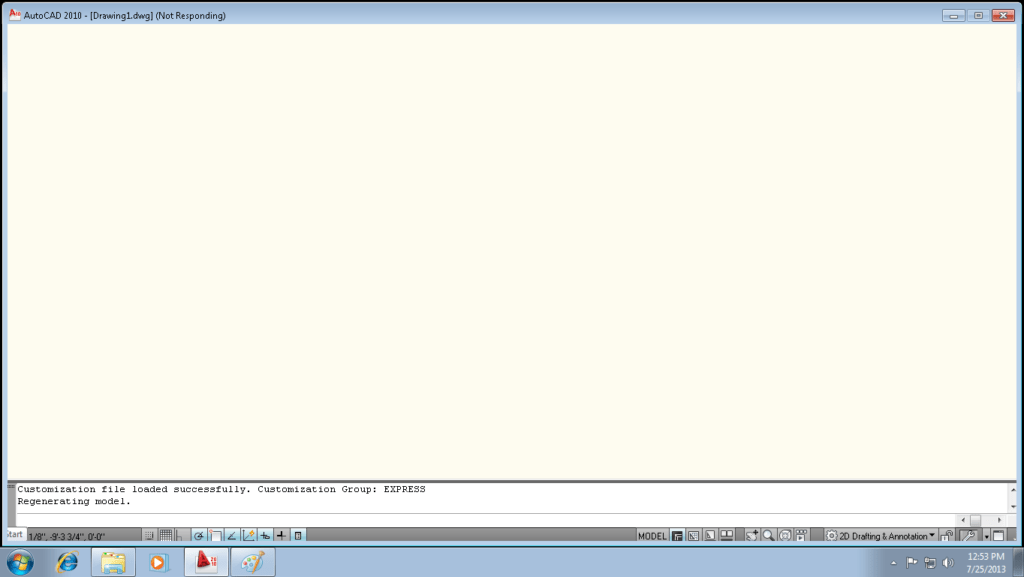
If your AutoCAD is hanging as soon as it starts (with no Ribbon visible) as shown below…

AutoCAD 2010 Freeze on startup

AutoCAD 2010 Freeze on startup

…then try these steps to fix the problem…

  1. Obtain your copy of the Longbow Converter here
  2. Select the 3rd tab named “Old AutoCAD Program Reviver
  3. Pick the “…” button to select your AutoCAD install folder. (for example C:\Program Files\AutoCAD 2010)
    1. next, click “Fix Old Program”
  4. Try your AutoCAD now, it should be fixed.

Copyright 2017 (c) Longbow Software

Interactions with the AutoCAD Ribbon crashes AutoCAD on Windows 10 (Solved)

Users complain of “autocad crashes when clicking anything” and “autocad crashing when using ribbon

It seems that a new Computers with the latest version of Windows 10 or computers that recently ran Windows Update for Windows 10 has caused Ribbon crashing issues with AutoCAD versions…

  • AutoCAD 2012
  • AutoCAD 2013
  • AutoCAD 2014
  • AutoCAD 2015

AutoCAD starts up, but any interactions with AutoCAD’s Ribbon, Status bar, or Right clicking the Command line causes AutoCAD to crash out instantly with:

Error: Unhandled Exception

We found that this issue is caused by the new .NET 4.7 update.

This update came down as part of KB3186568 and comes as standard in Windows 10 Creators Update (version 1703). Uninstalling all of the affected Windows Updates is not a solution because they are eventually forced down by Microsoft; besides Windows updates usually have security updates which stop hackers from gaining access to your computer so they should always be installed.

Fix AutoCAD Ribbon Crash

We have just released an update to fully fix this issue so you can once again rely on Windows Updates. We have solved this problem via our Longbow Converter App, you will need V11.18 or newer. Here’s what you need to do:

  1. Obtain your copy of the Longbow Converter App here
  2. Start the Converter App
    1. In the Converter App pick the 3rd tab named “Old AutoCAD Program Reviver
    2. Using the “. . .” button select the path to your problem AutoCAD
    3. Now click the “Fix Old Program“.
    4. Close the Converter App
  3. Now run AutoCAD as normal, Ribbon crash is solved.

Troubleshooting

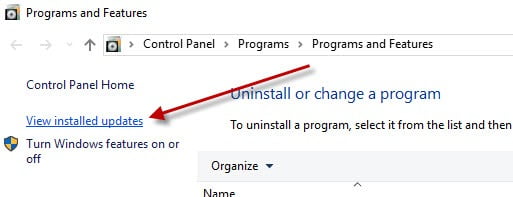
To see which Windows Updates you have installed

  1. Right Click the Windows Start Menu in the bottom right and pick “Programs and Features

    Select Programs and Features by Right-clicking the Windows 10 Start Menu

    Select Programs and Features by Right-clicking the Windows 10 Start Menu

  2. Click on “View Installed Updates” in the top left…

    Go to View installed Updates

    Go to View installed Updates

Detecting your installed version of Windows 10

  1. Right Click the Windows Start Menu in the bottom right and pick “Run
  2. Type “Winver” then Enter
Copyright 2019 (c) Longbow Software

Installing 32bit AutoCAD Architecture 2013 on Windows 7, Windows 8 and Windows 10

NOTE: This blog post specifically solves issues related to these error messages on installation…

  • “This operating system is not supported by AutoCAD® Architecture® 2013”
  • “You cannot install this product on the current operating system”
  • “You are attempting to use a 32-bit installer on a 64-bit operating system”
  • “This is a 32-bit AutoCAD® Architecture® 2013. It cannot be installed on 64-bit Windows”

Installing AutoCAD Architecture 2013 32bit on Windows 7, Windows 8, Windows 8.1 or Windows 10 64bit can be very easily defined in these short steps…

NOTE: These steps do not bypass normal Autodesk licensing/authorization, you should expect to use your own serial numbers in the normal way.

  1. Make sure all previous installed versions of AutoCAD 2013 are uninstalled first.
  2. Obtain your copy of the Longbow Converter here
  3. If you have CDs (if not check (3) below):
    1. Using Windows Explorer, backup/copy Disk 1 of your ADT 2013 CD to your hard drive, to a folder path c:\Autodesk\ADT2013
    2. If you have more CD’s, backup/copy them all directly over the top of Disk 1, overwrite all files in your previously copied c:\Autodesk\ADT2013 folder
  4. If you have a single self extracting exe downloaded from Autodesk called something like AutoCAD_Arch_2013_English_Win_32bit.exe
    1. Simply run the exe, it will ask to unzip to a folder inside of c:\Autodesk, make a note of the folder for later use (we’ll refer to it from here as c:\Autodesk\ADT2013), now click OK. Wait until all of the files have extracted, when they do, the ADT 2013 setup will automatically launch – simply close it and move to the next step.
  5. Now, start the Longbow Converter tool
    1. select the 1st tab titled “AutoCAD 32bit Installer Converter
    2. pick the c:\Autodesk\ADT2013 folder
    3. and click the “Convert…” button..
      1. Simply install as normal.Once the conversion process is complete, click the “Install/Run Setup” button to start setup.
  6. Windows 8, Windows 8.1 and Windows 10 users: Once the installation process is complete, go back to the Converter
    1. select the 3rd tab named “Old AutoCAD Program Reviver
    2. pick the newly installed C:\Program Files (x86)\Autodesk\AutoCAD Architecture 2013 folder
    3. then click “Fix Old Program”
  7. Now you can happily run your AutoCAD Architecture 2013 32bit on Windows 7, Windows 8 and Windows 10!

Installing ADT 2013 Service Packs

There are 2 sp’s for AutoCAD Architecture 2013, these are the the 32bit versions of the sp’s

  1. Here’s sp1 – AutoCAD Architecture 2013 sp1 – install as normal
  2. Here’s sp2 – AutoCAD Architecture 2013 sp2 – install as normal

Troubleshooting:

– If your AutoCAD crashes while interacting with the Ribbon click here

– If you are unable to activate your product, or the activation process crashes:

– If you have crashing problems using the File->Open or File->Save dialogs inside of AutoCAD please read this blog entry on the File->Open or File->Save Crash in AutoCAD

Copyright 2017 (c) Longbow Software

AutoCAD 2000 Proxy dialog warnings

If you are seeing a message like this while opening DWG files using AutoCAD 2000…

The last command created proxy objects and proxy entities to represent original objects and entities whose parent ARX application(s) are currently not loaded.

It’s because you are missing the AutoCAD 2000 service packs. You need to install AutoCAD 2000 sp1 and then AutoCAD 2000 sp2, as described half way down on this page Installing AutoCAD 2000 on Windows 7, Windows 8 and Windows 10

Copyright 2017 (c) Longbow Software

Installing AutoCAD R14 Express Tools Volume 6 on Windows 7, Windows 8 and Windows 10

If you are having trouble installing AutoCAD R14 Express Tools with “This app cannot run on your PC” then read on…

Installing AutoCAD R14 Express Tools Volume 6 (et1-6.exe) on Windows 7, Windows 8, Windows 8.1 and Windows 10 32bit or 64bit can be very easily defined in these short steps.

A quick word of advice: best to follow the instructions below precisely and to the letter, including folder names and paths, that way you will reduce the risk of having any problems…

  1. Obtain your copy of the Longbow Converter here
  2. Next, make sure you have AutoCAD R14 already installed – follow these steps Installing AutoCAD R14 on Windows 7, Windows 8, Windows 8.1 and Windows 10
  3. Unzip this zip to c:\Autodesk
  4. Start the Longbow Converter tool
    1. select the 2nd tab named “Old AutoCAD Installer Reviver“,
    2. pick the newly created c:\Autodesk\Express Tools R14 Volume 6 folder
    3. now click the “Run Old installer” button.
    4. Read and understand all the prompts before pressing OK.
  5. Now, I know it’s unheard of these days, but at this point expect to wait up to 45 minutes for your AutoCAD R14 Express Tools setup.exe program to fully appear. Once the setup starts, stop and read the next step…
  6. In the setup program, navigate through each setup dialog as normal, except when you get to the installation folder, **it’s vitally important to make sure you install to c:\acadR14 (not Program Files (x86)\AutoCAD Express Tools as usually prompted)**
    1. Do not reboot if prompted to do so
  7. Now you can happily run your Express Tools inside of AutoCAD R14 running on Windows 7, Windows 8 and Windows 10 –  using Windows Explorer, simply navigate to c:\acadr14 and double click acad.exe to start AutoCAD R14 and to use Express Tools R14

Troubleshooting:

  • If your Express Tools R14 setup is not starting after 45 minutes, try rebooting, then restart the steps above. If it is still failing, most likely it’s because of another application on your system which is preventing our setup routine from starting (perhaps anti-virus, or similar) – try the same steps as above in Windows Safe Mode
Copyright 2017 (c) Longbow Software

Quick start join.me to host a Technical Support Netmeeting

There’s this really cool and easy tool on the web called join.me, it allows you to quickly share your screen with someone over the internet. It’s particularly handy for issues where your computer needs direct Technical Support.

Here’s how to host a meeting **quickly** with join.me…

  1. Navigate to the join.me website by clicking on this link
  2. Next, click on the Get Started icon…

    Click the GET STARTED button

    Click the GET STARTED button

  3. Next…
    1. Enter your email
    2. A password
    3. then read and check the Accept the terms toggle
  4. Now join,me will try and gain information about you, simply click ‘SKIP‘ at the bottom of each prompt…

    Simply 'Skip' Join.me data mining

    Simply ‘Skip’ Join.me data mining

  5. Once you have skipped each page and have reached the ‘YOU”RE READY TO GO‘ page
    1. click the ‘DOWNLOAD JOIN.ME‘ button to download and run the join.me.exe (make sure you allow it to download, and once downloaded make sure you run it)

      Download Join.me

      Download Join.me

  6. At this point, if all is well, you will see a popup window stating that Join.me is starting…
  7. Once started, you will see like a join.me toolbox at the top center of your desktop
    1. select one-time code
    2. then click on the circular start triangle..
  8. Next, join.me will start the meeting and present you with a code – click the “Copy Link” button and paste the link to your Support Technician so he can see your screen.

Copyright 2017 (c) Longbow Software

Installing 64bit AutoCAD 2010 on Windows 7, Windows 8 and Windows 10 64bit


If your installed AutoCAD is hanging on startup then read this post first AutoCAD Freezes on startup (AutoCAD visible but the menus don’t appear)


Your 64bit AutoCAD 2010 was never designed to run in Windows 10, Windows 8 or Windows 8.1 64bit (these versions of Windows are newer than AutoCAD 2010) – you may see random crashing, hanging on startup and/or slow performance…

NOTE: If you are running VBA macros in AutoCAD and they are running extremely slowly, you can gain up to 1000x better performance by installing the 32bit version of AutoCAD 2010 on 64bit Windows 

NOTE: These steps do not bypass normal Autodesk licensing/authorization, you should expect to use your own serial numbers in the normal way.

  1. Obtain the Longbow Converter App (V11.15 or higher), download here
  2. Start the Converter tool
    1. Pick the 1st tab named “AutoCAD 32bit Installer Converter
    2. Using your mouse, right click the tab text “AutoCAD 32bit Installer Converter” so that it changes to “AutoCAD 64bit Installer Converter
    3. Next, using the “…” button, select your AutoCAD installation CD and follow the instructions presented by the Converter tool user interface.
  3. Once you have completed the AutoCAD installation process…
    1. close the setup program then start the Converter software
    2. Select the 3rd tab “Old AutoCAD Program Reviver
      1. Using the “…” button, pick the newly installed C:\Program Files\Autodesk\AutoCAD 2010 folder
      2. then click “Fix Old Program
  4. Now you can happily run your AutoCAD 2010 64bit on Windows 8 and Windows 10

Troubleshooting:

  1. If your installed AutoCAD is hanging on startup then read this post first AutoCAD Freezes on startup (AutoCAD visible but the menus don’t appear)
  2. if your AutoCAD hangs on startup (stuck at the “Checking License…” message, try installing the 32bit version of AutoCAD 2010 on 64bit Windows – we’ve actually found the 32bit AutoCAD 2010 running on 64bit Windows is much more stable and actually faster than the 64bit version of AutoCAD 2010.
  3. If your AutoCAD crashes while interacting with the Ribbon click here
  4. If you are unable to activate your product, or the activation process crashes:
    1. Try uninstalling the July 2014 Microsoft security update
    2. Try downgrading your Internet Explorer (IE) from version 11 to version 10 by following the instructions detailed here
  5. If you have crashing problems using the File->Open or File->Save dialogs inside of AutoCAD please read this blog entry on the File->Open or File->Save Crash in AutoCAD
  6. If your Windows hangs on startup after installing please refer to this help blog
Copyright 2017 (c) Longbow Software

Opening AutoCAD DWG file gives “Drawing File was created by an incompatible version” message

If you are trying to open a DWG file with AutoCAD and you get the message “Drawing File was created by an incompatible version” it’s because somewhere along the line your AutoCAD DWG files were saved with a newer version of AutoCAD.

All is not lost, you can make them open again in your version of AutoCAD, you just need to download the free DWGTrueView App from Autodesk – http://www.autodesk.com/products/dwg/viewers

Once installed, start DWGTrueview and open the DWG file in question, then save as making sure to select the lowest DWG file version that matches your version of AutoCAD.

Copyright 2017 (c) Longbow Software

Installing 32bit AutoCAD 2013 on Windows 7, Windows 8 and Windows 10

These instructions solve issues around installing/running your old AutoCAD 2013 on newer versions of 64bit Windows 7, Windows 8 and Windows 10. Some common issues are error messages like these…

  • “This operating system is not supported by AutoCAD® 2013”
  • “You cannot install this product on the current operating system”
  • “You are attempting to use a 32-bit installer on a 64-bit operating system”
  • “This is a 32-bit AutoCAD® 2013. It cannot be installed on 64-bit Windows”

You can automatically solve these problems using our Longbow Converter App, it fixes and manages the AutoCAD 2013 installation so that you can be up and running again… Follow these instructions:

How to install AutoCAD 2013

  1. Obtain your purchased copy of the Longbow Converter here
  2. Start the Converter App and note the user interface
  3. Select the 1st tab named “AutoCAD 32bit Installer Converter
    1. Using the “. . .” button, selection your AutoCAD installation CD
    2. Next, click the “Convert button and follow instructions
  4. Once the conversion process is complete
    1. click Install/Run Setup to start setup
    2. Simply install as normal, remembering to…
      1. Close the setup program when the installation is complete.
      2. Now back in the Converter app and make sure it’s completed the final stage of processing using the “Old AutoCAD Program Reviver” tab
  5. Now run your AutoCAD as normal

Installing AutoCAD 2013 Service Packs

There are 2 sp’s for AutoCAD 2013, these are the the 32bit versions of the sp’s

  1. Here’s sp1 –AutoCAD 2013 sp1 – install as normal
  2. Here’s sp2 – AutoCAD 2013 sp2 – install as normal

Troubleshooting

– If your AutoCAD crashes while interacting with the Ribbon click here

– If you are unable to activate your product, or the activation process crashes:

– If you have crashing problems using the File->Open or File->Save dialogs inside of AutoCAD please read this blog entry on the File->Open or File->Save Crash in AutoCAD

Copyright 2019 (c) Longbow Software

Install 32bit AutoCAD Architecture 2014 on Windows 7, Windows 8 and Windows 10

NOTE: This blog post specifically solves issues related to these error messages on installation…

  • “This operating system is not supported by AutoCAD® Architecture® 2014”
  • “You cannot install this product on the current operating system”
  • “You are attempting to use a 32-bit installer on a 64-bit operating system”
  • “This is a 32-bit AutoCAD® Architecture® 2014. It cannot be installed on 64-bit Windows”

Installing AutoCAD Architecture 2014 (ADT 2014) 32bit on Windows 7, Windows 8, Windows 8.1 or Windows 10 64bit can be very easily defined in these short steps…

NOTE: These steps do not bypass normal Autodesk licensing/authorization, you should expect to use your own serial numbers in the normal way.

  1. Obtain your copy of the Longbow Converter here
  2. If you have CDs (if not check (3) below):
    1. Using Windows Explorer, copy Disk 1 of your AutoCAD Architecture 2014 CD to your hard drive, to a folder path c:\Autodesk\ADT2014
    2. If you have more CD’s, copy them all directly over the top of Disk 1, overwrite all files in your previously copied c:\Autodesk\ADT2014 folder
  3. If you have a single self extracting exe downloaded from Autodesk called something like AutoCAD_Arch_2014_English_Win_32_64bit_en-us_Setup.exe
    1. Simply run the exe, it will ask to unzip to a folder inside of c:\Autodesk, make a note of the folder for later use (we’ll refer to it from here as c:\Autodesk\ADT2014), now click OK. Wait until all of the files have extracted, when they do, the AutoCAD Architecture 2014 setup will automatically launch – simply close it and move to the next step.
  4. Now, start the Longbow Converter tool, select the 1st tab, pick the c:\Autodesk\ADT2014 folder, and click the Convert button.
  5. Once the conversion process is complete, click Install/Run Setup to start setup. Simply install as normal.
    1. Once installed, we recommend you disable the AutoCAD Communication Center/InfoCenter toolbar as it uses a lot of memory, causes slow startup and most people don’t use it anyway!
  6. Now you can happily run your AutoCAD Architecture 2014 32bit on Windows 7, Windows 8, Windows 8.1 and Windows 10!

Troubleshooting:

– If your AutoCAD crashes while interacting with the Ribbon click here

– If you are unable to activate your product, or the activation process crashes:

– If you have crashing problems using the File->Open or File->Save dialogs inside of AutoCAD please read this blog entry on the File->Open or File->Save Crash in AutoCAD

Copyright 2014 (c) Longbow Software

Install Autodesk Architectural Desktop 3.3 on Windows 7, Windows 8 and Windows 10

Follow these instructions to solve issues around installing/running your old AutoCAD Architecture 3.3 (ADT 2002) on newer versions of 64bit Windows 7, Windows 8 and Windows 10

How to install AutoCAD ADT 3.3 

  1. Obtain your purchased copy of the Longbow Converter here
  2. Start the Longbow Converter tool
    1. Insert your AutoCAD CD into your CDRom drive
    2. Select the 2nd tab named “Old AutoCAD Installer Reviver
    3. Using the “…” button, path the to your AutoCAD CD
    4. Click “Run Old Installer
      1. Read and follow all the prompts
      2. Once the AutoCAD setup starts, stop and read the next step…
  3. In the AutoCAD setup program, navigate through each setup dialog as normal, with these exceptions…
    1. When you arrive at the installation folder path setup dialog…
      1. **it’s vitally important to make sure you install to c:\adt2002 (not Program Files (x86)\AutoCAD Architecture 3.3)**.
    2. Once installed
      1. Do not reboot if asked to do so
      2. Make sure to fully close the setup program when the installation is complete.
      3. Back in the Converter app and make sure it’s completed the final stage of processing using the “Old AutoCAD Program Reviver” tab
  4. Finally, it’s important to now reboot your PC and then install the service pack update below

Install AutoCAD Architecture 3.3 Sp2

To install the sp for your AutoCAD…
  1. Download your AutoCAD ADT 3.3 Sp2
  2. Copy the service pack exe installer to folder path c:\Autodesk\sp
  3. Start the Converter App
    1. select the 3rd tab named “Old AutoCAD Program Reviver
    2. Using the “. . .” button, pick the c:\Autodesk\sp folder
    3. click “Fix Old Program“.
  4. Now you can run the service pack exe installer from Windows explorer as normal

Last step…
We highly recommend that you disable the “Today” start page page that pops up when ADT starts…. Right click the command line->Options->Preferences->System->Startup:Do not show a startup dialog

Troubleshooting

Copyright 2019 (c) Longbow Software

Install 32bit AutoCAD 2017 on Windows 7, Windows 8 and Windows 10

These instructions solve issues around installing/running your old AutoCAD 2017 on newer versions of 64bit Windows 7, Windows 8 and Windows 10. Some common issues are error messages like these…

  • “This operating system is not supported by AutoCAD® 2017”
  • “You cannot install this product on the current operating system”
  • “You are attempting to use a 32-bit installer on a 64-bit operating system”
  • “This is a 32-bit AutoCAD® 2017. It cannot be installed on 64-bit Windows”

You can automatically solve these problems using our Longbow Converter App, it fixes and manages the AutoCAD 2017 installation so that you can be up and running again… Follow these instructions:

How to install AutoCAD 2017

  1. Obtain your purchased copy of the Longbow Converter here
  2. Start the Converter App and note the user interface
  3. Select the 1st tab named “AutoCAD 32bit Installer Converter
    1. Using the “. . .” button, selection your AutoCAD installation CD
    2. Next, click the “Convert button and follow instructions
  4. Once the conversion process is complete
    1. click Install/Run Setup to start setup
    2. Simply install as normal, remembering to…
      1. Close the setup program when the installation is complete.
      2. Back in the Converter app and make sure it has completed the final stage of processing using the “Old AutoCAD Program Reviver” tab
  5. Now run your AutoCAD as normal

Troubleshooting

– If your AutoCAD starts with a blank white screen…

  • Try turning down your screen resolution, if this doesn’t help…
    • from the Converter tool, pick the Tools->Clean Compatibility settings

– If you are unable to activate your product, or the activation process crashes:

– If you have crashing problems using the File->Open or File->Save dialogs inside of AutoCAD please read this blog entry on the File->Open or File->Save Crash in AutoCAD

Copyright 2019 (c) Longbow Software

Installing 32bit AutoCAD LT 2014 on Windows 7, Windows 8 and Windows 10

NOTE: This blog post specifically solves issues related to these error messages on installation…

  • “This operating system is not supported by AutoCAD LT®”
  • “You cannot install this product on the current operating system”
  • “You are attempting to use a 32-bit installer on a 64-bit operating system”
  • “This is a 32-bit AutoCAD LT® 2014. It cannot be installed on 64-bit Windows”

NOTE: These steps do not bypass normal Autodesk licensing/authorization, you should expect to use your own serial numbers in the normal way.

Installing AutoCAD LT 2014 32bit on Windows 7, Windows 8, Windows 8.1 or Windows 10 64bit can be very easily defined in these short steps.

  1. Obtain your copy of the Longbow Converter here
  2. If you have CDs (if not check (3) below):
    1. Using Windows Explorer, copy Disk 1 of your AutoCAD LT 2014 CD to your hard drive, to a folder path c:\Autodesk\AutoCADLT2014
    2. If you have more CD’s, copy them all directly over the top of Disk 1, overwrite all files in your previously copied c:\Autodesk\AutoCADLT2014 folder
  3. If you have a single self extracting exe downloaded from Autodesk called something like AutoCAD_LT_2014_English_Win_32bit.exe
    1. Simply run the exe, it will ask to unzip to a folder inside of c:\Autodesk, make a note of the folder for later use (we’ll refer to it from here as c:\Autodesk\AutoCADLT2014), now click OK. Wait until all of the files have extracted, when they do, the AutoCAD LT 2014 setup will automatically launch – simply close it and move to the next step.
  4. Now, start the Longbow Converter tool, select the 1st tab named ‘AutoCAD 32bit Installer Converter
    1. pick the c:\Autodesk\AutoCADLT2014 folder
    2. click the ‘Convert‘ button.
  5. Once the conversion process is complete
    1. Click ‘Install/Run Setup‘ to start setup
    2. Install as normal.
  6. Windows 8, Windows 8.1 and Windows 10 users: Once the installation process is complete…
    1. go back to the Converter, select the 3rd tab named ‘Old AutoCAD Program Reviver
    2. Pick the newly installed C:\Program Files (x86)\Autodesk\AutoCAD LT 2014 folder
    3. Click ‘Fix Old Program‘.
  7. Now you can happily run your AutoCAD LT 2014 32bit on Windows 7, Windows 8 and Windows 10!

Troubleshooting:

– If your AutoCAD crashes while interacting with the Ribbon click here

– If you are unable to activate your product, or the activation process crashes:

– If you have crashing problems using the File->Open or File->Save dialogs inside of AutoCAD please read this blog entry on the File->Open or File->Save Crash in AutoCAD

Copyright 2016 (c) Longbow Software

Install 32bit AutoCAD Electrical 2010 on Windows 7, Windows 8 and Windows 10

NOTE: This blog post specifically solves issues related to these error messages on installation…

  • “This operating system is not supported by AutoCAD® Electrical® 2010”
  • “You cannot install this product on the current operating system”
  • “You are attempting to use a 32-bit installer on a 64-bit operating system”
  • “This is a 32-bit AutoCAD® Electrical® 2010. It cannot be installed on 64-bit Windows”

…Also, hung “Merging content…” message while installing…

NOTE: These steps do not bypass normal Autodesk licensing/authorization, you should expect to use your own serial numbers in the normal way.

Installing 32bit AutoCAD Electrical 2010 on Windows 7, Windows 8, Windows 8.1 or Windows 10 64bit can be very easily defined in these short steps.

  1. First of all, you need V9.20 of the Longbow Converter (or newer) – obtain the latest version of the Longbow Converter here
  2. If you have CDs (if not skip to step 3 below) you must copy ALL CDs to your hard drive using the following instructions…
    1. Using Windows Explorer, copy Disk 1 of your AutoCAD Electrical 2010 CD to your hard drive, to a folder path c:\Autodesk\AutoCADE2010
    2. If you have more CD’s, copy them all directly over the top of Disk 1, overwrite all files in your previously copied c:\Autodesk\AutoCADE2010 folder
  3. If you have a single self extracting exe downloaded from Autodesk
    1. Run the exe, it will ask to unzip to a folder inside of c:\Autodesk, make a note of the folder name created for later use (we’ll refer to it from here as c:\Autodesk\AutoCADE2010), now click OK.
    2. Wait until all of the files have extracted, when they do, the AutoCAD Electrical 2010 setup will automatically launch – simply close it and move to the next step.
  4. Next start the Longbow Converter tool (V9.20 or newer)
    1. select the 1st tab named “AutoCAD 32bit Installer Converter
    2. Pick the c:\Autodesk\AutoCADE2010 folder (where you copied the CDs to)
    3. then click the “Convert… button
  5. Once the conversion process is complete
    1. click Install/Run Setup to start setup.
    2. Install as normal, EXCEPT – you must install to “c:\AcadE2010” (<<< the exact text, anything else will fail!) instead of c:\Program Files (x86)\AutoCAD Electrical.
    3. NOTE: Be sure to download any updates that the setup offers you.
  6. Windows 8 users: Once the installation process is complete, go back to the Converter, select the 3rd tab, pick the newly installed C:\Program Files (x86)\Autodesk\Acade 2010 folder, then click Fix Old Program
  7. Now you can happily run your AutoCAD 2010 32bit on Windows 7, Windows 8, Windows 8.1 and Windows 10.

Troubleshooting:

  1. If your installed AutoCAD is hanging on startup then read this post first AutoCAD Freezes on startup (AutoCAD visible but the menus don’t appear)
  2. if your AutoCAD hangs on startup (stuck at the “Checking License…” message, try installing the 32bit version of AutoCAD 2010 on 64bit Windows – we’ve actually found the 32bit AutoCAD 2010 running on 64bit Windows is much more stable and actually faster than the 64bit version of AutoCAD 2010.
  3. If your AutoCAD crashes while interacting with the Ribbon click here
  4. If you are unable to activate your product, or the activation process crashes:
    1. Try uninstalling the July 2014 Microsoft security update
    2. Try downgrading your Internet Explorer (IE) from version 11 to version 10 by following the instructions detailed here
  5. If you have crashing problems using the File->Open or File->Save dialogs inside of AutoCAD please read this blog entry on the File->Open or File->Save Crash in AutoCAD
  6. If your Windows hangs on startup after installing please refer to this help blog
Copyright 2016 (c) Longbow Software

Installing Rhino 3 (Rhinoceros 3) on Windows 7, Windows 8 and Windows 10

Installing your Rhino 3 on Windows 10, Windows 7, Windows 8 or Windows 8.1 32bit or 64bit can be very easily defined in these short steps…

  1. Obtain your copy of the Longbow Reviver tool here – you need version 4.13 or newer
  2. Copy your entire Rhino 3 CD to c:\CDs\Rhino3
  3. Start the Reviver tool
    1. Select the 1st tab named “Old Installer Reviver
    2. Pick the path to the copy of your Rhino CD on your hard drive e.g c:\CDs\Rhino3
    3. Click the “Fix and Run Old Installer” button
      1. Don’t select the “Disable Windows 64bit Device Driver Signing Verification” check box
      2. Read and understand all messages that appear and click OK
      3. d. Now the Rhino 3 setup should start as normal, read the next step before continuing
  4. Once in the Rhino setup, install as normal, except
    1. When prompted for the installation path c:\Program Files (x86)\Rhinoceros 3.0, change it to c:\Rhino3
    2. NOTE: You may have to create the folder by hand using Windows Explorer
    3. Now finish the install
    4. Completely close the setup application
  5. Next, before running Rhino 3
    1. Go back to the Reviver tool
    2. Pick the 2nd tab named “Old Program Reviver
    3. Using the “…” button, select the newly installed c:\Rhino3 path
    4. Click the “Fix Old Program” button
      1. When prompted “Do you want me to re-register your Program’s components?”, say no
  6. Now you can happily run your Rhino 3 on Windows 7, Windows 8 and Windows 10!

Copyright 2016 (c) Longbow Software

The Longbow Previewer – AutoCAD Shell Extensions for Windows and Outlook

Windows Shell Extensions for previewing, processing and printing AutoCAD file types within your Outlook and Windows Explorer Preview Panes


Getting Started | Overview of Functionality | Install/Uninstall | Additional Information | Contact | Support Information | Version History


Getting Started

The Longbow Previewer allows you to quickly preview, process and print AutoCAD file types such as DWG, DXF, DWT, DWF, etc. from within your Outlook and Windows Explorer Preview panes without the need to open the file with AutoCAD.

The Longbow Previewer provides access to AutoCAD related functionality via your Microsoft Outlook 2007 (or newer) and/or Windows Explorer running in Windows XP, Vista, Windows 7, Windows 8 or WIndows 10.

NOTE: Windows XP support includes all of the product features listed except for those provided by the Windows Explorer Preview Pane Window extensions (this feature is not supported in Windows XP)


Overview of functionality

  • Preview AutoCAD file types from Outlook and Windows Explorer Preview Pane window
    • High resolution preview of file
      • Hovering over the thumbnail gives huge high res preview
    • DWG/DXF “Save As” different AutoCAD file version
    • DWG Digital Signature information and verification
    • DIMSCALE information
      • Current Scale of the DWG file (DIMSCALE)
      • All Scales available in DWG file
      • Scale Rename (Coming soon!)
    • XRef information
      • includes details about resolved/unresolved xrefs
    • Purgeable objects information
      • Lists total number and types of all purgeable objects
    • Audit issues information
      • Reports all Audit issues
    • Export functionality
      • Export your DWG or DXF to PDF, DWF, DWFX, BMP, FBX, STL, WMF, SAT, EPS
      • Save your DWG or DXF to different versions of AutoCAD
      • “Quick Print” and “Print” – publish your DWG or DXF without opening AutoCAD
  • Preview other useful common file types such as
    • .lsp, .cuix, .mnu, .dbx, .arx, .crx, .mnl, and way more!.
    • for a full listing see Full Listing of Supported AutoCAD Files Types below.
  • Windows Explorer Shell Extensions – File views
    • Purgeable objects information
    • Audit issues information
      Run full Audit and save as new “Audited” file
    • Run full Purge and save as new “Purged” file
    • SaveAs functionality
      • right click a DWG or DXF file from within Windows Explorer and export to PDF, DWF, DWFX, BMP, FBX, STL, WMF, SAT, EPS
      • right click DWG or DXF and save to a different version of AutoCAD
  • Windows Explorer Shell Extensions – Folder views
    • Run full Audit on all DWG and DXF files in the same folder
      • saves them all as cleaned newly created “Audited” files
    • Run full Purge on all DWG and DXF files in the same folder
      • saves them all as cleaned newly created “Purged” files
    • SaveAs functionality
      • Export all DWG and DXF files in the same Windows folder to PDF, DWF, DWFX, BMP, FBX, STL, WMF, SAT, EPS
      • Save all DWG and DXF files in the same Windows to a different version of AutoCAD

Previewing AutoCAD file types from within the Outlook and Windows Explorer Preview Pane window

When you receive an email in Microsoft Outlook with a DWG or DXF file attached, single clicking the attachment will reveal the Longbow Previewer DWG preview control.

This control allows you to view important information about the file, without the need to open it inside of AutoCAD. The Previewer control also gives you the ability to Quick Print the DWG file, and to save the DWG or DXF as another file types or different AutoCAD DWG versions.

The image below shows a sample view of the Longbow Previewer previewing a DWG file from within an Outlook email (Note: The same preview is also available via Windows Explorer – make sure you have the Preview pane enabled then select a DWG or DXF file) As you can see, the original DWG thumbnail is displayed in the bottom right along with a much improved High-Res version just above it…
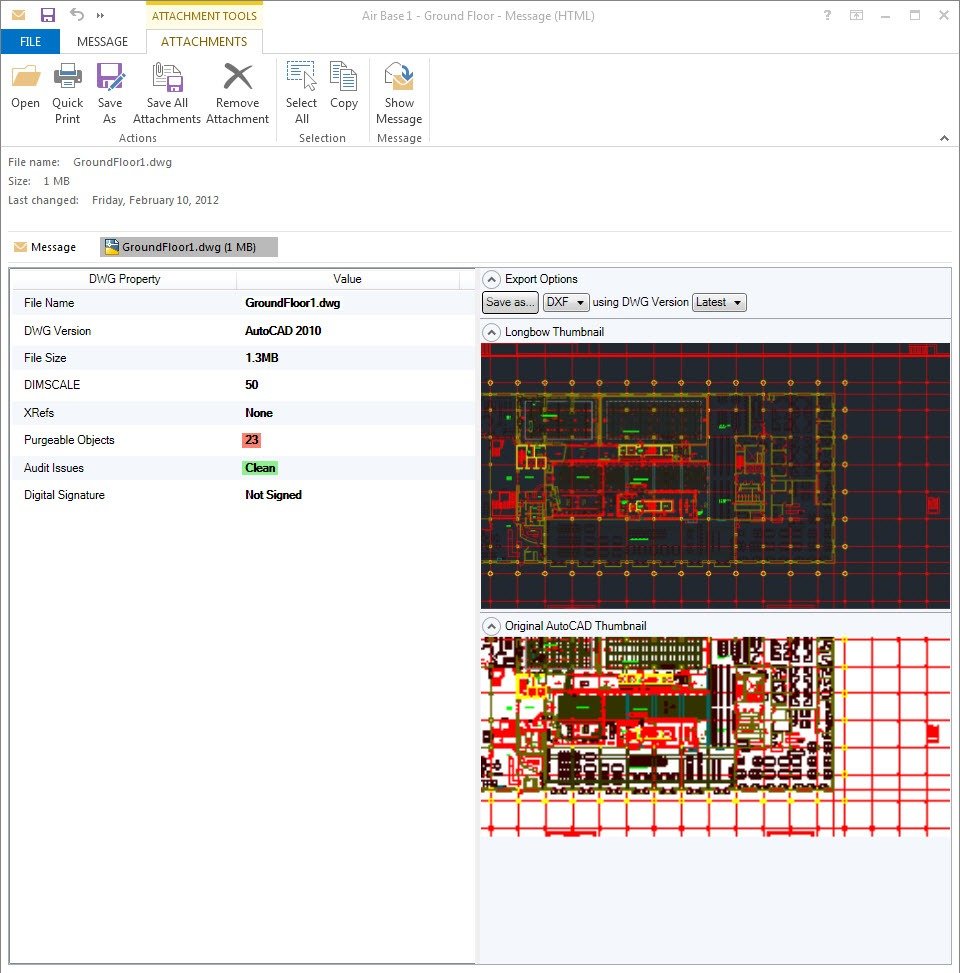
Preview DWG fiile inside of Outlook email

Preview DWG fiile inside of Outlook email
Installing 32bit AutoCAD LT 2015 on Windows 7, Windows 8 and Windows 10

NOTE: This blog post specifically solves issues related to these error messages on installation…

  • “This operating system is not supported by AutoCAD LT®”
  • “You cannot install this product on the current operating system”
  • “You are attempting to use a 32-bit installer on a 64-bit operating system”
  • “This is a 32-bit AutoCAD LT® 2015. It cannot be installed on 64-bit Windows”

NOTE: These steps do not bypass normal Autodesk licensing/authorization, you should expect to use your own serial numbers in the normal way.

Installing AutoCAD LT 2015 32bit on Windows 7, Windows 8, Windows 8.1 or Windows 10 64bit can be very easily defined in these short steps.

  1. Obtain your copy of the Longbow Converter here
  2. If you have CDs (if not check (3) below):
    1. Using Windows Explorer, copy Disk 1 of your AutoCAD LT 2015 CD to your hard drive, to a folder path c:\Autodesk\AutoCADLT2015
    2. If you have more CD’s, copy them all directly over the top of Disk 1, overwrite all files in your previously copied c:\Autodesk\AutoCADLT2015 folder
  3. If you have a single self extracting exe downloaded from Autodesk called something like AutoCAD_LT_2015_English_Win_32bit.exe
    1. Simply run the exe, it will ask to unzip to a folder inside of c:\Autodesk, make a note of the folder for later use (we’ll refer to it from here as c:\Autodesk\AutoCADLT2015), now click OK. Wait until all of the files have extracted, when they do, the AutoCAD LT 2015 setup will automatically launch – simply close it and move to the next step.
  4. Now, start the Longbow Converter tool, select the 1st tab named ‘AutoCAD 32bit Installer Converter
    1. pick the c:\Autodesk\AutoCADLT2015 folder
    2. click the ‘Convert‘ button.
  5. Once the conversion process is complete
    1. Click ‘Install/Run Setup‘ to start setup
    2. Install as normal.
  6. Windows 8, Windows 8.1 and Windows 10 users: Once the installation process is complete…
    1. go back to the Converter, select the 3rd tab named ‘Old AutoCAD Program Reviver
    2. Pick the newly installed C:\Program Files (x86)\Autodesk\AutoCAD LT 2015 folder
    3. Click ‘Fix Old Program‘.
  7. Now you can happily run your AutoCAD LT 2015 32bit on Windows 7, Windows 8 and Windows 10!

Troubleshooting:

– If you are unable to activate your product, or the activation process crashes:

– If you have crashing problems using the File->Open or File->Save dialogs inside of AutoCAD please read this blog entry on the File->Open or File->Save Crash in AutoCAD

Copyright 2016 (c) Longbow Software

Installing 32bit AutoCAD MEP 2013 on Windows 7, Windows 8 and Windows 10

These instructions solve issues around installing/running your old AutoCAD MEP 2013 on newer versions of 64bit Windows 7, Windows 8 and Windows 10. Some common issues are error messages like these…

  • “This operating system is not supported by AutoCAD MEP 2013”
  • “You cannot install this product on the current operating system”
  • “You are attempting to use a 32-bit installer on a 64-bit operating system”
  • “This is a 32-bit AutoCAD MEP 2013. It cannot be installed on 64-bit Windows”

You can automatically solve these problems using our Longbow Converter App, it fixes and manages the AutoCAD MEP 2013 installation so that you can be up and running again… Follow these instructions:

How to install AutoCAD MEP 2013

  1. Obtain your purchased copy of the Longbow Converter here
  2. Start the Converter App and note the user interface
  3. Select the 1st tab named “AutoCAD 32bit Installer Converter
    1. Using the “. . .” button, selection your AutoCAD installation CD
    2. Next, click the “Convert button and follow instructions
  4. Once the conversion process is complete
    1. click Install/Run Setup to start setup
    2. Simply install as normal, remembering to…
      1. Close the setup program when the installation is complete.
      2. Now back in the Converter app and make sure it’s completed the final stage of processing using the “Old AutoCAD Program Reviver” tab
  5. Now run your AutoCAD as normal
 

Installing AutoCAD MEP 2013 Service Packs

There are 2 sp’s for AutoCAD MEP 2013, these are the the 32bit versions of the sp’s

  1. Here’s sp1 – AutoCAD MEP 2013 sp1 – install as normal
  2. Here’s sp2 – AutoCAD MEP 2013 sp2 – install as normal
 

Troubleshooting

– If your AutoCAD crashes while interacting with the Ribbon click here

– If you are unable to activate your product, or the activation process crashes:

– If you have crashing problems using the File->Open or File->Save dialogs inside of AutoCAD please read this blog entry on the File->Open or File->Save Crash in AutoCAD


Copyright 2019 (c) Longbow Software
 

Installing CSG V3 for AutoCAD R14 on Windows 7, Windows 8 and Windows 10

If you are having problems installing your  CSG V3 for AutoCAD R14 on Windows 7, Windows 8 or Windows 10 32bit or 64bit with errors like…

Unsupported 16-bit Application - the program or feature cannot start or run due to incompatibility with 64-bit versions of WIndows

Unsupported 16-bit Application – the program or feature cannot start or run due to incompatibility with 64-bit versions of WIndows

…then read on…

Installing your CSG V3 for AutoCAD R14 on Windows 10, Windows 7, Windows 8 or Windows 8.1 32bit or 64bit can be very easily defined in these short steps…

  1. Obtain your copy of the Longbow Reviver tool here – you need version 4.10 or newer
  2. Unzip the contents of this zip file CSG Editor V3 for R14 into C:\InstallDisks\CSGR14
  3. Start the Longbow Reviver tool and select the 2nd tab called “Old Program Reviver
    1. Select the path to C:\InstallDisks\CSGR14
    2. Select the ‘Run As” option to Windows 2000
    3. Next, click the ‘Fix and Run Old Installer‘ button.
    4. Read and understand all the prompts before pressing OK. Now, I know it’s unheard of these days, but at this point expect to wait at least 45 minutes for your CSG setup.exe program to appear.
  4. Once the setup starts, stop and read the next step…
    1. If your CSG setup does not start after 45 minutes, read the Troubleshooting section below.
    2. In the setup program, navigate through each setup dialog as normal, except when you get to the installation folder input dialog, **it’s vitally important to make sure you install to your existing AutoCAD R14 folder – install to c:\acadR14 (not c:\Program Files\CSG as usually prompted)**
    3. Now carry on with the install (do not reboot once the install is complete).
      1. Do not reboot if prompted to do so
  5. Once installed, start AutoCAD R14
    1. If CSG doesn’t startup automaticaly, run the APPLOAD command, navigate to c:\acadR14 and load the CSG3.arx
  6. Now you can happily run your CSG V3 in AutoCAD R14 running on Windows 7, Windows 8, Windows 8.1 or Windows 10 32bit or 64bit
Troubleshooting:
  • If your CSG V3 setup is not starting after 45 minutes, try rebooting, then restart the steps above.
    • If it is still failing, most likely it’s because of another application on your system which is preventing our setup routine from starting (perhaps anti-virus, or similar) – try installing CSG from Windows Safe Mode

Copyright 2016 (c) Longbow Software

Installing AutoCAD Architecture 2012 32bit on Windows 7, Windows 8 and Windows 10

NOTE: This blog post specifically solves issues related to these error messages on installation of AutoCAD ADT 2012…

  • “This operating system is not supported by AutoCAD® Architecture®”
  • “You cannot install this product on the current operating system”
  • “You are attempting to use a 32-bit installer on a 64-bit operating system”
  • “This is a 32-bit AutoCAD® Architecture® 2012. It cannot be installed on 64-bit Windows”

NOTE: These steps do not bypass normal Autodesk licensing/authorization, you should expect to use your own serial numbers in the normal way.

Installing AutoCAD Architecture 2012 32bit on Windows 7, Windows 8, Windows 8.1 or Windows 10 64bit can be very easily defined in these short steps…

  1. Obtain your copy of the Longbow Converter tool here
  2. If you have CDs:
    1. Using Windows Explorer, make a backup of your Disk 1 of your ADT CD to your hard drive, to a folder path c:\Autodesk\adt2012
    2. Next, if you have a second CD, copy Disk 2 of your ADT CD’s directly over the top of Disk 1, overwrite all files in your previously copied c:\Autodesk\adt2012 folder
    3. Same again for Disk 3, if there is one
  3. If you have a single self extracting “??_sfx.exe” downloaded from Autodesk
    1. Run the exe, it will ask to unzip to a folder inside of c:\Autodesk, make a note of the folder for later use (we’ll refer to it from here as c:\Autodesk\adt2012), now click OK.
    2. Wait until all of the files have extracted, when they do, note that the ADT 2012 setup will automatically launch – make sure you close the setup and move to the next step.
  4. Now, start the Longbow Converter tool, select the 1st tab named “AutoCAD 32bit Installer Converter
    1. Next, using the ‘‘ button select the newly created c:\Autodesk\adt2012 folder, and click the ‘Convert‘ button.
      1. If the Converter complains that this is not a 32bit installer, make sure you select the folder which contains the setup.exe and the setup.ini files in the root of the installation media
  5. Once the conversion process is complete, simply click the “Install/Run Setup to start the setup.
    1. Now, just install as normal.
  6. Windows 8, Windows 8.1 and Windows 10 users…
    1. Once the installation process is complete, close the Setup program
    2. go back to the Converter…
      1. select the 3rd tab named “Old AutoCAD Program Reviver
      2. pick the newly installed C:\Program Files (x86)\\Autodesk\AutoCAD Architecture 2012 folder
      3. then click the ‘Fix‘ button.
  7. Now you can happily run your AutoCAD Architecture 2012 32bit on Windows 7, Windows 8, Windows 8.1 and Windows 10 64bit!

Installing ADT 2012 Service Packs

We recommend that you download and install the latest Service Packs from Autodesk which can be found here

Troubleshooting:

– If your AutoCAD crashes while interacting with the Ribbon click here

– If you are unable to activate your product, or the activation process crashes:

– If you have crashing problems using the File->Open or File->Save dialogs inside of AutoCAD please read this blog entry on the File->Open or File->Save Crash in AutoCAD

Copyright 2017 (c) Longbow Software

Installing AutoCAD Mechanical Desktop 2004 on Windows 7, Windows 8 and Windows 10

NOTE: We currently only US unlocked versions of 2004 on 64bit OS. European or locked US support 2004 is limited only to 32bit Windows 7, 8 and Windows 10.

Installing AutoCAD Mechanical 2004 on Windows 7, Windows 8 and Windows 10 32bit or 64bit can be very easily defined in these short steps…

NOTE: These steps do not bypass normal Autodesk licensing/authorization, you should expect to use your own serial numbers in the normal way.

  1. Obtain your copy of the Longbow Converter here
  2. Using Windows Explorer, your MDT 2004 CD to your hard drive, to folder path c:\Autodesk\InstallCDs\mdt2004
  3. Start the Longbow Converter tool…
    1. Select the 2nd tab named “Old AutoCAD Installer Reviver“,
    2. Now pick the ‘…’ button and select the folder path c:\Autodesk\InstallCDs\mdt2004
    3. Now click the “Run Old Installer…” button.
    4. Read and understand all the prompts before pressing OK. Once the setup starts, stop and read the next step…
      1. In the setup program, navigate through each setup dialog as normal, except when you get to the installation folder, **it’s vitally important to make sure you install to c:\mdt2004 (not Program Files (x86)\AutoCAD Mechanical 2004**
    5. If you see an error in install “.NET Runtime Optimization Service has stopped working” – simply ignore by clicking the “Close Program” button
  4. Once installed, go back to the Converter tool…
    1. select the 3rd tab named “Old AutoCAD Program Reviver
    2. pick the newly installed c:\mdt2004 folder and click “Fix Old Program…“.
  5. Now you can run happily your MDT 2004 in Windows 7, Windows 8 and Windows 10 both 32bit and 64bit.
    1. NOTE: If you see a warning dialog when you run saying “This program has known compatibility issues“, simply click “Don’t show this message again” and then click “Run the Program…”
Troubleshooting:
If you have crashing problems using the File->Open or File->Save dialogs inside of AutoCAD please read this blog entry on the File->Open or File->Save Crash in AutoCAD
Copyright 2016 (c) Longbow Software

Installing Qualcomm Eudora 7.1 on Windows 7, Windows 8 and Windows 10

If you are having problems installing your Qualcomm Eudora 7.1 on Windows 7, Windows 8 or Windows 10 32bit or 64bit with errors like…

“Error 1706. No valid source could be found for product Eudora Project.  The Windows Installer cannot continue”

…then read on…

Installing your Eudora 7.1 on Windows 10, Windows 7, Windows 8 or Windows 8.1 32bit or 64bit can be very easily defined in these short steps…

  1. Obtain your copy of the Longbow Reviver tool here – you need version 4.10 or newer
  2. Copy your Eudora_7.1.<version>.exe setup program to a folder on your hard drive, say C:\InstallDisks\Eudora
  3. Start the Longbow Reviver tool and select the 2nd tab called “Old Program Reviver
    1. Select the path to C:\InstallDisks\Eudora
    2. Select the ‘Run As” option to Windows 2000
    3. Next, click the ‘Fix Old Program‘ button.
    4. Once the process is complete, using Windows Explorer, double click the C:\InstallDisks\Eudora\Eudora_7.1.<version>.exe to install as normal
  4. Once installed, and before running the application…
    1. Go back to the Reviver application, select the 2nd tab called “Old Program Reviver
    2. Pick the path C:\Program Files (x86)\Qualcomm\Eudora then then click the ‘Fix Old Program‘ button.
  5. Now you can happily run your Eudora!

Copyright 2016 (c) Longbow Software