Installing 32bit AutoCAD Civil 3D 2012 on 64bit Windows 7, Windows 8 and Windows 10

NOTE: This blog post specifically solves issues related to these error messages on installation…

  • “This operating system is not supported by AutoCAD® Civil 3D® 2012”
  • “You cannot install this product on the current operating system”
  • “You are attempting to use a 32-bit installer on a 64-bit operating system”
  • “This is a 32-bit AutoCAD® Civil 3D® 2012. It cannot be installed on 64-bit Windows”

Installing AutoCAD Civil 3D 2012 32bit on Windows 7, Windows 8, Windows 8.1 or Windows 10 64bit can be very easily defined in these short steps…

NOTE: These steps do not bypass normal Autodesk licensing/authorization, you should expect to use your own serial numbers in the normal way.

  1. Obtain your copy of the Longbow Converter here
  2. If you have CDs:
    1. Using Windows Explorer, copy Disk 1 of your Civil 3D 2012 CD to your hard drive, to a folder path c:\Autodesk\Civil3d2012
    2. Next, copy Disk 2 of your Civil 3D CD directly over the top of Disk 1, overwrite all files in your previously copied c:\Autodesk\Civil3d2012 folder
    3. Same again for Disk 3
  3. If you have a single self extracting exe downloaded from Autodesk
    1. Run the exe, it will ask to unzip to a folder inside of c:\Autodesk, make a note of the folder for later use (we’ll refer to it from here as c:\Autodesk\Civil3d2012), now click OK. Wait until all of the files have extracted, when they do, the Civil 3D 2012 setup will automatically launch – simply close it and move to the next step.
  4. Now, start the Longbow Converter tool, select the 1st tab named “AutoCAD 32bit Installer Converter
    1. Next, using the ‘‘ button select the newly created c:\Autodesk\civil3d2012 folder, and click the ‘Convert‘ button.
      1. If the Converter complains that this is not a 32bit installer, make sure you select the folder which contains the setup.exe and the setup.ini files in the root of the installation media
  5. Once the conversion process is complete, click Install/Run Setup to start setup. Simply install as normal.
  6. Windows 8, Windows 8.1 and Windows 10 users: Once the installation process is complete, go back to the Converter, select the 3rd tab, pick the newly installed C:\Program Files (x86)\AutoCAD Civil3d 2012 folder, then click Fix.
  7. Now you can happily run your Civil 3D 2012 32bit on Windows 10, Windows 7 and Windows 8 64bit.

Installing the 32bit Civil 3D Service Packs

We recommend that you download and install the latest Service Packs from Autodesk which can be found here –

Troubleshooting:

– If your AutoCAD crashes while interacting with the Ribbon click here

– If you are unable to activate your product, or the activation process crashes:

– If you have crashing problems using the File->Open or File->Save dialogs inside of AutoCAD please read this blog entry on the File->Open or File->Save Crash in AutoCAD

Copyright 2015 (c) Longbow Software

Install Autodesk Architectural Desktop 2i on Windows 10, Windows 7, Windows 8 and Windows 8.1

Most current AutoCAD R2 ADT users are very used to the software package and cannot do without it. With the latest hardware and required move to new Windows versions, trying to install your AutoCAD ADT gives an error like this one…

Windows 16bit setup error - This app can't run on your PC

Windows 16bit setup error – This app can’t run on your PC

Or maybe this error…

Setup Halted System requirements error Wrong OS, AutoCAD supports Windows NT 4.0, Windows NT 5.0, Windows 95 and Windows 98

Error while trying to install AutoCAD ADT R2

…all is not lost, just read on…

Installing AutoCAD Autodesk Architectural Desktop R2i (AutoCAD 2000) on Windows 10, Windows 7, Windows 8 or Windows 8.1 32bit or 64bit can be very easily defined in these short steps…

NOTE: These steps do not bypass normal Autodesk licensing/authorization, you should expect to use your own serial numbers in the normal way.

I recommend that you follow these steps precisely so to eliminate the risk of something going wrong with the install…

Obtain your copy of the Longbow Converter here

  1. Using Windows Explorer…
    1. Copy your entire AutoCAD Autodesk Architectural Desktop 2i installation CD to your hard drive, to a folder path named exactly c:\Autodesk\CDs\adt2000 e.g.

      Copy ADT 2000 CD to c:\Autodesk\CDs\adt2000

      Copy ADT 2000 CD to c:\Autodesk\CDs\adt2000


  2. Start the Longbow Converter tool
    1. Select the 2nd tab named “Old AutoCAD Installer Reviver
    2. Pick the c:\Autodesk\CDs\adt2000 folder
    3. Now click “Run Old Installer”.
    4. The process will take a few moments to complete, then a dialog will appear – read and understand all the prompts before clicking OK.
  3. For ADT 2000, the Migration Wizard almost instantly pops up, simply click Install 2000 as normal.
  4. Now, I know it’s unheard of these days, but at this point expect to wait at least 45 minutes for your ADT R2i setup.exe program to fully appear.
    1. Once the setup starts, stop and read the next step…
    2. In the setup program…
      1. navigate through each setup dialog as normal except when you get to the installation folder… **it’s vitally important to make sure you install to c:\adt2000 (not “c:\Program Files (x86)\AutoCAD Architectural Desktop” as usually prompted)**
    3. During the final stages of the installation, simply ignore the fact the the ADT shortcut cannot be created, you will need to create this by hand once the installation is finished.
    4. Do not reboot if prompted to do so
  5. Once installed
    1. Go back to the Converter tool
    2. Select the 3rd tab named “Old AutoCAD Program Reviver
    3. Pick the newly installed c:\adt2000 folder and click ‘Fix Old Program‘.
  6. Now you can happily run your AutoCAD Autodesk Architectural Desktop 2i in Windows 7, Windows 8 and Windows 10!
  7. Simply use Windows Explorer, navigate to c:\adt2000 and double click acad.exe (you will need to manually create a shortcut as mentioned in step (4.a)
Installing AutoCAD 2000 Service Pack 1
  1. Download AutoCAD 2000 sp1 from here
  2. Unzip your newly downloaded sp to folder path c:\Autodesk\sp
  3. Start the Converter, select the 2nd tab, pick the c:\Autodesk\sp\AutoCAD 2000 sp1 folder and click ‘Run’
  4. Wait for the setup to appear, it could take up to 45 minutes, then install as normal

Installing AutoCAD 2000 Service Pack 2

  1. Download AutoCAD 2000 sp2 from here
  2. Unzip your newly downloaded sp to folder path c:\Autodesk\sp
  3. Start the Converter, select the 2nd tab, pick the c:\Autodesk\sp\AutoCAD 2000 sp2 folder and click ‘Run’
  4. Wait for the setup to appear, it could take up to 45 minutes, then install as normal.

Troubleshooting:

If you have crashing problems using the File->Open or File->Save dialogs inside of AutoCAD please read this blog entry on the File->Open or File->Save Crash in AutoCAD
Copyright 2016 (c) Longbow Software

Installing 64bit AutoCAD 2013 on Windows 10 64bit

Your 64bit AutoCAD 2013 was not designed to run in Windows 10 (this version of Windows is newer than AutoCAD 2013). In order for your AutoCAD 2013 to run as it did in previous versions of Windows, you need to follow these easy steps…

Install 64bit AutoCAD 2013

  1. Make sure all previous installed versions of AutoCAD 2013 are uninstalled first.
  2. Obtain your copy of the Longbow Converter here
  3. Start the Converter tool
    1. Pick the 1st tab named “AutoCAD 32bit Installer Converter
    2. Using your mouse, right click the tab text “AutoCAD 32bit Installer Converter” so that it changes to “AutoCAD 64bit Installer Converter
    3. Next, using the “…” button, select your AutoCAD installation CD and follow the instructions presented by the Converter tool user interface.
  4. Once you have completed the AutoCAD installation process…
    1. close the setup program then start the Converter software
    2. Select the 3rd tab “Old AutoCAD Program Reviver
      1. Using the “…” button, pick the newly installed C:\Program Files\Autodesk\AutoCAD 2013 folder
      2. then click “Fix Old Program
  5. Next install the AutoCAD 2013 sp2 from here 
  6. Now you can happily run your AutoCAD 2013 64bit on Windows 10

Troubleshooting

– If your AutoCAD crashes while interacting with the Ribbon click here

– If your AutoCAD is running really slowly, try disabling your integrated graphics card so you can run your high-performance card instead

– If you are unable to activate your product, or the activation process crashes:

– If you have crashing problems using the File->Open or File->Save dialogs inside of AutoCAD please read this blog entry on the File->Open or File->Save Crash in AutoCAD

Copyright 2019 (c) Longbow Software

Installing AutoCAD Mechanical 2008 from Inventor Series 2008 CD on Windows 10, Windows 7, Windows 8 and Windows 8.1

NOTE: This solution only works with an Autodesk Inventor Series 2008 installation media.

Installing Mechanical 2008 from Inventor Series 2008 CD on Windows 10, Windows 7, Windows 8 or Windows 8.1 32bit or 64bit can be very easily defined in these short steps…
NOTE: These steps do not bypass normal Autodesk licensing/authorization, you should expect to use your own serial numbers in the normal way.
  1. Obtain your copy of the Longbow Converter here
  2. Copy your Inventor Series 2008 CD to your hard drive, to a folder path c:\Autodesk\CDs\InventorSeries2008 
    1. IMPORTANT: If you have more than one CD, copy them all to the same c:\Autodesk\CDs\InventorSeries2008 folder – overwriting any existing files and folders.
  3. Start the Longbow Converter tool, select the 1st tab, pick the c:\Autodesk\CDs\InventorSeries2008 folder.
  4. The Converter will say that the media is not fully supported; simply click the Tools->Manual MSI Correction menu option
  5. Once the conversion process is completed, click the “Run Setup/Install AutoCAD…” button to bring up your Inventor 2008 setup program as normal.
    1. Un-check all install options except AutoCAD Mechanical 2008
    2. Install as normal
  6. Windows 8, Windows 8.1 and Windows 10 users: Once the installation process is complete, go back to the Converter, select the 3rd tab, pick the newly installed C:\Program Files (x86)\Autodesk\MDT 2008 folder, then click “Fix
  7. Now you can happily run your AutoCAD Mechanical 2008 on Windows 10, Windows 7 or Windows 8.

Troubleshooting:

– If you are unable to activate your product, or the activation process crashes:

– If you have crashing problems using the File->Open or File->Save dialogs please read this blog entry on the File->Open or File->Save Crash in Autodesk Products

Copyright 2016 (c) Longbow Software

Installing Adobe Photoshop 6 on Windows 7, Windows 8 and Windows 10

Installing your Adobe Photoshop 6.0 on Windows 7, Windows 8 or Windows 10 32bit or 64bit can be very easily defined in these short steps…

How to install Adobe Photoshop 6

A quick word of advice: best to follow the instructions below precisely and to the letter, including folder names and paths, that way you will reduce the risk of having any problems…

  1. Obtain your copy of the Longbow Reviver tool here – you need version 4.10 or newer
  2. Using Windows Explorer, copy your entire Adobe Photoshop 6 install CD media to your hard drive, to a folder path c:\InstallCDs\Adobe\Photoshop6
  3. Start the Longbow Reviver tool…
    1. select the 1st tab “Old Installer Reviver
    2. using the ‘…’ button pick the  c:\InstallCDs\Adobe\Photoshop6 folder
    3. Now click the ‘Fix and Run Old Installer’ button
    4. Read and understand all the prompts that appear, then continue by clicking OK.
    5. You will need to wait up to 45 minutes before seeing the Adobe Photoshop 6.0 setup screen appear, be patient!
      1. If you have waited 90 minutes and nothing has appeared, reboot into Safe Mode and try this same process again.
  4. Once your Adobe Photoshop 6.0 setup screen appears, install as normal except:
    1. When you arrive at the install to ‘Destination Folder” – it is vitally important that you install to c:\adobe\photoshop6 (not C:\Program Files (x86)\Adobe\Photoshop 6.0 as normally prompted)
    2. Do not reboot if prompted to do so
  5. Now Photoshop is installed, go back to the the Longbow Reviver tool
    1. select the 2nd tab “Old Program Reviver
    2. using the “…” button pick the newly installed c:\adobe\photoshop6 folder
    3. Set the “Run As” Option to “Windows 98
    4. click ‘Fix Old Program’
      1. Say ‘Yes’ if the Reviver tool asks if you want to re-register…
  6. Now you can happily run your Adobe Photoshop 6 on Windows 7, Windows 8 or Windows 10 32bit or 64bit!

Installing the Photoshop 7 Upgrade

If you have a Adobe Photoshop 7 Upgrade CD, simply follow the same instructions as detailed here – Installing Adobe Photoshop 7 on Windows 10, Windows 7, Windows 8 and Windows 8.1


Troubleshooting

  • If your setup is not appearing within 1 hour, reboot into Safe Mode and try the same process as above again.
Copyright 2021 (c) Longbow Software

Installing AutoCAD Land Development Desktop R2i on Windows 7, Windows 8 and Windows 10

Installing AutoCAD Land Development Desktop R2i (LDDT R2i) on Windows 7, Windows 8, Windows 8.1 or Windows 10 32bit or 64bit can be very easily defined in these short steps…

NOTE: These steps do not bypass normal Autodesk licensing/authorization, you should expect to use your own serial numbers in the normal way.

A quick word of advice: best to follow the instructions below precisely and to the letter, including folder names and paths, that way you will reduce the risk of having any problems…
  1. Obtain your copy of the Longbow Converter here – you will need version 8.56 or newer
  2. Using Windows Explorer, copy your entire LDDT R2i 2000i installation CD to your hard drive, specifically to a folder path of c:\Autodesk\CD\ldtr2000i
  3. Start the Longbow Converter tool, select the 2nd tab “Old AutoCAD Installer Reviver”, pick the c:\Autodesk\CD\ldtr2000i folder, and click Run. Read and understand any/all the prompts the Converter pops up before pressing OK.
  4. In the setup program, navigate through each setup dialog as normal, except when you get to the installation folder, **it’s vitally important to make sure you install to c:\ldt2000i (not C:\Program Files (x86)\Land Desktop R2\ as usually prompted)**
    1. Install as normal
    2. If you see the “AutoCAD Land Development Desktop 2i Migration assistant” dialog appear, say “No” – we did not test that installation path.
    3. Do not reboot if prompted to do so
  5. Make sure the setup is completely closed down, next, go back to the Converter tool, select the 3rd tab “Old AutoCAD Program Reviver”, pick the newly installed c:\ldt2000i folder and click “Fix
  6. Now you can run your Land Desktop R2i on Windows 7, Windows 8, and Windows 10, but be sure to read the Troubleshooting guide below…

Installing Autodesk Civil Design 2i

Once you have installed AutoCAD Land Development Desktop R2i using the above instructions, you can now install Civil. Here’s how:

  1. Using Windows Explorer, copy your Autodesk Civil Design 2i installation CD to your hard drive, specifically to a folder path of c:\Autodesk\CD\CivilDesign2000i
  2. Start the Converter again, select the 2nd tab “Old AutoCAD Installer Reviver”, pick the c:\Autodesk\CD\CivilDesign2000i folder, and click “Run“.
    1. If the Converter asks you “What type of installer is this? – Is this a service pack , update or plug-in/app…?” – say “Yes”.
    2. Read and understand any/all the prompts the Converter pops up before pressing OK
  3. Install as normal.
    1. If you cannot find your menu items, you may need to MENULOAD c:\ldt2000i\Support\Civil.mnu

Installing Autodesk Survey 2i

Once you have installed AutoCAD Land Development Desktop R2i using the above instructions, you can now install Survey. Here’s how:

  1. Using Windows Explorer, copy your Autodesk Survey 2i installation CD to your hard drive, specifically to a folder path of c:\Autodesk\CD\Survey2000i
  2. Start the Converter again, select the 2nd tab “Old AutoCAD Installer Reviver”, pick the c:\Autodesk\CD\Survey2000i folder, and click “Run“.
    1. If the Converter asks you “What type of installer is this? – Is this a service pack , update or plug-in/app…?” – say “Yes”.
    2. Read and understand any/all the prompts the Converter pops up before pressing OK
  3. Install as normal.
    1. If you cannot find your menu items, you may need to MENULOAD c:\ldt2000i\Support\Survey.mnu

The LDT R2i Service Pack

  1. First download the Land Desktop 2i Civil Design 2i Service Pack 2 (stand-alone and network) from here and save to c:\Autodesk\sp
  2. Next, start the Converter, select the 3rd tab “Old AutoCAD Program Reviver” select the c:\Autodesk\sp folder, then click Fix.
    1. If asked if this is a service pack by the Converter tool, say yes.
  3. Now run the ld2i_sp2_ul.exe as normal from Windows Explorer.

Troubleshooting:

Copyright 2015 (c) Longbow Software

Installing AutoCAD Map Release 3 on Windows 7, Windows 8 and Windows 10

Most current AutoCAD Map R3 users are very used to the software package and cannot do without it. With the latest hardware and required move to new Windows versions, trying to install your AutoCAD gives an error like this one…

Windows 16bit setup error - This app can't run on your PC

Windows 16bit setup error – This app can’t run on your PC

…all is not lost, just read on…

How to install AutoCAD Map R3

NOTE: We have had the best success installing this product using our Converter solution on Windows 8 and Windows 10, in fact, we strongly advise using Windows 10 for this product.

A quick word of advice: best to follow the instructions below precisely and to the letter, including folder names and paths, that way you will reduce the risk of having any problems…

  1. Obtain your copy of the Longbow Converter here
  2. Before starting, we recommend turning off Windows UAC before installing AutoCAD Map R3
  3. Start the Longbow Converter tool by double clicking the Longbow Converter shortcut on your Desktop… .
    1. Insert your AutoCAD Map R3  CD
    2. Select the 2nd tab titled “Old AutoCAD Installer Reviver” by clicking on it
    3. Next, using the ‘…’ button select your AutoCAD CD
    4. Now click the “Run Old Installer” button.
      1. Read, understand and follow all the prompts.
      2. Read the next step!
  4. Now, I know it’s unheard of these days, but at this point expect to wait at least 45 minutes for your AutoCAD 2000 setup.exe program to fully appear
    1. Once the setup starts, stop and read the next step
  5. In the setup program, navigate through each setup dialog as normal, except when you get to the installation folder, **it’s vitally important to make sure you install to c:\mapR14 (not Program Files (x86)\Land Desktop as usually prompted)**
  6. Now carry on with the install, ignore any errors related to:
    1. not being able to “…create the folder ‘AutoCAD Map Release 3”, you will have to create a shortcut on your computer Desktop to your c:\mapR14\acad.exe by hand.
    2. Failing to register DAO3032.dll, this will be automatically fixed later by the Converter
    3. Do not reboot if prompted to do so
  7. Once installed, go back to the Converter tool
    1. select the 3rd tab named “Old AutoCAD Program Reviver
    2. Using the “. . .” button pick the newly installed c:\mapR14 folder
    3. click Fix Old Program.
  8. Now you can happily run your AutoCAD Map R3 on Windows 7, Windows 8, or Windows 10 32bit or 64bit

Installing AutoCAD Map R3 Service Pack 1

  1. Download AutoCAD R14 Map R3 sp1 from here
  2. Unzip your newly downloaded sp to folder path c:\Autodesk\sp
  3. Start the Converter, select the 2nd tab, pick the c:\Autodesk\sp\AutoCAD R14 Map R3 sp1 folder and click ‘Run’
  4. Wait for the setup to appear, it could take up to 45 minutes, then install as normal

Troubleshooting

  • If you are getting either a Bad Mem Pointer error and or a Smartheap handler recursively re-entered error when you start your AutoCAD Map R3 then you need to re-run all the steps above, taking care to do each step precisely as it says.
  • If the Converter complains that “Cannot convert this AutoCAD R14, there was a problem updating the dependencies” – AutoCAD R14 must be installed first, please contact Longbow Software Support and explain this comment to them
  • If you are getting a WinHelp() error when pressing F1 to try and access the Help system then simply install the WinHelp (WinHlp32.exe) module from Microsoft
  • Issues with Calcomp Digitizer – Calcomp Digitizer not working
  • If you have crashing problems using the File->Open or File->Save dialogs inside of AutoCAD please read this blog entry on the File->Open or File->Save Crash in AutoCAD
Copyright 2019 (c) Longbow Software

Install 32bit AutoCAD Architecture 2015 on Windows 7, Windows 8 and Windows 10

NOTE: This blog post specifically solves issues related to these error messages on installation…

  • “This operating system is not supported by AutoCAD® Architecture® 2015”
  • “You cannot install this product on the current operating system”
  • “You are attempting to use a 32-bit installer on a 64-bit operating system”
  • “This is a 32-bit AutoCAD® Architecture® 2015. It cannot be installed on 64-bit Windows”

Installing AutoCAD Architecture 2015 32bit on Windows 7, Windows 8, Windows 8.1 or Windows 10 64bit can be very easily defined in these short steps…

NOTE: These steps do not bypass normal Autodesk licensing/authorization, you should expect to use your own serial numbers in the normal way.

  1. Obtain your copy of the Longbow Converter here
  2. If you have CDs (if not check (3) below):
    1. Using Windows Explorer, copy Disk 1 of your AutoCAD Architecture 2015 CD to your hard drive, to a folder path c:\Autodesk\ADT2015
    2. If you have more CD’s, copy them all directly over the top of Disk 1, overwrite all files in your previously copied c:\Autodesk\ADT2015 folder
  3. If you have a single self extracting exe downloaded from Autodesk called something like AutoCAD_Arch_2015_English_Win_32_64bit_en-us_Setup.exe
    1. Simply run the exe, it will ask to unzip to a folder inside of c:\Autodesk, make a note of the folder for later use (we’ll refer to it from here as c:\Autodesk\ADT2015), now click OK. Wait until all of the files have extracted, when they do, the AutoCAD Architecture 2015 setup will automatically launch – simply close it and move to the next step.
  4. Now, start the Longbow Converter tool, select the 1st tab, pick the c:\Autodesk\ADT2015 folder, and click the Convert button.
  5. Once the conversion process is complete, click Install/Run Setup to start setup. Simply install as normal.
    1. Once installed, we recommend you disable the AutoCAD Communication Center/InfoCenter toolbar as it uses a lot of memory, causes slow startup and most people don’t use it anyway!
  6. Now you can happily run your AutoCAD Architecture 2015 32bit on Windows 7, Windows 8, Windows 8.1 and Windows 10!

Troubleshooting:

– If you are unable to activate your product, or the activation process crashes:

– If you have crashing problems using the File->Open or File->Save dialogs inside of AutoCAD please read this blog entry on the File->Open or File->Save Crash in AutoCAD

Copyright 2015 (c) Longbow Software

Installing Softdesk 8 Landscape for AutoCAD R14 on Windows 7, Windows 8 and Windows 10

NOTE: We have had the best success installing this product using our Converter solution on Windows 8 and Windows 10

Installing Softdesk 8 Landscape for AutoCAD R14 on Windows 7, Windows 8, Windows 8.1 and Windows 10 32bit or 64bit can be very easily defined in these short steps.

A quick word of advice: best to follow the instructions below precisely and to the letter, including folder names and paths, that way you will reduce the risk of having any problems…

  1. First, obtain your copy of the Longbow Converter here
  2. Install your AutoCAD R14 by carefully following the steps detailed here
  3. Using Windows Explorer, copy your entire Softdesk 8 Imaging CD contents to your hard drive, to a folder path c:\Autodesk\landscape
  4. Start the Longbow Converter tool, select the 2nd tab, pick the c:\Autodesk\landscape folder, and click Run.
    1. When asked “Is this an installation media, a service pack/update or plug-in/app for AutoCAD?” say Yes
    2. Next, read and understand all the prompts before pressing OK… Now, I know it’s unheard of these days, but at this point expect to wait at least 45 minutes for your Softdesk setup.exe program to appear. Once the setup starts, install as normal (simply accept all defaults).
  5. Next, start your AutoCAD R14. Once AutoCAD starts up fully, simply type “preferences” at the command line, select the Profiles tab, double click the Softdesk profile and make it the Current Profile. Finally, OK out of the Preferences dialog.
  6. Now you can happily run your Softdesk 8 Landscape inside of AutoCAD R14 on Windows 7, Windows 8, Windows 8.1 or Windows 10 32bit or 64bit

Troubleshooting

If your setup is not starting after 45 minutes, try rebooting, then restart the steps above.

  • If it is still failing, most likely it’s because of another application on your system which is preventing our setup routine from starting (perhaps anti-virus, or similar) – try installing from Windows Safe Mode
Copyright 2015 (c) Longbow Software

Installing Adobe Photoshop 7 on Windows 7, Windows 8 and Windows 10

Installing your Adobe Photoshop 7.0 on Windows 7, Windows 8 or Windows 10 32bit or 64bit can be very easily defined in these short steps…

How to install Adobe Photoshop 7

A quick word of advice: best to follow the instructions below precisely and to the letter, including folder names and paths, that way you will reduce the risk of having any problems…

  1. Obtain your copy of the Longbow Reviver tool here – you need version 4.7 or newer
  2. Using Windows Explorer, copy your entire Adobe Photoshop 7.0 install CD media to your hard drive, to a folder path c:\InstallCDs\Adobe\Photoshop7
  3. Start the Longbow Reviver tool, select the 1st tab “Old Installer Reviver“, pick the c:\InstallCDs\Adobe\Photoshop7 folder
    1. Now click the Fix and Run Old Installer button
    2. Read and understand all the prompts that appear, then continue by clicking OK.
    3. IMPORTANT: You will need to wait up to 45 minutes before seeing the Adobe Photoshop 7.0 setup screen appear, be patient!
      1. If you have waited 90 minutes and nothing has appeared, reboot into Safe Mode and try this same process again.
  4. Once your Adobe Photoshop 7 setup screen appears, install as normal except:
    1. When you arrive at the install to ‘Destination Folder” – it is vitally important that you install to c:\adobe\photoshop7 (not C:\Program Files (x86)\Adobe\Photoshop 7.0 as normally prompted)
    2. Do not reboot if prompted to do so
  5. Now Photoshop is installed, back in the Longbow Reviver tool
    1. select the 2nd tab “Old Program Reviver
    2. Using the “…” button, pick the newly installed c:\adobe\photoshop7 folder
    3. Now click ‘Fix Old Program’
    4. Say ‘Yes’ if the Reviver tool asks if you want to re-register…
  6. Now you can happily run your Adobe Photoshop 7!

Troubleshooting

  • If when you start Adobe Photoshop 7 it complains that “…the scratch disk is full” it’s because your hard drive is very big – try uninstalling, then reinstalling onto a USB thumbnail drive, preferably below 2GB in size.
  • If you are getting a WinHelp() error when pressing F1 to try and access the Help system then simply install the WinHelp (WinHlp32.exe) module from Microsoft
Copyright 2020 (c) Longbow Software

Installing Autodesk Mechanical Desktop 4 on Windows 7, Windows 8 and Windows 10

Installing Autodesk Mechanical Desktop R4 on Windows 7, Windows 8 and Windows 10 is almost impossible to achieve, you will run into lots of problems including the error message shown below…

Windows 16bit setup error - This app can't run on your PC

Windows 16bit setup error – This app can’t run on your PC

Installing your Autodesk Mechanical Desktop R4 (otherwise known as MDT 4 and built on the AutoCAD 2000 platform) on Windows 7, Windows 8, Windows 8.1 and Windows 10 32bit or 64bit can be very easily defined in these short steps.

Instructions on installing Autodesk Mechanical R3 can be found here…

A quick word of advice: best to follow the instructions below precisely and to the letter, including folder names and paths, that way you will reduce the risk of having any problems…
  1. Obtain your copy of the Longbow Converter here
  2. Using Windows Explorer, copy your entire MDT 4 CD to your hard drive, to a folder path c:\Autodesk\InstallCDs\mdt2000
  3. Start the Longbow Converter tool
    1. Select the 2nd tab named “Old AutoCAD Installer Reviver
    2. Pick the c:\Autodesk\InstallCDs\mdt2000 folder
    3. Click “Run Old Installer“.
    4. Read and understand all the prompts before pressing OK.
      1. Now, I know it’s unheard of these days, but at this point expect to wait up to 45 minutes for your Mechanical 4 setup.exe program to appear.
      2. Once the setup starts, stop and read the next step…
  4. In the setup program, navigate through each setup dialog as normal, except when you get to the installation folder, **it’s vitally important to make sure you install to c:\mdt2000 (not .\MDT as usually prompted)**

    MDT 4 select the Browse button

    MDT 4 select the Browse button

    MDT 4 Select Install path to c:\mdt2000

    MDT 4 Select Install path to c:\mdt2000

  5. Now carry on with the install, please read all of the following tips while your installation is running so that you are prepared…
    1. Do not reboot once the install is complete.
    2. Ignore any errors related to not being able to create the shortcut folder “Mechanical Desktop 4”, you will have to create a shortcut on your computer Desktop pointing to your c:\mdt2000\acad.exe by hand.
    3. If you see errors stating errors with objectdbx.z or dao2535.tlb – please reboot your machine and re-do all of the steps above.
    4. Once you click “OK” to setup not being able to create your shortcut folder “Mechanical Desktop 4” – setup may now try to install Acrobat Reader 3.01. If this happens, you will see a blue Mechanical Desktop 4 screen with nothing on it, it will sit there for maybe 60 minutes, just let it do its thing and be patient. Eventually, you will see the Acrobat setup appear, install accepting all defaults.
    5. When the MDT 4 setup asks if you want to “Install the Mechanical Desktop Migration Assistant” say No.
  6. Once the installation has finished and you have closed the blue setup program, go back to the Converter tool…
    1. Select the 3rd tab named “Old AutoCAD Program Reviver
    2. Pick the newly installed c:\mdt2000 folder
    3. Click the “Fix” button.
  7. Now you are ready to run your AutoCAD, simply run c:\mdt2000\acad.exe using Windows Explorer.
  8. If you find that you are running in raw AutoCAD mode, to enable your Mechanical Desktop features, carry out these next steps, either…
    1. Add a shortcut (recommended) to c:\mdt2000\acad.exe making sure that the Target Property of the shortcut is set to (including quotes) “C:\mdt2000\acad.exe”  /p “C:\mdt2000\desktop\desktop.arg” and the Start In Property is set to the same path as the .arg file e.g.

      Creating a shortcut to Mechanical R4

      Creating a shortcut to Mechanical R4 making sure the Startin property points to where the .arg file resides

      1. For the Power Packs use a new shortcut with the Target set to either
        1. “C:\mdt2000\acad.exe”  /p “C:\mdt2000\acadm\mdtpp.arg”
        2. “C:\mdt2000\acad.exe”  /p “C:\mdt2000\acadm\acadmpp.arg”
          …with both Shortcut Start In: properties set to and the C:\mdt2000\acadm
    2. or update your AutoCAD support path by hand…
      1. At the AutoCAD Command line, type the command ‘Preferences’, add new Support path folders c:\mdt2000\acadm and then also c:\mdt2000\acadm\support, now click ‘Apply’ and then ‘OK’ out of the dialog.
      2. Next, restart AutoCAD.
      3. When you are back in AutoCAD, type ‘Menuload’ at the command line, click browse, then navigate to C:\mdt2000\acadm\support, change the file filter at the bottom to *.mnu, then open acadm.mnu, finally click Load, then pick Close.
      4. Now restart AutoCAD
  9. Now you can happily run your Autodesk Mechanical Desktop 4 on Windows 7, Windows 8, Windows 8.1 and Windows 10 32bit or 64bit – but we do recommend you install the following Service Packs…

Installing AutoCAD 2000 Service Pack 1

  1. Obtain AutoCAD 2000 sp1
  2. Unzip your newly downloaded sp to folder path c:\Autodesk\sp
  3. Start the Converter, select the 2nd tab named “Old AutoCAD Installer Reviver“,
    1. pick the c:\Autodesk\sp\AutoCAD 2000 sp1 folder and click ‘Run Old Installer
  4. Wait for the setup to appear, it could take up to 45 minutes, then install as normal

Installing AutoCAD 2000 Service Pack 2

  1. Obtain AutoCAD 2000 sp2
  2. Unzip your newly downloaded sp to folder path c:\Autodesk\sp
  3. Start the Converter, select the 2nd tab named “Old AutoCAD Installer Reviver“,
    1. pick the c:\Autodesk\sp\AutoCAD 2000 sp2 folder and click ‘Run Old Installer
  4. Wait for the setup to appear, it could take up to 45 minutes, then install as normal.

Installing AutoCAD 2000 Service Pack 3

  1. Obtain the AutoCAD MDT R4 sp 3
  2. Unzip your newly downloaded sp to folder path c:\Autodesk\sp
  3. Start the Converter, select the 2nd tab named “Old AutoCAD Installer Reviver“,
    1. pick the c:\Autodesk\sp\AutoCAD 2000 sp3 folder and click ‘Run Old Installer
  4. Wait for the setup to appear, it could take up to 45 minutes, then install as normal.

Installing AutoCAD 2000 Service Pack 4a

  1. Obtain the AutoCAD MDT R4 sp 4a
  2. Unzip your newly downloaded sp to folder path c:\Autodesk\sp
  3. Start the Converter, select the 2nd tab named “Old AutoCAD Installer Reviver“,
    1. pick the c:\Autodesk\sp\AutoCAD 2000 sp4 folder and click ‘Run Old Installer
  4. Wait for the setup to appear, it could take up to 45 minutes, then install as normal.
Troubleshooting:
Copyright 2016 (c) Longbow Software

Installing 32bit AutoCAD Civil 3D 2009 on 64bit Windows 7, Windows 8 and Windows 10

NOTE: This blog post specifically solves issues related to these error messages on installation…

  • “This operating system is not supported by AutoCAD® Civil 3D® 2009”
  • “You cannot install this product on the current operating system”
  • “You are attempting to use a 32-bit installer on a 64-bit operating system”
  • “This is a 32-bit AutoCAD® Civil 3D® 2009. It cannot be installed on 64-bit Windows”

Installing AutoCAD Civil 3D 2009 32bit on Windows 7, Windows 8, Windows 8.1 or Windows 10 64bit can be very easily defined in these short steps…

NOTE: These steps do not bypass normal Autodesk licensing/authorization, you should expect to use your own serial numbers in the normal way.

  1. Obtain your copy of the Longbow Converter here
  2. If you have CDs:
    1. Using Windows Explorer, copy Disk 1 of your Civil 3D CD to your hard drive, to a folder path c:\Autodesk\Civil3d2009
    2. Next, copy Disk 2 of your Civil 3D CD directly over the top of Disk 1, overwrite all files in your previously copied c:\Autodesk\Civil3d2009 folder
    3. Same again for Disk 3
  3. If you have a single self extracting exe downloaded from Autodesk
    1. Run the exe, it will ask to unzip to a folder inside of c:\Autodesk, make a note of the folder for later use (we’ll refer to it from here as c:\Autodesk\Civil3d2009), now click OK. Wait until all of the files have extracted, when they do, the Civil 3D 2009 setup will automatically launch – simply close it and move to the next step.
  4. Now, start the Longbow Converter tool
    1. Select the 1st tab titled “AutoCAD 32bit Installer Converter
    2. Using the ‘…’ button, select the c:\Autodesk\Civil3d2009 folder and click OK
    3. Once you have c:\Autodesk\Civil3d2009 selected , click the “Convert…” button to convert the media.
  5. Once the conversion process is complete, click Install/Run Setup to start setup. Simply install as normal.
  6. Windows 8, Windows 8.1 and Windows 10 users: Once the installation process is complete, go back to the Converter, select the 3rd tab, pick the newly installed C:\Program Files (x86)\AutoCAD Civil3d 2009 folder, then click “Fix Old Program…“.
  7. Now you can happily run your Civil 3D 2009 32bit on Windows 10, Windows 7 and Windows 8 64bit.

Installing the Civil 3d 2009 sp3

We recommend that you download and install the latest sp3 from Autodesk which can be found here – AutoCAD Civil 3d 2009 sp3

Troubleshooting:

– If you are unable to activate your product, or the activation process crashes:

– If you have crashing problems using the File->Open or File->Save dialogs inside of AutoCAD please read this blog entry on the File->Open or File->Save Crash in AutoCAD

Copyright 2016 (c) Longbow Software

Install 32bit AutoCAD Architecture 2016 on Windows 7, Windows 8 and Windows 10

NOTE: This blog post specifically solves issues related to these error messages on installation of 32bit AutoCAD Architecture 2016 on 64bit Windows…

  • “This operating system is not supported by AutoCAD® Architecture®”
  • “You cannot install this product on the current operating system”
  • “You are attempting to use a 32-bit installer on a 64-bit operating system”
  • “This is a 32-bit AutoCAD® Architecture® 2016. It cannot be installed on 64-bit Windows”

Installing 32bit AutoCAD Architecture 2016 on Windows 7, Windows 8, Windows 8.1 or Windows 10 64bit can be very easily defined in these short steps…

NOTE: These steps do not bypass normal Autodesk licensing/authorization, you should expect to use your own serial numbers in the normal way.

  1. Obtain your copy of the Longbow Converter here
  2. If you have CDs (if not check (3) below):
    1. Using Windows Explorer, copy Disk 1 of your AutoCAD Architecture 2016 install media to your hard drive, to a folder path c:\Autodesk\ADT2016
    2. If you have more CD’s, copy them all directly over the top of Disk 1, overwrite all files in your previously copied c:\Autodesk\ADT2016 folder
  3. If you have a single self extracting exe downloaded from Autodesk called something like Architecture_2016_English_Win_32_64bit_en-us_Setup.exe
    1. Simply run the exe, it will ask to unzip to a folder inside of c:\Autodesk, make a note of the folder for later use (we’ll refer to it from here as c:\Autodesk\ADT2016), now click OK. Wait until all of the files have extracted, when they do, the AutoCAD Architecture 2016 setup will automatically launch – simply close it and move to the next step.
  4. Now, start the Longbow Converter tool, select the 1st tab, pick the c:\Autodesk\ADT2016 folder, and click the Convert button.
  5. Once the conversion process is complete, click Install/Run Setup to start setup. Simply install as normal.
    1. Once installed, we recommend you disable the AutoCAD Communication Center/InfoCenter toolbar as it uses a lot of memory, causes slow startup and most people don’t use it anyway!
  6. Now you can happily run your AutoCAD Architecture 2016 32bit on Windows 7, Windows 8, Windows 8.1 and Windows 10!

Troubleshooting:

– If you are unable to activate your product, or the activation process crashes:

– If you have crashing problems using the File->Open or File->Save dialogs inside of AutoCAD please read this blog entry on the File->Open or File->Save Crash in AutoCAD

Copyright 2015 (c) Longbow Software

Installing Map 3D 2015 32bit on Windows 7, Windows 8 and Windows 10

NOTE: This blog post specifically solves issues related to these error messages on installation of AutoCAD Map3D 2015…

  • “This operating system is not supported by AutoCAD® Map 3D®”
  • “You cannot install this product on the current operating system”
  • “You are attempting to use a 32-bit installer on a 64-bit operating system”
  • “This is a 32-bit AutoCAD® Map 3D® 2015. It cannot be installed on 64-bit Windows”

Installing AutoCAD Map 3D 2015 32bit on Windows 7, Windows 8, Windows 8.1 or Windows 10 64bit can be very easily defined in these short steps…

NOTE: These steps do not bypass normal Autodesk licensing/authorization, you should expect to use your own serial numbers in the normal way.

  1. Obtain your copy of the Longbow Converter here
  2. If you have CDs:
    1. Using Windows Explorer, copy Disk 1 of your Map 3D CD to your hard drive, to a folder path c:\Autodesk\Map3d2015
    2. Next, if you have a second CD, copy Disk 2 of your Map 3D CD directly over the top of Disk 1, overwrite all files in your previously copied c:\Autodesk\Map3d2015 folder
    3. Same again for Disk 3, if there is one
  3. If you have a single self extracting exe downloaded from Autodesk
    1. Run the exe, it will ask to unzip to a folder inside of c:\Autodesk, make a note of the folder for later use (we’ll refer to it from here as c:\Autodesk\Map3d2015), now click OK. Wait until all of the files have extracted, when they do, note that the Map 3D 2015 setup will automatically launch – make sure you close the setup and move to the next step.
  4. Now, start the Longbow Converter tool, select the 1st tab, pick the c:\Autodesk\Map3d2015 folder, and click the Convert button.
  5. Once the conversion process is complete, click Install/Run Setup to start setup. Next, just install as normal.
  6. Windows 8, Windows 8.1 and Windows 10 users: Once the installation process is complete, go back to the Converter, select the 3rd tab, pick the newly installed C:\Program Files (x86)\Autodesk\AutoCAD Map 3d 2015 folder, then click ‘Fix Old Program‘.
  7. Now you can happily run your Map 3D 2015 32bit on Windows 7, Windows 8 and Windows 10 64bit!

Troubleshooting:

– If you are unable to activate your product, or the activation process crashes:

– If you have crashing problems using the File->Open or File->Save dialogs inside of AutoCAD please read this blog entry on the File->Open or File->Save Crash in AutoCAD

Copyright 2016 (c) Longbow Software

Installing 32bit AutoCAD LT 2013 on Windows 7, Windows 8 and Windows 10

NOTE: This blog post specifically solves issues related to these error messages on installation…

  • “This operating system is not supported by AutoCAD LT®”
  • “You cannot install this product on the current operating system”
  • “You are attempting to use a 32-bit installer on a 64-bit operating system”
  • “This is a 32-bit AutoCAD LT® 2013. It cannot be installed on 64-bit Windows”

Installing AutoCAD LT 2013 32bit on Windows 7, Windows 8, Windows 8.1 or Windows 10 64bit can be very easily defined in these short steps…

NOTE: These steps do not bypass normal Autodesk licensing/authorization, you should expect to use your own serial numbers in the normal way.

  1. Make sure all previous installed versions of AutoCAD 2013 are uninstalled first.
  2. Obtain your copy of the Longbow Converter here
  3. If you have CDs (if not check (3) below):
    1. Using Windows Explorer, copy Disk 1 of your AutoCAD LT 2013 CD to your hard drive, to a folder path c:\Autodesk\AutoCADLT2013
    2. If you have more CD’s, copy them all directly over the top of Disk 1, overwrite all files in your previously copied c:\Autodesk\AutoCADLT2013 folder
  4. If you have a single self extracting exe downloaded from Autodesk called something like AutoCAD_LT_2013_English_Win_32bit.exe
    1. Simply run the exe, it will ask to unzip to a folder inside of c:\Autodesk, make a note of the folder for later use (we’ll refer to it from here as c:\Autodesk\AutoCADLT2013), now click OK. Wait until all of the files have extracted, when they do, the AutoCAD LT 2013 setup will automatically launch – simply close it and move to the next step.
  5. Now, start the Longbow Converter tool, select the 1st tab named ‘AutoCAD 32bit Installer Converter
    1. pick the c:\Autodesk\AutoCADLT2013 folder
    2. click the ‘Convert‘ button.
  6. Once the conversion process is complete
    1. Click ‘Install/Run Setup‘ to start setup
    2. Install as normal.
  7. Windows 8, Windows 8.1 and Windows 10 users: Once the installation process is complete…
    1. go back to the Converter, select the 3rd tab named ‘Old AutoCAD Program Reviver
    2. Pick the newly installed C:\Program Files (x86)\Autodesk\AutoCAD LT 2013 folder
    3. Click ‘Fix Old Program‘.
  8. Now you can happily run your AutoCAD LT 2013 32bit on Windows 7, Windows 8 and Windows 10!

Installing AutoCAD LT 2013 Service Packs

There are 2 sp’s for AutoCAD LT 2013, these are the the 32bit versions of the sp’s

  1. Here’s sp1 – AutoCAD LT 2013 sp1 – install as normal
  2. Here’s sp2 – AutoCAD LT 2013 sp2 – install as normal

Troubleshooting:

– If your AutoCAD crashes while interacting with the Ribbon click here

– If you are unable to activate your product, or the activation process crashes:

– If you have crashing problems using the File->Open or File->Save dialogs inside of AutoCAD please read this blog entry on the File->Open or File->Save Crash in AutoCAD

Copyright 2015 (c) Longbow Software

Installing 32bit AutoCAD LT 2012 on Windows 7, Windows 8 and Windows 10

These instructions solve issues around installing/running your old AutoCAD LT 2012 on newer versions of 64bit Windows 7, Windows 8 and Windows 10. Some common issues are error messages like these

  • “This operating system is not supported by AutoCAD® LT 2012”
  • “You cannot install this product on the current operating system”
  • “You are attempting to use a 32-bit installer on a 64-bit operating system”
  • “This is a 32-bit AutoCAD® LT 2012. It cannot be installed on 64-bit Windows”

You can automatically solve these problems using our Longbow Converter App, it fixes and manages the AutoCAD LT 2012 installation so that you can be up and running again… Just follow these instructions:

How to install AutoCAD LT 2012

  1. Obtain your purchased copy of the Longbow Converter here
  2. Start the Converter App and note the user interface
  3. Select the 1st tab named “AutoCAD 32bit Installer Converter
    1. Using the “. . .” button, selection your AutoCAD installation CD
    2. Next, click the “Convert button and follow instructions
  4. Once the conversion process is complete
    1. click Install/Run Setup to start setup
    2. Simply install as normal, remembering to…
      1. Close the setup program when the installation is complete.
      2. Now back in the Converter app and make sure it’s completed the final stage of processing using the “Old AutoCAD Program Reviver” tab
  5. Now run your AutoCAD as normal

Installing AutoCAD LT 2012 Service Packs

We recommend that you download and install the latest Service Packs from Autodesk which can be found here

Troubleshooting

– If your AutoCAD crashes while interacting with the Ribbon click here

– If you are unable to activate your product, or the activation process crashes:

– If you have crashing problems using the File->Open or File->Save dialogs inside of AutoCAD please read this blog entry on the File->Open or File->Save Crash in AutoCAD

Copyright 2019 (c) Longbow Software

Installing Mathcad 2000 Pro on Windows 7, Windows 8 and Windows 10


If you are having trouble installing Parametric Technology Corporation’s Mathcad 2000 Pro with errors like this…

Windows 16bit setup error - This app can't run on your PC

Windows 16bit setup error – “This app can’t run on your PC

then read on…


How to install Mathcad 2000

  1. Purchase a copy of the Longbow Reviver tool here
  2. Using Windows Explorer
    1. Copy your Mathcad 2000 CD to your hard drive, to a folder path c:\InstallCDs\Mathcad2000
  3. Start the Longbow Reviver tool
    1. select the 1st tab named “Old Installer Reviver” 
    2. using the ‘…’ button, select folder c:\InstallCDs\Mathcad2000\Mathcad. At this point, the Reviver tool should display a message telling you that setup.exe was found, if so…
    3. Click the “Fix and Run Old Installer” button
    4. Read and understand all the prompts that appear, then continue by clicking OK.
  4. Now, I know it’s unheard of these days, but at this point expect to wait up to 45 minutes for your full Mathcad 2000 setup.exe program to appear….
      1. Be patient, grab lunch maybe… 🙂
      2. Once the Mathcad 2000 Professional setup application finally displays all in Blue stop and read the next step
  5. In the setup program click through setup as normal, except when you get to the path for the installation – make sure you update the entry from c:\…\Mathcad 2000 Professional to c:\Mathcad2000 
  6. Now carry on with the install
    1. Do not reboot if prompted to do so
    2. Note, we did not Register when testing this install
  7. Once Mathcad 2000 Professional is installed
    1. Be sure to fully quit the setup
    2. go back to the Reviver tool
      1. select the 2nd tab named “Old Program Reviver” 
      2. Using the ‘…’ button, pick the newly installed c:\Mathcad2000 folder
      3. click “Fix Old Program”
      4. Say “Yes” if the Reviver tool asks if you want to re-register…
  8. Now you can happily run your Mathcad 2000 Professional on Windows 7, Windows 8 or Windows 10

MathCAD 2000 Pro Update

There is an update for MathCAD Pro 2000, here’s how to install it

  1. Download the MathCAD 2000 Pro Update from here
  2. Unzip to folder c:\InstallCDs\MathCAD2000sp
  3. Start the Longbow Reviver tool
    1. select the 1st tab named “Old Installer Reviver” 
    2. using the ‘…’ button, select folder c:\InstallCDs\MathCAD2000sp. At this point, the Reviver tool should display a message telling you that setup.exe was found, if so…
    3. Click the “Fix and Run Old Installer” button
    4. Read and understand all the prompts that appear, then continue by clicking OK.
  4. Wait up to 45 minutes for your full Mathcad 2000 setup.exe program to appear, then install as normal

Troubleshooting

Copyright 2021 (c) Longbow Software

Installing Autodesk Land Development Desktop R2 on Windows 7, Windows 8 and Windows 10

Installing AutoCAD Land Development Desktop R2 (LDDT R2 is AutoCAD 2000 based) on Windows 7, Windows 8, Windows 8.1 or Windows 10 32bit or 64bit can be very easily defined in these short steps…

NOTE: These steps do not bypass normal Autodesk licensing/authorization, you should expect to use your own serial numbers in the normal way.

A quick word of advice: best to follow the instructions below precisely and to the letter, including folder names and paths, that way you will reduce the risk of having any problems…
 
  1. Obtain your copy of the Longbow Converter here – you will need version 8.50 or newer
  2. Using Windows Explorer, copy your entire LDDT R2 2000 installation CD to your hard drive, specifically to a folder path of c:\Autodesk\lddt2000
  3. Start the Longbow Converter tool, select the 2nd tab, pick the c:\Autodesk\lddt2000 folder, and click Run. Read and understand all the prompts before pressing OK.
  4. For AutoCAD 2000 versions, the Migration Wizard almost instantly pops up, simply click Install 2000 as normal. Now, I know it’s unheard of these days, but at this point expect to wait at least 45 minutes for your Land Desktop R2 setup.exe program to fully appear. Once the setup starts, stop and read the next step…
  5. In the setup program, navigate through each setup dialog as normal, except when you get to the installation folder, **it’s vitally important to make sure you install to c:\landdt2000 (not .\Autodesk Land Development Desktop as usually prompted)**
    1. Ignore the fact the the shortcut cannot be created, you will need to create this by hand once the installation is finished.
    2. Do not reboot if prompted to do so
  6. Once installed, using Windows Explorer, navigate to c:\Autodesk\lddt2000\data and run the MDAC_TYP.exe program, with these instructions
    1. When the “Microsoft Data Access Components 2.0” license agreement pops up, if you agree with the terms, click ‘Yes’
    2. At the next dialog, simply click “Continue”
    3. When the option dialog to do a Complete install or a Custom install, click “Custom”
    4. At the next dialog, un-check “Microsoft Remote Data Services” and then click “Continue”
    5. Exit the setup when finished.
  7. Next, go back to the Converter tool, select the 3rd tab, pick the newly installed c:\landdt2000 folder and click “Fix”
  8. Now you must run your AutoCAD Land Development Desktop R2 2000 as is as a first time initialization, it will start up in raw AutoCAD mode (using Windows Explorer, simply navigate to c:\landdt2000 and double click acad.exe)
    1. If you want to startup in LDT mode, simply create a shortcut to c:\landdt2000\acad.exe and set the Target property to c:\landdt2000\acad.exe /p lddt.arg
    2. If you want to startup in Map mode, simply create a shortcut to c:\landdt2000\acad.exe and set the Target property to c:\landdt2000\acad.exe /p map.arg
  9. Now you can run your Land Desktop R2 on Windows 7, Windows 8, and Windows 10, but be sure to read the Troubleshooting guide below…

The LDT 2000 Service Pack

  1. First download the stand-alone LandDesktop R2 2.01 sp from here and save to c:\Autodesk\sp
  2. Next, start the Converter, select the 3rd tab “Old AutoCAD Program Reviver” select the c:\Autodesk\sp folder, then click Fix.
    1. If asked if this is a service pack by the Converter tool, say yes.
  3. Now run the land201.exe as normal from Windows Explorer.

Troubleshooting:

  • If you are getting an “Out of memory error” when you start a new drawing, try creating a new project, and use a previous drawing to ‘Save As’ a template for use instead.

  • If your AutoCAD 2000 setup is not starting after 45 minutes, try rebooting, then restart the steps above. If it is still failing, most likely it’s because of another application on your system which is preventing our setup routine from starting (perhaps anti-virus, or similar) – try installing AutoCAD 2000 from Windows Safe Mode


Copyright 2014 (c) Longbow Software

Installing AutoCAD 2002 Express Tools on Windows 7, Windows 8 and Windows 10

If you are having trouble installing AutoCAD 2002 Express Tools with “This app cannot run on your PC” then read on…

Installing AutoCAD 2002 Express Tools (et1-9.exe) on Windows 7, Windows 8 and Windows 8.1 32bit or 64bit can be very easily defined in these short steps.

A quick word of advice: best to follow the instructions below precisely and to the letter, including folder names and paths, that way you will reduce the risk of having any problems…

  1. Obtain your copy of the Longbow Converter here
  2. Next, make sure you have AutoCAD 2002 already installed – follow these steps Installing AutoCAD 2002 on Windows 7, Windows 8 and Windows 10
  3. Unzip this zip file to c:\Autodesk
  4. Start the Longbow Converter tool, select the 2nd tab, pick the newly created c:\Autodesk\ExpressTools2002 folder, and click Run. Read and understand all the prompts before pressing OK.
  5. Now, I know it’s unheard of these days, but at this point expect to wait at least 45 minutes for your AutoCAD 2002 Express Tools setup.exe program to fully appear. Once the setup starts, stop and read the next step…
  6. In the setup program, navigate through each setup dialog as normal, except when you get to the installation folder, **it’s vitally important to make sure you install to c:\acad2002Et (not Program Files (x86)\AutoCAD Express Tools 2002 as usually prompted)**
    1. Do not reboot if prompted to do so
  7. Now you can happily run your Express Tools inside of AutoCAD 2002, simply start AutoCAD 2002 and to use Express Tools 2002 as normal..

Troubleshooting:

  • If your Express Tools 2002 setup is not starting after 45 minutes, try rebooting, then restart the steps above. If it is still failing, most likely it’s because of another application on your system which is preventing our setup routine from starting (perhaps anti-virus, or similar) – try the same steps as above in Windows Safe Mode
Copyright 2015 (c) Longbow Software

Installing AutoCAD 2000 Express Tools Volume 9 on Windows 7, Windows 8 and Windows 10

If you are having trouble installing AutoCAD 2000 Express Tools with “This app cannot run on your PC” then read on…


Installing AutoCAD 2000 Express Tools Volume 9 (et1-9.exe) on Windows 7, Windows 8, Windows 8.1 and Windows 10 32bit or 64bit can be very easily defined in these short steps.

A quick word of advice: best to follow the instructions below precisely and to the letter, including folder names and paths, that way you will reduce the risk of having any problems…

  1. Obtain your copy of the Longbow Converter here
  2. Next, make sure you have AutoCAD 2000 already installed – follow these steps Installing AutoCAD 2000 on Windows 7, Windows 8, Windows 8.1 and Windows 10
  3. Unzip this zip file to c:\Autodesk
  4. Start the Longbow Converter tool, select the 2nd tab, pick the newly created c:\Autodesk\Express Tools 2000 Volume 9 folder, and click Run. Read and understand all the prompts before pressing OK.
  5. Now, I know it’s unheard of these days, but at this point expect to wait at least 45 minutes for your AutoCAD 2000 Express Tools setup.exe program to fully appear. Once the setup starts, stop and read the next step…
  6. In the setup program, navigate through each setup dialog as normal, except when you get to the installation folder, **it’s vitally important to make sure you install to c:\acad2000Et (not Program Files (x86)\AutoCAD Express Tools as usually prompted)**
    1. Do not reboot if prompted to do so
  7. Now you can happily run your Express Tools inside of AutoCAD 2000 running on Windows 7, Windows 8 and Windows 10 –  using Windows Explorer, simply navigate to c:\acad2000 and double click acad.exe to start AutoCAD 2000 and to use Express Tools 2000

Troubleshooting:

  • If your Express Tools 2000 setup is not starting after 45 minutes, try rebooting, then restart the steps above. If it is still failing, most likely it’s because of another application on your system which is preventing our setup routine from starting (perhaps anti-virus, or similar) – try the same steps as above in Windows Safe Mode
Copyright 2015 (c) Longbow Software

Installing Autodesk Land Desktop 2005 on Windows 7, Windows 8 and Windows 10

Installing AutoCAD LDT 2005 on Windows 7, Windows 8, Windows 8.1 and Windows 10 32bit or 64bit can be very easily defined in these short steps…

NOTE: These steps do not bypass normal Autodesk licensing/authorization, you should expect to use your own serial numbers in the normal way.

IMPORTANT NOTE: Autodesk no longer supply License Activation codes for this version of AutoCAD. The best way is to transfer your existing license to the new PC but there are other options, we document them here

  1. Obtain your copy of the Longbow Converter here
  2. Copy your LDT 2005 installation CD media to your hard drive, to a folder path c:\Autodesk\ldt2005 
    1. NOTE: If you have more LDT specific CD’s (not Survey or Civil as these are installed separately), simply copy the contents of each CD directly over the top of Disk 1, basically, overwrite all files in your previously copied c:\Autodesk\ldt2005 folder with the files from each of the CDs
  3. Next, start the Longbow Converter tool
    1. select the 2nd tab named “Old AutoCAD Installer Reviver
    2. pick the c:\Autodesk\ldt2005 folder (where you copied your LDT CDs to on your hard drive)
    3. click the Run Old Installer button.
      1. Read and understand all the prompts before pressing OK.
      2. Once the setup starts, stop and read the next step…
  4. In the setup program, navigate through each setup dialog as normal, with these exceptions… (if you cannot move past the first screen in the setup, see Trouble Shooting below)…
    1. When you click the Install link from your setup you may see a dialog box appear saying – “This program has compatibility issues” – simply check the “Don’t show this message again” and then click the “Run the program without getting help”.
    2. When you arrive at the installation folder path setup dialog, **it’s vitally important to make sure you install to c:\ldt2005 (not C:\Program Files (x86)\Autodesk Land Desktop 2005 that is defaulted)**.
    3. If asked to reboot after the install, say NO
  5. Once installed
    1. do not reboot
    2. make sure you fully close the AutoCAD setup program (because the Converter is waiting for the setup program to fully close) then
    3. go back to the Converter tool
    4. select the 3rd tab named “Old AutoCAD Program Reviver
    5. pick the newly installed c:\ldt2005 folder
    6. click the Fix Old Program button.
  6. Now you can run your Autodesk LDT 2005 on Windows 7, Windows 8 and Windows 10, both 32bit and 64bit.
    1. NOTE: When starting AutoCAD, if you see a warning dialog when you run saying “This program has known compatibility issues“, simply click “Don’t show this message again” and then click “Run the Program…

Troubleshooting:

– If you are seeing this error when running either the “Import LandXML” or “Export LandXML” commands

LandXML Export - Run-time error '429' ActiveX component can't create object

LandXML Export – Run-time error ‘429’ ActiveX component can’t create object

then LDT 2005 Fixed VBA Modules into the same folder as your acad.exe (using the instructions above, it should be c:\ldt2005)

– If you are unable to activate your product, or the activation process crashes immediately on startup:

– If you have crashing problems using the File->Open or File->Save dialogs inside of AutoCAD please read this blog entry on the File->Open or File->Save Crash in AutoCAD

Copyright 2023 (c) Longbow Software

Installing Inventor R11 (2007) on Windows 7, Windows 8 and Windows 8.1

***** NOTE: This solution is currently broken, we are actively trying to resolve it – more soon *****

Installing Inventor 2007 on Windows 7, Windows 8 or Windows 8.1 32bit or 64bit can be very easily defined in these short steps…

NOTE: These steps do not bypass normal Autodesk licensing/authorization, you should expect to use your own serial numbers in the normal way.

  1. Obtain your copy of the Longbow Converter here – you will need V8.11 or newer
  2. Copy your entire Inventor R11/Inventor 2007 CD to your hard drive, to a folder path c:\Autodesk\inventor2007 
  3. Start the Longbow Converter tool, select the 2nd tab, pick the c:\Autodesk\inventor2007 folder, and click “Run Old Installer”. Read and understand all the prompts before pressing OK. Once the setup starts, stop and read the next step…
  4. In the setup program, navigate through each setup dialog as normal, with these exceptions…
    1. When you click the Install Autodesk Inventor 11 link from your setup you may see a dialog box appear saying – “This program has compatibility issues” – if this happens, simply check the “Don’t show this message again” and then click the “Run the program without getting help”.
    2. I recommend that you do not install Vault or Autodesk Data Management Server – disable these options in the setup
    3. When you arrive at the installation folder path setup dialog, **it’s vitally important to make sure you install to c:\inventor2007\ (not Program Files (x86)\Autodesk\)**
    4. If there are any errors installing .NET Framework Runtime 1.1 sp1 – simply ignore and continue.
    5. You may see an error “error 26001. Cannot connect to Internet Information Server. (-2147221164) ” – I’m not sure what causes this problem, most likely Autodesk has shutdown the service, but you should simply click “Ignore” if you see this message.
    6. You may see an additional error popup “Error 29001. Vault management error: The request failed with HTTP status 404: Not Found.” – simply ignore by clicking “OK”
  5. Once installed, make sure you fully close the Autodesk Inventor 11 setup program (because the Converter is waiting for the setup program to fully close) then go back to the Converter tool, select the 3rd tab, pick the newly installed c:\inventor2007 folder and click “Fix Old Program”.
  6. Next, before running your Inventor 2007, install all the sp’s in chronological order (NOTE if you cannot install the sp’s, see the Troubleshooting section below)
    1. Autodesk Inventor 11 Service Pack 1
    2. Autodesk Inventor 11 Service Pack 2
    3. Autodesk Inventor 11 Service Pack 3
    4. Autodesk Inventor 11 Service Pack 4
  7. Now you can run your Autodesk Inventor 11 on Windows 7, Windows 8 and Windows 8.1, both 32bit and 64bit.
    1. NOTE: When starting Inventor 11, if you see a warning dialog when you run saying “This program has known compatibility issues”, simply click “Don’t show this message again” and then click “Run the Program…”

Troubleshooting:

– If you cannot install your Inventor 11 Service Packs because of an error “The upgrade patch cannot be installed by the Windows Installer service because the program to be upgraded may be missing, or the upgrade patch may be a different version of the program. Verify that the program to be upgraded exists on your computer and that you have the correct upgrade patch” – rather than try and solve this issue, the easiest solution is:

  1. To go back to your old Windows XP machine and make sure that all of the sp’s are installed on your old Windows XP machine’s installation of inventor 11
  2. Next, simply copy all of the Inventor 11 program files and folders from your old Windows XP machine to a USB drive – copy the “contents” of C:\Program Files\Autodesk\Inventor
  3. Now transfer the USB to your new machine and copy the files that were on your old Windows XP machine’s C:\Program Files\Autodesk\Inventor folder into your newly installed c:\inventor2007 folder – you should see a question if you should overwrite all files, say YES

– If you are unable to activate your product, or the activation process crashes:

– If you have crashing problems using the File->Open or File->Save dialogs inside of Inventor please read this blog entry on the File->Open or File->Save Crash in AutoCAD

Copyright 2015 (c) Longbow Software

Upgrading your existing AutoCAD to Windows 10 and Windows 11

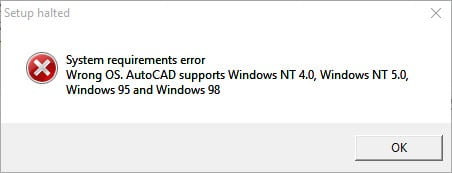
So you have an old PC with a working copy of AutoCAD and you want to upgrade to Windows 10? STOP and read this whole blog first before you wipe your working PC…

Autodesk License Activation for older versions of AutoCAD

That’s right, Autodesk no longer support versions of AutoCAD (at the time of writing 2014 or earlier) which means that they will not give you a new authorization code. That means you will have to activate your AutoCAD license without Autodesk – you do have some options:

  1. First try activation via this offline process that Autodesk recently added
  2. If you have an activation code, try an Offline Activation 
  3. Transfer your existing AutoCAD license from your old PC to your new PC. Your AutoCAD install CD comes with utility to do the job, see below…

    NOTE: A good idea (before transfering the AutoCAD license from your old PC to the new PC) is to setup AutoCAD to run in offline mode then clone your old PC hard drive. This ensures you have a backup of your old PC with a valid license.

    NOTE: Apparently, the license transfer will fail if your license is invalid. Some examples we heard about failing are: it’s a USA license running in a different country or it’s an Education License or you used a serial number that was compromised

    1. AutoCAD 2009 or older – transfer license using the Autodesk Portable License Transfer Utility

      NOTE: AutoCAD 2006/2007
      users – you MUST install this patch so you do not lose your activation through a bug in the software once it is transferred to the new PC
    2. AutoCAD 2010 or newer – transfer license using the License Transfer Utility
  4. If you have an Autodesk Network licensing setup, keep it. Apparently, if you have this you are completely safe from shutdown and you can move to new systems without problems.
  5. Call Autodesk an explain your situation, we heard some people managed to get an activation code because their existing one was lost through software fault.
  6. Go back to an older version of AutoCAD. AutoCAD R13, R14, 2000, 2000i, 2002, 2004 and some versions of 2005 don’t require online activation therefore, as long as you have the original activation codes, they can still be used.
    • They all run perfectly on Windows 10, but you will need to install them using our Converter App (click for install instructions R13 R14 2000 2000i 2002 2004 2005)
    • If you have DWG files saved by newer versions of AutoCAD then simply use the free Autodesk DWGTrueview App (which is a cut down version of AutoCAD) to convert your DWG file save versions back to an earlier version.
  7. For information purposes only: There is an AutoCAD Keygen application online called “X-Force” which you can use to generate your authcode. NOTE: using a keygen is highly illegal when using hacked serial numbers, we don’t recommend it. Some ask if it is still illegal to use a keygen with a paid/valid serial number? You need to do your own legal checks on that question before using a keygen. 

Is it possible to protect your working AutoCAD from losing its license?

Yes. The latest version of our Converter App (12.30 or newer) has a new Block Internet Connection” feature which disables all internet access to and from your AutoCAD, this makes it impossible for your AutoCAD license to be deactivated at some point in the future (with the disadvantage that you lose any internet based features in AutoCAD)

Windows XP and Windows Vista AutoCAD users upgrading to Windows 10

For those of you who are still running AutoCAD on Windows XP and want to upgrade to Windows 10, you will need to

  1. Get a new Windows 10 PC, preferably one without (or disabled) Intel onBoard graphics.
  2. Once you have a Windows 10 PC, run Windows Update until there are no more updates left to be installed.
  3. Next, install your AutoCAD using the Converter app…
    1. click on the version of AutoCAD you have (it explains all that you need to do) : AutoCAD R14 AutoCAD 2000 AutoCAD 2000i AutoCAD 2002 AutoCAD 2004 AutoCAD 2005 AutoCAD 2006 AutoCAD 2007 AutoCAD 2008 32bit AutoCAD 2009 32bit AutoCAD 2010 32bit AutoCAD 2011 32bit AutoCAD 2012 32bit AutoCAD 2013 32bit AutoCAD 2014 32bit 
    2. NOTE: If you can’t find your version listed, use the “Search” at the top left of this page
    3. Transfer the AutoCAD license as described above

Windows 7, Windows 8 and Windows 8.1 AutoCAD users upgrading to Windows 10

Here’s how to upgrade your PC to Windows 10 so that you can carry on using AutoCAD…

  1. Transfer your existing AutoCAD license from your old PC to your new PC. Your AutoCAD install CD comes with utility to do the job, see below… (A good idea is, before you transfer the AutoCAD license from your old PC to the new PC clone your old PC hard drive. This ensures you have a backup of your old PC with a valid license)
    1. AutoCAD 2009 or older – transfer license using the Autodesk Portable License Transfer Utility

      NOTE: AutoCAD 2006/2007 users – you MUST install this patch so you do not lose your activation through a bug in the software once it is transferred to the new PC
    2. AutoCAD 2010 or newer – transfer license using the License Transfer Utility
  2. Next, uninstall all AutoCAD versions on your system; it’s very important that you do this, if you don’t the Autodesk licensing system may get corrupted when you upgrade to Windows 10 at which point you will have to wipe the computer and start again.
  3. Now Upgrade to Windows 10
  4. Obtain the latest Longbow Converter supporting Windows 10 here
  5. Next, install your AutoCAD using the Converter app…
    1. click on the version of AutoCAD you have (it explains all that you need to do) : AutoCAD R14 AutoCAD 2000 AutoCAD 2000i AutoCAD 2002 AutoCAD 2004 AutoCAD 2005 AutoCAD 2006 AutoCAD 2007 AutoCAD 2008 32bit AutoCAD 2009 32bit AutoCAD 2010 32bit AutoCAD 2011 32bit AutoCAD 2012 32bit AutoCAD 2013 32bit AutoCAD 2014 32bit 
    2. If you can’t find your version listed, use the “Search” at the top left of this page
    3. AutoCAD 2006/2007 users – you MUST install this patch so you do lose your license activation randomly 
  • What happens if you already upgraded to Windows 8.1 with your existing AutoCAD installation – most likely your AutoCAD will not run, nor will you be able to repair it. The best thing to get your AutoCAD running again is to carry out a Windows Reset.

Users of 32bit AutoCAD versions 2002 thru 2013 and running or Windows 7 upgrading to Windows 8.1

If you have a working Windows 7 machine and you are thinking to upgrade to Windows 8.1 best just stay where you are. Better to upgrade to Windows 10, aside from being a free upgrade, it seems to be a much better platform too.

With that said, if you must upgrade your working Windows 7 system to Windows 8.1, then it is of course possible using our Longbow Converter tool – you ***must*** first uninstall all AutoCAD products before doing the upgrade. Once Windows 8.1 has been installed, just use the Longbow Converter to re-install your 32bit AutoCAD software as before.

  • What happens if you already upgraded to Windows 8.1 with your existing AutoCAD installation – most likely your AutoCAD will not run, nor will you be able to repair it. The best thing to get your AutoCAD running again is to carry out a Windows Reset.

Users of 64bit AutoCAD versions 2002 thru 2013 and running or Windows 7 upgrading to Windows 8.1

If you have a working Windows 7 machine and you are thinking to upgrade to Windows 8.1 best just stay where you are. Better to upgrade to Windows 10, aside from being a free upgrade, it seems to be a much better platform too.

With that said, if you must upgrade your working Windows 7 system to Windows 8.1, then it is of course possible using our Longbow Converter tool – you ***must*** first uninstall all AutoCAD products before doing the upgrade. Once Windows 8.1 has been installed, install your 64bit AutoCAD products as normal then use the Longbow Converter to fix all 64bit AutoCAD 2008 thru 2013 Windows 8 issues

Copyright 2020 (c) Longbow Software


Installing 32bit AutoCAD Mechanical 2008 on Windows 7, Windows 8 and Windows 10

NOTE: This blog post specifically solves issues related to these error messages on installation of AutoCAD Mechanical 2008…

  • “This operating system is not supported by AutoCAD® Mechanical®”
  • “You cannot install this product on the current operating system”
  • “You are attempting to use a 32-bit installer on a 64-bit operating system”
  • “This is a 32-bit AutoCAD® Mechanical® 2008. It cannot be installed on 64-bit Windows”

Installing 32bit AutoCAD Mechanical 2008 on Windows 7, Windows 8, Windows 8.1 or Windows 10 64bit can be very easily defined in these short steps…

NOTE: These steps do not bypass normal Autodesk licensing/authorization, you should expect to use your own serial numbers in the normal way.

  1. Obtain your copy of the Longbow Converter here
  2. If you have CDs (if not check (3) below):
    1. Using Windows Explorer, copy Disk 1 of your AutoCAD Mechanical 2008 CD to your hard drive, to a folder path c:\Autodesk\AutoCADM2008
    2. If you have more CD’s, copy them all directly over the top of Disk 1, overwrite all files in your previously copied c:\Autodesk\AutoCADM2008 folder
  3. If you have a single self extracting exe downloaded from Autodesk
    1. Run the exe, it will ask to unzip to a folder inside of c:\Autodesk, make a note of the folder for later use (we’ll refer to it from here as c:\Autodesk\AutoCADM2008), now click OK. Wait until all of the files have extracted, when they do, the AutoCAD Mechanical 2008 setup will automatically launch – simply close it and move to the next step.
  4. Now, start the Longbow Converter tool, select the 1st tab, pick the c:\Autodesk\AutoCADM2008 folder, and click the Convert button.
  5. Once the conversion process is complete, click Install/Run Setup to start setup. Simply install as normal.
  6. Windows 8, Windows 8.1 and Windows 10 users: Once the installation process is complete, go back to the Converter, select the 3rd tab, pick the newly installed C:\Program Files (x86)\AutoCAD Mechanical 2008 folder, then click Fix
  7. Now you can happily run your AutoCAD Mechanical 2008 32bit on Windows 7, Windows 8, Windows 8.1 and Windows 10!

Troubleshooting:

– If you are unable to activate your product, or the activation process crashes:

– If you have crashing problems using the File->Open or File->Save dialogs inside of AutoCAD please read this blog entry on the File->Open or File->Save Crash in AutoCAD

Copyright 2015 (c) Longbow Software

Install 32bit AutoCAD 2016 on Windows 7, Windows 8 and Windows 10

These instructions solve issues around installing/running your old AutoCAD 2016 on newer versions of 64bit Windows 7, Windows 8 and Windows 10. Some common issues are error messages like these…

  • “This operating system is not supported by AutoCAD® 2016”
  • “You cannot install this product on the current operating system”
  • “You are attempting to use a 32-bit installer on a 64-bit operating system”
  • “This is a 32-bit AutoCAD® 2016. It cannot be installed on 64-bit Windows”

How to install AutoCAD 2016

  1. Obtain your purchased copy of the Longbow Converter here
  2. Start the Converter App and note the user interface
  3. Select the 1st tab named “AutoCAD 32bit Installer Converter
    1. Using the “. . .” button, selection your AutoCAD installation CD
    2. Next, click the “Convert button and follow instructions
  4. Once the conversion process is complete
    1. click Install/Run Setup to start setup
    2. Simply install as normal, remembering to…
      1. Close the setup program when the installation is complete.
      2. Now back in the Converter app and make sure it’s completed the final stage of processing using the “Old AutoCAD Program Reviver” tab
  5. Now run your AutoCAD as normal

    Once installed, we recommend you disable the AutoCAD Communication Center/InfoCenter toolbar as it uses a lot of computer memory and causes slow startup and most people don’t use it anyway!

Troubleshooting

– If your AutoCAD starts with a blank white screen…

  • Try turning down your screen resolution, if this doesn’t help…
    • from the Converter tool, pick the Tools->Clean Compatibility settings

– If you are unable to activate your product, or the activation process crashes:

– If you have crashing problems using the File->Open or File->Save dialogs inside of AutoCAD please read this blog entry on the File->Open or File->Save Crash in AutoCAD

Copyright 2019 (c) Longbow Software