Install AutoCAD 2000i on Windows 11

Follow these instructions to solve issues around installing/running your legacy AutoCAD 2000i on Windows 11

Ransomware Protection Windows 11 and AutoCAD

Windows 11 comes with a Ransomware Protection which includes Controlled Folder Access. Controlled folder access blocks applications from writing to your Documents, Pictures, Videos, Music, Public and Favorites folders. AutoCAD versions all the way to AutoCAD 2021 write to certain user Public folders and are therefore blocked by this feature. This can cause issues with all sorts of things including activating your AutoCAD license and even running AutoCAD. Ransomware Protection is an important feature of Windows 11 but it will affect your AutoCAD unless you allow AutoCAD and its dependent applications access to the controlled folders.

How to install AutoCAD 2000i

A quick word of advice: please follow the instructions below precisely as documented including using the same folder names and paths. This will significantly reduce the risk of having any problems…
  1. If you don’t yet have a copy of the Longbow Converter App you can purchase it here or click on the download link we sent you via email in order to download the Converter App to your PC.
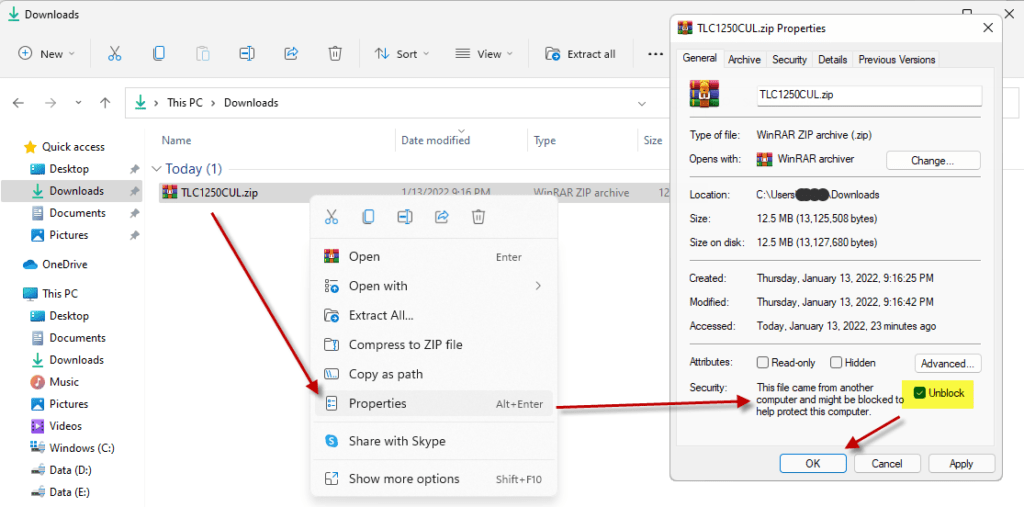
  2. Before installing the Converter App, make sure the files downloaded from our site are not blocked by Windows SmartScreen… Windows 11 is finicky, click the TLC zip first to make sure it’s fully selected then Right+click the file and select Properties. Be sure to check the Unblock checkbox as shown below and Click OK…
  3. Double click the zip file to open it and install the TLC application as normal. By the way, TLC stands for The Longbow Converter
  4. Start the Longbow Converter tool
    1. Insert your AutoCAD 2000 CD into your CDRom drive
    2. Select the 2nd tab named “Old AutoCAD Installer Reviver
    3. Using the “…” button, pick your AutoCAD CD
    4. Click “Run Old Installer
      1. Read and follow all the prompts
      2. Once the AutoCAD setup starts, stop and read the next step…
  5. In the AutoCAD setup program, navigate through each setup dialog as normal, with these exceptions…
    1. When you arrive at the installation folder path setup dialog…
      1. **it’s vitally important to make sure you install to c:\acad2000i (not Program Files (x86)\AutoCAD  2000i which is normally default)**
      2. Once setup completes…
        1. Do not reboot if asked to do so
        2. Make sure to fully close the setup program when the installation is complete.
  6. Back in the Converter app and make sure it’s completed the final stage of processing using the “Old AutoCAD Program Reviver” tab, it should say SUCCESS!
  7. Finally, reboot your PC and run your AutoCAD!

Installing the AutoCAD 2000i sp2 service pack

  1. download the locked AutoCAD 2000i sp2 from here or download the unlocked AutoCAD 2000i sp2 from here
  2. Next, unzip and save the service pack file to c:\Autodesk\sp – do not install yet
  3. Go back into the Converter, select the 3rd tab, select the c:\Autodesk\sp folder and click Fix.
  4. Install the 2000i sp2 by running either the c:\Autodesk\sp\u090_u181p.exe for unlocked or c:\Autodesk\sp\u090_u181p_swl.exe for locked
  5. Once your sp is installed, start the Longbow Converter tool again; we are going to repeat some of the steps from the original installation before. Select the 2nd tab, pick the copy of your AutoCAD 2000i CD on your hard drive which last time was in c:\Autodesk\acad2000i folder, now select the 3rd tab, select the install folder c:\acad2000i now click Fix.
  6. Now, you can happily run your AutoCAD 2000i with sp2 on Windows 10, Windows 7 and Windows 8.

Troubleshooting


Copyright 2024 (c) Longbow Software

Installing Autodesk Land Desktop 2002 (LDT 2002) on Windows 11

Follow these instructions to solve issues around installing/running your legacy AutoCAD LDT 2002 on Windows 11. It requires the purchase of our Longbow Converter App which provides the framework to allow your old AutoCAD to install and run natively on Windows 11.

NOTE: We currently only support US unlocked versions of 2002 on 64bit OS. European or locked US support 2002 is limited only to 32bit Windows 11.

Ransomware Protection Windows 11 and AutoCAD

Just before we start note that Windows 11 comes with a Ransomware Protection which includes Controlled Folder Access. Controlled folder access blocks applications from writing to your Documents, Pictures, Videos, Music, Public and Favorites folders. AutoCAD versions all the way to AutoCAD 2021 write to certain user Public folders and are therefore blocked by this feature. This can cause issues with all sorts of things including activating your AutoCAD license and even running AutoCAD. Ransomware Protection is an important feature of Windows 11 but it will affect your AutoCAD unless you allow AutoCAD and its dependent applications access to the controlled folders.

How to install Autodesk LDT 2002

  1. If you don’t yet have a copy of the Longbow Converter App you can purchase it here or click on the download link we sent you via email in order to download the Converter App to your PC.
  2. Before installing the Converter App, make sure the files downloaded from our site are not blocked by Windows SmartScreen… Windows 11 is finicky, click the TLC zip first to make sure it’s fully selected then Right+click the file and select Properties. Be sure to check the Unblock checkbox as shown below and Click OK…
  3. Double click the zip file to open it and install the TLC application as normal. By the way, TLC stands for The Longbow Converter
  4. This image has an empty alt attribute; its file name is ProblemSolved-1.pngStart the Longbow Converter tool
    1. Select the 2nd tab named “Old AutoCAD Installer Reviver
    2. Using the “. . .” button, pick your LDT 2002 CD ROM
      1. Now click the “Run Old Installer” button
      2. Next, just follow the Converter’s instructions.
    3. Once the AutoCAD setup starts, stop and read the next step
  5. In the setup program, navigate through each setup dialog as normal, except when you get to the installation folder **it’s vitally important to make sure you install to c:\ldt2002 (not Program Files (x86)\Autodesk Land Desktop 3 as usually prompted by default)**
    1. Now carry on with the install as usual
    2. Do not reboot if asked to do so
  6. Once installed…
    1. Be sure to completely close the setup application
    2. Now go back to the Converter app and make sure it’s completed the final stage of processing using the “Old AutoCAD Program Reviver” tab, it should say “SUCCESS!!”
    3. Finally, reboot your PC and run your AutoCAD as normal
  7. Now you can happily run your LDT 2002!

Installing LDT 3 Service Packs

You must first install sp1, followed by sp2…

LDT 3 sp1 – software lock/unlocked with html documentation

LDT 3 sp2 – software lock/unlocked with html documentation 

  1. Unzip the sp1 into a folder called c:\Autodesk\LDT3 sp1
  2. Next, start the Converter, select the 3rd tab “Old AutoCAD Program Reviver” select the c:\Autodesk\LDT3 sp1 folder, then click Fix.
    1. If asked if this is a service pack by the Converter tool, say yes.
  3. Now run the sp1 as you need from Windows Explorer.
  4. Repeat for sp2

Installing Civil Design 3

Using the Longbow Converter solution, you can also install the Civil Design add-on to LDT 3.

  1. Using Windows Explorer, copy your entire Civil Design 3 CD to your hard drive, to a folder path c:\Autodesk\ldt2002 – Civil Design 3 
  2. Start the Longbow Converter tool, select the 2nd tab, pick the c:\Autodesk\ldt2002 – Civil Design 3 folder, and click Run. Read and understand all the prompts before pressing OK. Once the setup starts, stop and read the next step…
  3. In the setup program, navigate through each setup dialog as normal
  4. Now your Civil Design 3 is up and running with LDT.

Installing Survey 3

Using the Longbow Converter solution, you can also install the Survey add-on to LDT 3.

  1. Using Windows Explorer, copy your entire Survey 3 CD to your hard drive, to a folder path c:\Autodesk\ldt2002 – Survey 3 
  2. Start the Longbow Converter tool, select the 2nd tab, pick the c:\Autodesk\ldt2002 – Survey 3 folder, and click Run. Read and understand all the prompts before pressing OK. Once the setup starts, stop and read the next step…
  3. In the setup program, navigate through each setup dialog as normal
  4. Now your Survey 3 is up and running with LDT.

Installing Raster Design 3

Using the Longbow Converter solution, you can also install the Raster Design add-on to LDT 3.

  1. Using Windows Explorer, copy your entire Survey 3 CD to your hard drive, to a folder path c:\Autodesk\ldt2002 – Raster Design 3 
  2. Start the Longbow Converter tool, select the 2nd tab, pick the c:\Autodesk\ldt2002 – Raster Design 3 folder, and click Run. Read and understand all the prompts before pressing OK. Once the setup starts, stop and read the next step…
  3. In the setup program, navigate through each setup dialog as normal
  4. Now your Raster Design 3 is up and running with LDT.

Troubleshooting

– If you have crashing problems using the File->Open or File->Save dialogs inside of AutoCAD please read this blog entry on the File->Open or File->Save Crash in AutoCAD

Copyright 2024 (c) Longbow Software

Install AutoCAD 2002 on Windows 11

Follow these instructions to solve issues around installing/running your legacy AutoCAD 2002 on Windows 11

Ransomware Protection Windows 11 and AutoCAD

Windows 11 comes with a Ransomware Protection which includes Controlled Folder Access. Controlled folder access blocks applications from writing to your Documents, Pictures, Videos, Music, Public and Favorites folders. AutoCAD versions all the way to AutoCAD 2021 write to certain user Public folders and are therefore blocked by this feature. This can cause issues with all sorts of things including activating your AutoCAD license and even running AutoCAD. Ransomware Protection is an important feature of Windows 11 but it will affect your AutoCAD unless you allow AutoCAD and its dependent applications access to the controlled folders.

How to install AutoCAD 2002

A quick word of advice: please follow the instructions below precisely as documented including using the same folder names and paths. This will significantly reduce the risk of having any problems…
  1. If you don’t yet have a copy of the Longbow Converter App you can purchase it here or click on the download link we sent you via email in order to download the Converter App to your PC.
  2. Before installing the Converter App, make sure the files downloaded from our site are not blocked by Windows SmartScreen… Windows 11 is finicky, click the TLC zip first to make sure it’s fully selected then Right+click the file and select Properties. Be sure to check the Unblock checkbox as shown below and Click OK…
  3. Double click the zip file to open it and install the TLC application as normal. By the way, TLC stands for The Longbow Converter
  4. Start the Longbow Converter tool
    1. Insert your AutoCAD 2002 CD into your CDRom drive
    2. Select the 2nd tab named “Old AutoCAD Installer Reviver
    3. Using the “…” button, pick your AutoCAD CD
    4. Click “Run Old Installer
      1. Read and follow all the prompts
      2. Once the AutoCAD setup starts, stop and read the next step…
  5. In the AutoCAD setup program, navigate through each setup dialog as normal, with these exceptions…
    1. When you arrive at the installation folder path setup dialog…
      1. **it’s vitally important to make sure you install to c:\acad2002 (not Program Files (x86)\AutoCAD  2002 which is normally default)**
      2. Once setup completes…
        1. Do not reboot if asked to do so
        2. Make sure to fully close the setup program when the installation is complete.
  6. Back in the Converter app and make sure it’s completed the final stage of processing using the “Old AutoCAD Program Reviver” tab, it should say SUCCESS!
  7. Finally, reboot your PC and run your AutoCAD and once registered, exit AutoCAD and continue to the next step.
  8. Next, obtain the AutoCAD 2002 sp1 from here unzip and save to c:\Autodesk\spdo not install yet
    1. Go back into the Converter
    2. Select the 3rd tab again
    3. titled “Old AutoCAD Program Reviver
    4. Using the ‘…’ button, select the c:\Autodesk\sp folder
    5. click “Fix Old Program
    6. Finally, install the AutoCAD 2002 sp1 by running the c:\Autodesk\sp\acad2002sp1.exe 
  9. Now, you can happily run your AutoCAD 2002 on Windows 11

Troubleshooting

  • If your AutoCAD 2002 setup stuck at very end, check out this blog
  • If you have crashing problems using the File->Open or File->Save dialogs inside of AutoCAD please read this blog entry on the File->Open or File->Save Crash in AutoCAD 
Copyright 2023 (c) Longbow Software

Installing AutoCAD LT 2002 on Windows 11

If you are a seasoned AutoCAD LT 2002 user, no doubt you will at some point have run into the famous GEDIT 3 error and been very frustrated with it. That error occurs because of certain video card drivers and/or certain types of anti-virus software setups.

On Windows 10, Windows 7 and Windows 8, the GEDIT 3 error is even more prominent because of all the new security features that are inside of Windows 7 and 8. The good news is that it’s totally possible to eradicate the GEDIT 3 error by follow the instructions below.
 

Follow these instructions to solve issues around installing/running your legacy AutoCAD LT 2002 on Windows 11

Ransomware Protection Windows 11 and AutoCAD

Windows 11 comes with a Ransomware Protection which includes Controlled Folder Access. Controlled folder access blocks applications from writing to your Documents, Pictures, Videos, Music, Public and Favorites folders. AutoCAD versions all the way to AutoCAD 2021 write to certain user Public folders and are therefore blocked by this feature. This can cause issues with all sorts of things including activating your AutoCAD license and even running AutoCAD. Ransomware Protection is an important feature of Windows 11 but it will affect your AutoCAD unless you allow AutoCAD and its dependent applications access to the controlled folders.

How to install AutoCAD LT 2002 

A quick word of advice: please follow the instructions below precisely as documented including using the same folder names and paths. This will significantly reduce the risk of having any problems…
  1. If you don’t yet have a copy of the Longbow Converter App you can purchase it here or click on the download link we sent you via email in order to download the Converter App to your PC.
  2. Before installing the Converter App, make sure the files downloaded from our site are not blocked by Windows SmartScreen… Windows 11 is finicky, click the TLC zip first to make sure it’s fully selected then Right+click the file and select Properties. Be sure to check the Unblock checkbox as shown below and Click OK…
  3. Double click the zip file to open it and install the TLC application as normal. By the way, TLC stands for The Longbow Converter
  4. Start the Longbow Converter tool
    1. Insert your AutoCAD LT 2002 CD into your CDRom drive
    2. Select the 2nd tab named “Old AutoCAD Installer Reviver
    3. Using the “…” button, pick your AutoCAD CD
    4. Click “Run Old Installer
      1. Read and follow all the prompts
      2. Once the AutoCAD setup starts, stop and read the next step…
  5. In the AutoCAD setup program, navigate through each setup dialog as normal, with these exceptions…
    1. When you arrive at the installation folder path setup dialog…
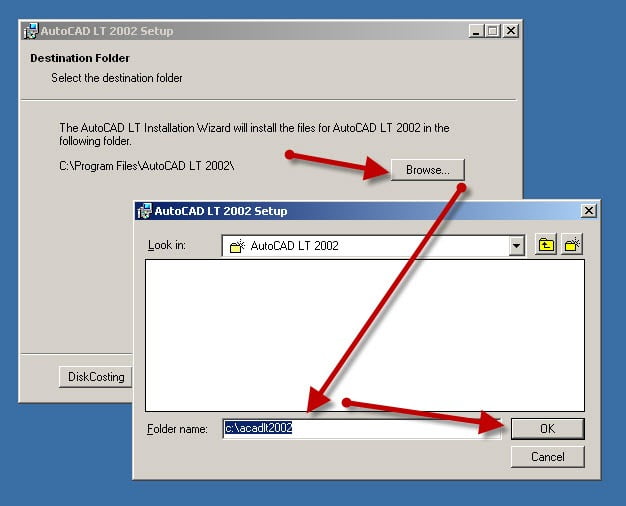
      1. **it’s vitally important to make sure you install to c:\acadlt2002 (not Program Files (x86)\AutoCAD LT 2002 which is normally default)** – e.g.

        You must change the default AutoCAD LT 2002 Install path
      2. Once setup completes…
        1. Do not reboot if asked to do so
        2. Make sure to fully close the setup program when the installation is complete.
  6. Back in the Converter app and make sure it’s completed the final stage of processing using the “Old AutoCAD Program Reviver” tab, it should say SUCCESS!
  7. Finally, reboot your PC and run your AutoCAD and once registered, exit AutoCAD and continue to the next step.
  8. Next, obtain the AutoCAD LT 2002 sp1 from here unzip and save to c:\Autodesk\spdo not install yet
  9. Next, obtain the AutoCAD LT 2002 sp2 from here (or AutoCAD LT 2002 sp2 locked version from here) and save to c:\Autodesk\sp do not install yet
  10. Go back into the Converter
    1. select the 3rd tab named “Old AutoCAD Program Reviver”
    2. Using the “. . .” button, select the c:\Autodesk\sp folder
    3. click “Fix Old Program“.
      1. Now Install the LT 2002 sp1 by running c:\Autodesk\sp\acad2002LTsp1.exe
        1. IMPORTANT NOTE: If you get a 114 error, contact Longbow Software Support to get them to fix it for you.
      2. Next, install the LT 2002 sp2 by running either the unlocked c:\Autodesk\sp\acltk044-k047unl.exe or the locked c:\Autodesk\sp\acltk044-k047swl.exe
        1. IMPORTANT NOTE: If you get a 114 error, contact Longbow Software Support to get them to fix it for you.
  1. Finally, reboot your PC and run AutoCAD as normal.

Troubleshooting

  • If you cannot install your AutoCAD LT 2002 Service Packs because of an error “114: Autocad LT 2002 update was not applied” – rather than try and solve this issue, the easiest solution is:
    1. To go back to your old Windows XP machine and make sure that all of the sp’s are installed on your old Windows XP machine’s installation of AutoCAD LT 2002
    2. Next, simply copy all of the AutoCAD LT 2002 program files and folders from your old Windows XP machine to a USB drive – copy the “contents” of C:\Program Files\AutoCAD LT 2002
    3. Now transfer the USB to your new machine and copy the files that were on your old Windows XP machine’s C:\Program Files\AutoCAD LT 2002 folder into your newly installed c:\acadlt2002 folder – you should see a question if you should overwrite all files, say YES
  • If you have crashing problems using the File->Open or File->Save dialogs inside of AutoCAD please read this blog entry on the File->Open or File->Save Crash in AutoCAD
Copyright 2022 (c) Longbow Software

AutoCAD 2002 setup stuck at very end

If you are installing AutoCAD 2002 and your setup is just sitting there right at the end at about 99% complete showing “Please wait, installation in progress”…

  1. Start Task Manager (right click on the Windows Taskbar and click “Start Task Manager”
  2. In Task Manager, make sure you have enabled the “Detailed view” 
  3. Pick the “Details” tab
  4. Search for all “msiexec.exe”
  5. Now look at all the msiexec.exe’s “PID” values
    1. Right click the msiexec.exe with the highest PID value (last run) and select “End Process Tree”
      1. Now check the AutoCAD setup, is it continuing again?
      2. If not, repeat 5.1

Copyright 2021 (c) Longbow Software

Installing AutoCAD Mechanical Desktop 6 on Windows 7, Windows 8 and Windows 10

If you are trying to install your old version of AutoCAD MDT 6 on new versions of Windows you can run into lots of problems. Because there are so many issues, we created an App called the Longbow Converter to automatically smooth over installation and running issues for you.

All you need to do is follow these steps to install your AutoCAD MDT 6 on Windows 10 and make it work…


How to install AutoCAD MDT 6 on Windows

NOTE: These steps do not bypass normal Autodesk licensing/authorization, you should expect to use your own serial numbers in the normal way.

I recommend that you follow these steps precisely so to eliminate the risk of something going wrong with the install… 

  1. Obtain your copy of the Longbow Converter here
  2. Insert your MDT 6 CD into your computer
  3. Start the Longbow Converter tool
    1. Select the 2nd tab named “Old AutoCAD Installer Reviver”
    2. Using the “. . .” button, pick your MDT 6 CD
      1. Now click the “Run Old Installer” button
      2. Next, just follow the Converter’s instructions.
    3. Once the MDT 6 setup starts, stop and read the next step
  4. In the setup program, navigate through each setup dialog as normal, except when you get to the installation folder, **it’s vitally important to make sure you install to c:\mdt2002 (not Program Files (x86)\Mechanical Desktop 6 as usually prompted by default)**
  5. Once installed, completely close the setup application
    1. Now go back to the Converter app and make sure it’s completed the final stage of processing using the “Old AutoCAD Program Reviver” tab
    2. Finally, reboot your PC and run your AutoCAD as normal

Troubleshooting  

Copyright 2019 (c) Longbow Software

Uninstalling all Autodesk Products from your Computer

Here’s a good one for you. We added a new tool in our Longbow Converter App which allows you to uninstall all Autodesk products from your computer in one go…

  1. Obtain your copy of the Longbow Converter here
  2. Start the Converter tool
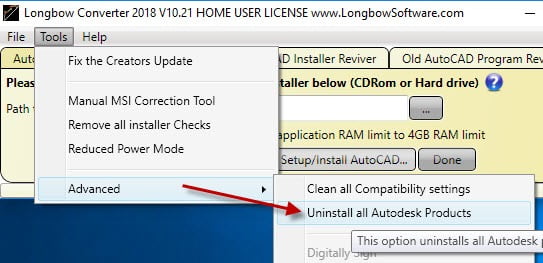
  3. Click the Tools->Advanced->Uninstall all Autodesk Products menu…

    Uninstall All Autodesk Products

    Uninstall All Autodesk Products

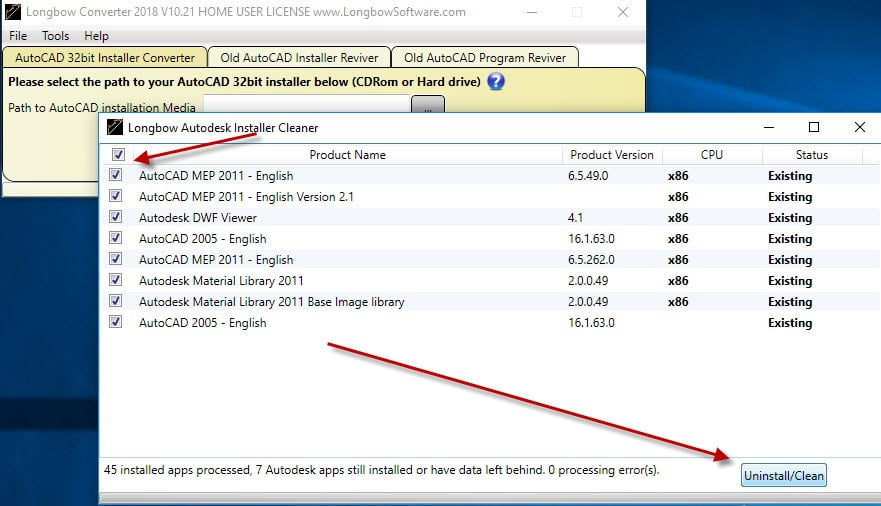
  4. The Converter will now list all of the Autodesk products installed on your computer, you can press F5 to refresh. Select which ones you want to be uninstalled, then click Uninstall/Clean

    Uninstall and Clean

    Uninstall and Clean

  5. Note that you will have to interact with the setups, but the software does a really good job of cleaning everything off.

Copyright 2017 (c) Longbow Software

Opening AutoCAD DWG file gives “Drawing File was created by an incompatible version” message

If you are trying to open a DWG file with AutoCAD and you get the message “Drawing File was created by an incompatible version” it’s because somewhere along the line your AutoCAD DWG files were saved with a newer version of AutoCAD.

All is not lost, you can make them open again in your version of AutoCAD, you just need to download the free DWGTrueView App from Autodesk – http://www.autodesk.com/products/dwg/viewers

Once installed, start DWGTrueview and open the DWG file in question, then save as making sure to select the lowest DWG file version that matches your version of AutoCAD.

Copyright 2017 (c) Longbow Software

Install Autodesk Architectural Desktop 3.3 on Windows 7, Windows 8 and Windows 10

Follow these instructions to solve issues around installing/running your old AutoCAD Architecture 3.3 (ADT 2002) on newer versions of 64bit Windows 7, Windows 8 and Windows 10

How to install AutoCAD ADT 3.3 

  1. Obtain your purchased copy of the Longbow Converter here
  2. Start the Longbow Converter tool
    1. Insert your AutoCAD CD into your CDRom drive
    2. Select the 2nd tab named “Old AutoCAD Installer Reviver
    3. Using the “…” button, path the to your AutoCAD CD
    4. Click “Run Old Installer
      1. Read and follow all the prompts
      2. Once the AutoCAD setup starts, stop and read the next step…
  3. In the AutoCAD setup program, navigate through each setup dialog as normal, with these exceptions…
    1. When you arrive at the installation folder path setup dialog…
      1. **it’s vitally important to make sure you install to c:\adt2002 (not Program Files (x86)\AutoCAD Architecture 3.3)**.
    2. Once installed
      1. Do not reboot if asked to do so
      2. Make sure to fully close the setup program when the installation is complete.
      3. Back in the Converter app and make sure it’s completed the final stage of processing using the “Old AutoCAD Program Reviver” tab
  4. Finally, it’s important to now reboot your PC and then install the service pack update below

Install AutoCAD Architecture 3.3 Sp2

To install the sp for your AutoCAD…
  1. Download your AutoCAD ADT 3.3 Sp2
  2. Copy the service pack exe installer to folder path c:\Autodesk\sp
  3. Start the Converter App
    1. select the 3rd tab named “Old AutoCAD Program Reviver
    2. Using the “. . .” button, pick the c:\Autodesk\sp folder
    3. click “Fix Old Program“.
  4. Now you can run the service pack exe installer from Windows explorer as normal

Last step…
We highly recommend that you disable the “Today” start page page that pops up when ADT starts…. Right click the command line->Options->Preferences->System->Startup:Do not show a startup dialog

Troubleshooting

Copyright 2019 (c) Longbow Software

Installing AutoCAD 2002 Express Tools on Windows 7, Windows 8 and Windows 10

If you are having trouble installing AutoCAD 2002 Express Tools with “This app cannot run on your PC” then read on…

Installing AutoCAD 2002 Express Tools (et1-9.exe) on Windows 7, Windows 8 and Windows 8.1 32bit or 64bit can be very easily defined in these short steps.

A quick word of advice: best to follow the instructions below precisely and to the letter, including folder names and paths, that way you will reduce the risk of having any problems…

  1. Obtain your copy of the Longbow Converter here
  2. Next, make sure you have AutoCAD 2002 already installed – follow these steps Installing AutoCAD 2002 on Windows 7, Windows 8 and Windows 10
  3. Unzip this zip file to c:\Autodesk
  4. Start the Longbow Converter tool, select the 2nd tab, pick the newly created c:\Autodesk\ExpressTools2002 folder, and click Run. Read and understand all the prompts before pressing OK.
  5. Now, I know it’s unheard of these days, but at this point expect to wait at least 45 minutes for your AutoCAD 2002 Express Tools setup.exe program to fully appear. Once the setup starts, stop and read the next step…
  6. In the setup program, navigate through each setup dialog as normal, except when you get to the installation folder, **it’s vitally important to make sure you install to c:\acad2002Et (not Program Files (x86)\AutoCAD Express Tools 2002 as usually prompted)**
    1. Do not reboot if prompted to do so
  7. Now you can happily run your Express Tools inside of AutoCAD 2002, simply start AutoCAD 2002 and to use Express Tools 2002 as normal..

Troubleshooting:

  • If your Express Tools 2002 setup is not starting after 45 minutes, try rebooting, then restart the steps above. If it is still failing, most likely it’s because of another application on your system which is preventing our setup routine from starting (perhaps anti-virus, or similar) – try the same steps as above in Windows Safe Mode
Copyright 2015 (c) Longbow Software

Upgrading your existing AutoCAD to Windows 10 and Windows 11

So you have an old PC with a working copy of AutoCAD and you want to upgrade to Windows 10? STOP and read this whole blog first before you wipe your working PC…

Autodesk License Activation for older versions of AutoCAD

That’s right, Autodesk no longer support versions of AutoCAD (at the time of writing 2014 or earlier) which means that they will not give you a new authorization code. That means you will have to activate your AutoCAD license without Autodesk – you do have some options:

  1. First try activation via this offline process that Autodesk recently added
  2. If you have an activation code, try an Offline Activation 
  3. Transfer your existing AutoCAD license from your old PC to your new PC. Your AutoCAD install CD comes with utility to do the job, see below…

    NOTE: A good idea (before transfering the AutoCAD license from your old PC to the new PC) is to setup AutoCAD to run in offline mode then clone your old PC hard drive. This ensures you have a backup of your old PC with a valid license.

    NOTE: Apparently, the license transfer will fail if your license is invalid. Some examples we heard about failing are: it’s a USA license running in a different country or it’s an Education License or you used a serial number that was compromised

    1. AutoCAD 2009 or older – transfer license using the Autodesk Portable License Transfer Utility

      NOTE: AutoCAD 2006/2007
      users – you MUST install this patch so you do not lose your activation through a bug in the software once it is transferred to the new PC
    2. AutoCAD 2010 or newer – transfer license using the License Transfer Utility
  4. If you have an Autodesk Network licensing setup, keep it. Apparently, if you have this you are completely safe from shutdown and you can move to new systems without problems.
  5. Call Autodesk an explain your situation, we heard some people managed to get an activation code because their existing one was lost through software fault.
  6. Go back to an older version of AutoCAD. AutoCAD R13, R14, 2000, 2000i, 2002, 2004 and some versions of 2005 don’t require online activation therefore, as long as you have the original activation codes, they can still be used.
    • They all run perfectly on Windows 10, but you will need to install them using our Converter App (click for install instructions R13 R14 2000 2000i 2002 2004 2005)
    • If you have DWG files saved by newer versions of AutoCAD then simply use the free Autodesk DWGTrueview App (which is a cut down version of AutoCAD) to convert your DWG file save versions back to an earlier version.
  7. For information purposes only: There is an AutoCAD Keygen application online called “X-Force” which you can use to generate your authcode. NOTE: using a keygen is highly illegal when using hacked serial numbers, we don’t recommend it. Some ask if it is still illegal to use a keygen with a paid/valid serial number? You need to do your own legal checks on that question before using a keygen. 

Is it possible to protect your working AutoCAD from losing its license?

Yes. The latest version of our Converter App (12.30 or newer) has a new Block Internet Connection” feature which disables all internet access to and from your AutoCAD, this makes it impossible for your AutoCAD license to be deactivated at some point in the future (with the disadvantage that you lose any internet based features in AutoCAD)

Windows XP and Windows Vista AutoCAD users upgrading to Windows 10

For those of you who are still running AutoCAD on Windows XP and want to upgrade to Windows 10, you will need to

  1. Get a new Windows 10 PC, preferably one without (or disabled) Intel onBoard graphics.
  2. Once you have a Windows 10 PC, run Windows Update until there are no more updates left to be installed.
  3. Next, install your AutoCAD using the Converter app…
    1. click on the version of AutoCAD you have (it explains all that you need to do) : AutoCAD R14 AutoCAD 2000 AutoCAD 2000i AutoCAD 2002 AutoCAD 2004 AutoCAD 2005 AutoCAD 2006 AutoCAD 2007 AutoCAD 2008 32bit AutoCAD 2009 32bit AutoCAD 2010 32bit AutoCAD 2011 32bit AutoCAD 2012 32bit AutoCAD 2013 32bit AutoCAD 2014 32bit 
    2. NOTE: If you can’t find your version listed, use the “Search” at the top left of this page
    3. Transfer the AutoCAD license as described above

Windows 7, Windows 8 and Windows 8.1 AutoCAD users upgrading to Windows 10

Here’s how to upgrade your PC to Windows 10 so that you can carry on using AutoCAD…

  1. Transfer your existing AutoCAD license from your old PC to your new PC. Your AutoCAD install CD comes with utility to do the job, see below… (A good idea is, before you transfer the AutoCAD license from your old PC to the new PC clone your old PC hard drive. This ensures you have a backup of your old PC with a valid license)
    1. AutoCAD 2009 or older – transfer license using the Autodesk Portable License Transfer Utility

      NOTE: AutoCAD 2006/2007 users – you MUST install this patch so you do not lose your activation through a bug in the software once it is transferred to the new PC
    2. AutoCAD 2010 or newer – transfer license using the License Transfer Utility
  2. Next, uninstall all AutoCAD versions on your system; it’s very important that you do this, if you don’t the Autodesk licensing system may get corrupted when you upgrade to Windows 10 at which point you will have to wipe the computer and start again.
  3. Now Upgrade to Windows 10
  4. Obtain the latest Longbow Converter supporting Windows 10 here
  5. Next, install your AutoCAD using the Converter app…
    1. click on the version of AutoCAD you have (it explains all that you need to do) : AutoCAD R14 AutoCAD 2000 AutoCAD 2000i AutoCAD 2002 AutoCAD 2004 AutoCAD 2005 AutoCAD 2006 AutoCAD 2007 AutoCAD 2008 32bit AutoCAD 2009 32bit AutoCAD 2010 32bit AutoCAD 2011 32bit AutoCAD 2012 32bit AutoCAD 2013 32bit AutoCAD 2014 32bit 
    2. If you can’t find your version listed, use the “Search” at the top left of this page
    3. AutoCAD 2006/2007 users – you MUST install this patch so you do lose your license activation randomly 
  • What happens if you already upgraded to Windows 8.1 with your existing AutoCAD installation – most likely your AutoCAD will not run, nor will you be able to repair it. The best thing to get your AutoCAD running again is to carry out a Windows Reset.

Users of 32bit AutoCAD versions 2002 thru 2013 and running or Windows 7 upgrading to Windows 8.1

If you have a working Windows 7 machine and you are thinking to upgrade to Windows 8.1 best just stay where you are. Better to upgrade to Windows 10, aside from being a free upgrade, it seems to be a much better platform too.

With that said, if you must upgrade your working Windows 7 system to Windows 8.1, then it is of course possible using our Longbow Converter tool – you ***must*** first uninstall all AutoCAD products before doing the upgrade. Once Windows 8.1 has been installed, just use the Longbow Converter to re-install your 32bit AutoCAD software as before.

  • What happens if you already upgraded to Windows 8.1 with your existing AutoCAD installation – most likely your AutoCAD will not run, nor will you be able to repair it. The best thing to get your AutoCAD running again is to carry out a Windows Reset.

Users of 64bit AutoCAD versions 2002 thru 2013 and running or Windows 7 upgrading to Windows 8.1

If you have a working Windows 7 machine and you are thinking to upgrade to Windows 8.1 best just stay where you are. Better to upgrade to Windows 10, aside from being a free upgrade, it seems to be a much better platform too.

With that said, if you must upgrade your working Windows 7 system to Windows 8.1, then it is of course possible using our Longbow Converter tool – you ***must*** first uninstall all AutoCAD products before doing the upgrade. Once Windows 8.1 has been installed, install your 64bit AutoCAD products as normal then use the Longbow Converter to fix all 64bit AutoCAD 2008 thru 2013 Windows 8 issues

Copyright 2020 (c) Longbow Software


Install AutoCAD 2002 on Windows 7, Windows 8 and Windows 10

Installing AutoCAD 2002 on Windows 10, Windows 7, Windows 8 or Windows 8.1 32bit or 64bit can be very easily defined in these short steps…

NOTE: These steps do not bypass normal Autodesk licensing/authorization, you should expect to use your own serial numbers in the normal way.

  1. Obtain your copy of the Longbow Converter here
  2. Using Windows Explorer, backup your entire AutoCAD 2002 CD to your hard drive, to a folder path c:\Autodesk\CDs\acad2002 
  3. Start the Longbow Converter tool
    1. select the 2nd tab titled “Old AutoCAD Installer Reviver
    2. Using the ‘…’ button, pick the c:\Autodesk\CDs\acad2002 folder (where you just copied your 2002 CD)
    3. Click the “Run Old Installer” button.
      1. Read and understand all the prompts before pressing OK.
      2. Once the setup starts, stop and read the next step…
  4. In the setup program, navigate through each setup dialog as normal, except when you get to the installation folder, **it’s vitally important to make sure you install to c:\acad2002 (not Program Files (x86)\AutoCAD 2002 as usually prompted by default)**
    1. IMPORTANT NOTE: You may find that entering the path C:\acad2002 may not take (a bug in the AutoCAD 2002 installer). In that case, you will need to select the installation folder C:\Program Files (x86)\AutoCAD 2002 in step (5) below
    2. Do not reboot if prompted to do so
  5. Once installed, go back to the Converter tool…
    1. Select the 3rd tab titled “Old AutoCAD Program Reviver
    2. Using the ‘…’ button, pick the newly installed c:\acad2002 folder
    3. click “Fix Old Program“.
  6. Now run your AutoCAD 2002 and completely register as normal. Once registered, exit AutoCAD and continue to the next step…
  7. Next, obtain the AutoCAD 2002 sp1 from here unzip and save to c:\Autodesk\spdo not install yet
    1. Go back into the Converter
    2. Select the 3rd tab again
    3. titled “Old AutoCAD Program Reviver
    4. Using the ‘…’ button, select the c:\Autodesk\sp folder
    5. click “Fix Old Program
  8. Finally, install the AutoCAD 2002 sp1 by running the c:\Autodesk\sp\acad2002sp1.exe 
  9. Now, you can happily run your AutoCAD 2002 on Windows 10, Windows 7 and Windows 8.
Troubleshooting:
Copyright 2017 (c) Longbow Software

AutoCAD “There was a problem sending the command to the program”

If you are seeing the message “There was a problem sending the command to the program” when you double click a DWG file from Windows Explorer, then the solution is to follow the instructions listed for your AutoCAD version below:

If you do not see your version of AutoCAD listed, or you are not an AutoCAD user, leave me a comment below and I’ll check it out for you.

Copyright Longbow Software 2015

Installing Land Desktop 3 (LDT 2002) on Windows 7, Windows 8 and Windows 10

Installing Land Desktop 3 (LDT 2002) on Windows 7, Windows 8 or Windows 10 32bit or 64bit can be very easily defined in these short steps…

NOTE: These steps do not bypass normal Autodesk licensing/authorization, you should expect to use your own serial numbers in the normal way.

It is recommended that you follow these steps precisely as documented so as to eliminate the risk of something going wrong with the install…

Obtain your copy of the Longbow Converter here

How to install Land Desktop 2002 

  1. Obtain your copy of the Longbow Converter here
  2. Insert your LDT 2002 CD into your computer
  3. This image has an empty alt attribute; its file name is ProblemSolved-1.pngStart the Longbow Converter tool
    1. Select the 2nd tab named “Old AutoCAD Installer Reviver”
    2. Using the “. . .” button, pick your LDT 2002 CD ROM
      1. Now click the “Run Old Installer” button
      2. Next, just follow the Converter’s instructions.
    3. Once the AutoCAD setup starts, stop and read the next step
  4. In the setup program, navigate through each setup dialog as normal, except when you get to the installation folder **it’s vitally important to make sure you install to c:\ldt2002 (not Program Files (x86)\Autodesk Land Desktop 3 as usually prompted by default)**
    1. Now carry on with the install as usual
    2. Do not reboot if asked to do so
  5. Once installed…
    1. Be sure to completely close the setup application
    2. Now go back to the Converter app and make sure it’s completed the final stage of processing using the “Old AutoCAD Program Reviver” tab, it should say SUCCESS!!
    3. Finally, reboot your PC and run your AutoCAD as normal
  6. Now you can happily run your LDT 2002!

Installing LDT 3 Service Packs

You must first install sp1, followed by sp2…

LDT 3 sp1 – software lock/unlocked with html documentation

LDT 3 sp2 – software lock/unlocked with html documentation 

  1. Unzip the sp1 into a folder called c:\Autodesk\LDT3 sp1
  2. Next, start the Converter, select the 3rd tab “Old AutoCAD Program Reviver” select the c:\Autodesk\LDT3 sp1 folder, then click Fix.
    1. If asked if this is a service pack by the Converter tool, say yes.
  3. Now run the sp1 as you need from Windows Explorer.
  4. Repeat for sp2

Installing Civil Design 3

Using the Longbow Converter solution, you can also install the Civil Design add-on to LDT 3.

  1. Using Windows Explorer, copy your entire Civil Design 3 CD to your hard drive, to a folder path c:\Autodesk\ldt2002 – Civil Design 3 
  2. Start the Longbow Converter tool, select the 2nd tab, pick the c:\Autodesk\ldt2002 – Civil Design 3 folder, and click Run. Read and understand all the prompts before pressing OK. Once the setup starts, stop and read the next step…
  3. In the setup program, navigate through each setup dialog as normal
  4. Now your Civil Design 3 is up and running with LDT.

Installing Survey 3

Using the Longbow Converter solution, you can also install the Survey add-on to LDT 3.

  1. Using Windows Explorer, copy your entire Survey 3 CD to your hard drive, to a folder path c:\Autodesk\ldt2002 – Survey 3 
  2. Start the Longbow Converter tool, select the 2nd tab, pick the c:\Autodesk\ldt2002 – Survey 3 folder, and click Run. Read and understand all the prompts before pressing OK. Once the setup starts, stop and read the next step…
  3. In the setup program, navigate through each setup dialog as normal
  4. Now your Survey 3 is up and running with LDT.

Installing Raster Design 3

Using the Longbow Converter solution, you can also install the Raster Design add-on to LDT 3.

  1. Using Windows Explorer, copy your entire Survey 3 CD to your hard drive, to a folder path c:\Autodesk\ldt2002 – Raster Design 3 
  2. Start the Longbow Converter tool, select the 2nd tab, pick the c:\Autodesk\ldt2002 – Raster Design 3 folder, and click Run. Read and understand all the prompts before pressing OK. Once the setup starts, stop and read the next step…
  3. In the setup program, navigate through each setup dialog as normal
  4. Now your Raster Design 3 is up and running with LDT.

Troubleshooting

Copyright 2021 (c) Longbow Software

Installing Mechanical Desktop 6 on Windows 10, Windows 7, Windows 8 and Windows 8.1

Installing Mechanical Desktop 6 (MDT 2002) on Windows 10, Windows 7, Windows 8 or Windows 8.1 32bit or 64bit can be very easily defined in these short steps…

NOTE: These steps do not bypass normal Autodesk licensing/authorization, you should expect to use your own serial numbers in the normal way.

Before starting, a quick word of advice: best to follow the instructions below precisely and to the letter, including folder names and paths, that way you will reduce the risk of having any problems…
  1. Obtain your copy of the Longbow Converter here
  2. Copy your Mechanical Desktop 6 CD to your hard drive, to a folder path c:\Autodesk\mdt2002 
  3. Start the Longbow Converter tool, select the 2nd tab, pick the c:\Autodesk\mdt2002 folder, and click Run. Read and understand all the prompts before pressing OK. Once the setup starts, stop and read the next step…
  4. In the setup program, navigate through each setup dialog as normal, except when you get to the installation folder, **it’s vitally important to make sure you install to c:\mdt2002 (not Program Files (x86)\Mechanical 6**
  5. Once installed, go back to the Converter tool, select the 3rd tab, pick the newly installed c:\mdt2002 folder and click Fix.
  6. Now you can happily run your Mechanical Desktop 6.
Troubleshooting:
Copyright 2015 (c) Longbow Software

Installing AutoCAD LT 2002 on Windows 10, Windows 7, Windows 8 and Windows 8.1

If you are a seasoned AutoCAD LT 2002 user, no doubt you will at some point have run into the famous GEDIT 3 error and been very frustrated with it. That error occurs because of certain video card drivers and/or certain types of anti-virus software setups.

On Windows 10, Windows 7 and Windows 8, the GEDIT 3 error is even more prominent because of all the new security features that are inside of Windows 7 and 8. The good news is that it’s totally possible to eradicate the GEDIT 3 error by follow the instructions below:
 

How to install AutoCAD LT 2002 

  1. Obtain your purchased copy of the Longbow Converter here
  2. Start the Longbow Converter tool
    1. Insert your AutoCAD CD into your CDRom drive
    2. Select the 2nd tab named “Old AutoCAD Installer Reviver
    3. Using the “…” button, path the to your AutoCAD CD
    4. Click “Run Old Installer
      1. Read and follow all the prompts
      2. Once the AutoCAD setup starts, stop and read the next step…
  3. In the setup program, navigate through each setup dialog as normal, except when you get to the installation folder – **it’s vitally important to make sure you install to c:\acadlt2002 (not Program Files (x86)\AutoCAD LT 2002 as usually prompted by default)**
    1. IMPORTANT NOTE: For AutoCAD 2002 you may find that entering the path C:\acadlt2002 may not take (a bug in the AutoCAD 2002 installer). In that case, you will need to select the installation folder C:\Program Files (x86)\AutoCAD LT 2002 in step (5) below
    2. Do not reboot if prompted to do so

      You must change the default AutoCAD LT 2002 Install path
  4. Once installed
    1. Once installed
      1. Do not reboot if asked to do so
      2. Make sure to fully close the setup program when the installation is complete.
      3. Back in the Converter app and make sure it’s completed the final stage of processing using the “Old AutoCAD Program Reviver” tab.
  5. Now run your AutoCAD LT 2002 and completely register as normal. Once registered, exit AutoCAD and continue to the next step.
  6. Next, obtain the AutoCAD LT 2002 sp1 from here unzip and save to c:\Autodesk\spdo not install yet
  7. Next, obtain the AutoCAD LT 2002 sp2 from here (or AutoCAD LT 2002 sp2 locked version from here) and save to c:\Autodesk\sp do not install yet
  8. Go back into the Converter
    1. select the 3rd tab named “Old AutoCAD Program Reviver”
    2. Using the “. . .” button, select the c:\Autodesk\sp folder
    3. click “Fix Old Program“.
  9. Now Install the LT 2002 sp1 by running c:\Autodesk\sp\acad2002LTsp1.exe
    1. IMPORTANT NOTE: If you get a 114 error, contact Longbow Software Support to get them to fix it for you.
  10. Next, install the LT 2002 sp2 by running either the unlocked c:\Autodesk\sp\acltk044-k047unl.exe or the locked c:\Autodesk\sp\acltk044-k047swl.exe
    1. IMPORTANT NOTE: If you get a 114 error, contact Longbow Software Support to get them to fix it for you.
  11. Finally, reboot your PC and run AutoCAD as normal.

Troubleshooting

  • If you cannot install your AutoCAD LT 2002 Service Packs because of an error “114: Autocad LT 2002 update was not applied” – rather than try and solve this issue, the easiest solution is:
    1. To go back to your old Windows XP machine and make sure that all of the sp’s are installed on your old Windows XP machine’s installation of AutoCAD LT 2002
    2. Next, simply copy all of the AutoCAD LT 2002 program files and folders from your old Windows XP machine to a USB drive – copy the “contents” of C:\Program Files\AutoCAD LT 2002
    3. Now transfer the USB to your new machine and copy the files that were on your old Windows XP machine’s C:\Program Files\AutoCAD LT 2002 folder into your newly installed c:\acadlt2002 folder – you should see a question if you should overwrite all files, say YES
  • If you have crashing problems using the File->Open or File->Save dialogs inside of AutoCAD please read this blog entry on the File->Open or File->Save Crash in AutoCAD


Copyright 2019 (c) Longbow Software

AutoCAD File->Save or File->Open Crash…

If are experiencing crashing problems using the File->Open or File->Save dialog inside of AutoCAD (or any other Autodesk product), there are a few items that can cause this:

  1. New HP Machine If you have recently purchased a new HP computer or you have an HP computer for which you have recently carried out an HP update on Windows 10, Windows 7, Windows 8 or Windows 8.1…Check if you have any of these applications installed:
    • HP Trust Center
    • HP Client Security Manager

      If so, uninstall them and reboot. We recommend you find an alternative as they cause this issue.

  2. For AutoCAD versions >= 2008, you can try disabling the InfoCenter toolbar at the top right of AutoCAD.
    1. If you know LISP, this code will work for all versions of AutoCAD 2008 or higher
      1. add this code to the end of your acad.lsp (vl-registry-write (strcat “HKEY_LOCAL_MACHINE\\” (vlax-product-key)”\\Applications\\InfoCenterAcConn”) “LOADCTRLS” 0)
    2. If you do not know LISP
      1. Start Regedit.exe
      2. Navigate to HKEY_LOCAL_MACHINE\SOFTWARE\Autodesk\AutoCAD\<Release.Number>\ACAD-<VerticalCode>:<LanguageCode>\Applications\InfoCenterAcConn 
      3. Set the LoadCtrls value to 0
      4. To turn it back on, simply set LoadCtrls value to 76
  3. Remove all USB devices – older versions of AutoCAD don’t understand what a Samsung Phone is, and this can cause crashes.
  4. If you have been opening DWG files from an external drive (e.g. USB drive) try re-connecting the drive…
  5. The latest Windows Operating systems (Windows 7, Windows 8, and Windows 10) correctly enforce permission settings for your personal files (Documents folder etc). The problem is that your older version of AutoCAD does not understand these new permission settings, and this can stop you being about to open your DWG files and even cause AutoCAD crash. As a quick test, copy the DWG files that always crash when you save to a USB drive, then create a new folder called c:\MyDwgs, now copy the files from your USB to the c:\MyDwgs folder. Finally, try AutoCAD with the DWG files in c:\MyDwgs – is AutoCAD working now? If so, you can either leave your DWG files in that folder, or you’ll need to relax the permissions on your DWG folder to allow access to AutoCAD.
  6. MSN Plugin – if you see MSN as an entry in your Windows Explorer, uninstall MSN – AutoCAD doesn’t like this.
  7. For versions of AutoCAD >= 2000i here’s a quick fix to bypass the problem (although hard to remember each time) – on starting AutoCAD, type “Options” at the command line, select the ‘Files’ tab, click ‘Browse’, then simply click cancel. Now cancel out of the Options dialog altogether. Try your File->Open… Does it work? If so, you should now be good until the next time you start AutoCAD.
  8. If you have a non-HP machine that is giving you this issue or (2) didn’t work for you, please record below in the comments section:
    1. What computer make you are running
    2. What specific Windows version you are running
    3. What exact version of AutoCAD you are running (e.g. AutoCAD Architecture 2008 32bit)
    4. What AutoCAD service packs (if any) you have applied
    5. What anti-virus software you are running. We’ll see if we can solve this for you…
  9. Check out this page Interactions with the AutoCAD Ribbon crashes AutoCAD on Windows 10
  10. If all this fails, you can of course set FILEDIA = 0 at the command line to turn off the File Dialog User Interface
Copyright 2017 (c) Longbow Software

AutoCAD 32bit/64bit side-by-side installation compatibility chart

This blog has been written to help advise those who require 32bit versions of AutoCAD to reside on the same computer system as 64bit versions of AutoCAD.

Before we start, when installing 32bit AutoCAD on 64bit Windows, you should take care not to mix the same version/series of AutoCAD 32bit with the same version/series of the corresponding 64bit version of AutoCAD, on the same computer. The reason is that they were not designed to run in a side-by-side configuration and therefore may conflict. The same rule can generally be made for all Autodesk products.

NOTES:

  • When installing 32bit AutoCAD, we advise that you uninstall all previous versions of 64bit AutoCAD before installing your 32bit version of AutoCAD.
  • If you are installing multiple versions of AutoCAD, you should always install in chronological order, in other words, oldest to newest.
    • e.g AutoCAD 2004, Architecture 2004, Map 2005, AutoCAD 2007, Civil3d 2015
    • Failure to follow this simple rule can render you with missing entry point errors, un-explained crashing, un-installable Autodesk software and more.
  • For best results, we recommend that you install only 32bit versions of AutoCAD on your computer system, however, mixing is possible with care – refer to the chart below if you must have the 64bit version installed on the same computer.

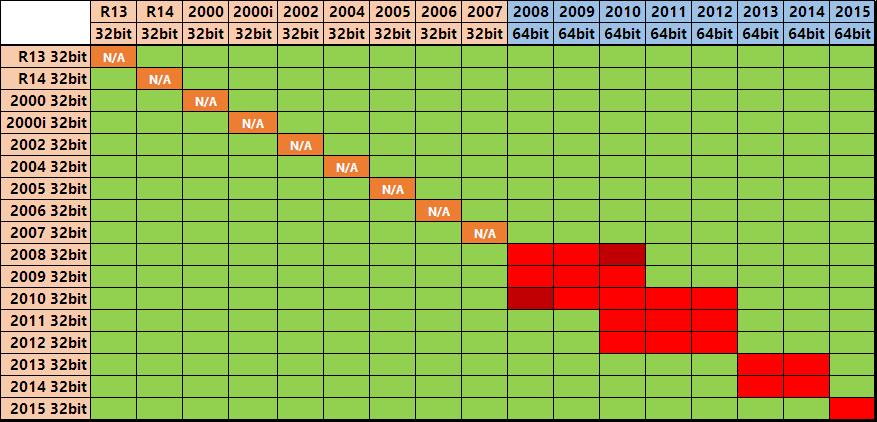
This chart shows which 32bit AutoCAD versions can be installed on the same system as 64bit AutoCAD versions…

  • Green means Should be OK
  • Red/Dark Red means Problems will occur, you should not do this

AutoCAD 32bit 64bit side by side configurations

Shows which versions of 32bit AutoCAD can be installed side by side to 64bit versions of AutoCAD

Copyright 2015 (c) Longbow Software